1c setting up commercial equipment. How to connect commercial equipment in six steps? Installing and testing drivers
In "1C: Accounting 8" the ability to punch checks on a cash register connected in fiscal registrar mode to a computer on which "1C: Accounting 8" is installed is implemented.
If you intend to use commercial equipment and receive data from the used commercial equipment into the information base, then before starting work it is necessary to establish a connection between the commercial equipment and the information base.
Interaction with retail equipment is carried out using service processing.
Service processing represents external processing of the 1C:Enterprise 8 system that complies with a certain standard and provides a unified (independent of a specific equipment model) way of interaction of the configuration with retail equipment.
When interacting with equipment, service processing can either use the retail equipment driver or interact with the equipment directly. The use of service processing allows you to simplify the procedure for connecting retail equipment in the configuration. Using maintenance routines eliminates the need for configuration changes when a device driver is updated or an attempt is made to connect devices that were not previously supported in the configuration.
When an external event occurs, the configuration passes information about it to the appropriate service engine that handles the event. With this organization of interaction with retail equipment, in order to connect new models of retail equipment, there is no need to make changes to the configuration itself. Setting device operating parameters (port to which the device is connected, data transfer speed, etc.) is also performed by service processing tools. Each service processing must have the form of setting the operating parameters of the commercial equipment models it supports (equipment models for which this processing was created).
The procedure for connecting and setting up commercial equipment
Before connecting retail equipment in the configuration, you must physically connect the equipment and install the necessary drivers.
The configuration comes with ready-made maintenance processing for all types of retail equipment. These maintenance processes are stored in the directory "TradeWareEpf" information base.
Connection of commercial equipment is carried out in a special form, which is called up from the menu "Service" › "Service" › "Connecting and setting up commercial equipment".
The form contains bookmarks corresponding to the types of commercial equipment with which interaction is possible.
Before you start connecting commercial equipment, you must:
- load external service processing into the infobase;
- upload to directory "Retail store equipment" list of used models of commercial equipment
Continuing the theme of automation retail Let's return to commercial equipment. In our previous materials, we discussed the theory: how to choose the right retail equipment and how it interacts with 1C. This article will focus on practice, namely the method of connecting retail equipment to configurations on the 1C:Enterprise platform. We strongly recommend this material for study, since in the future, when talking about the features of this or that type of retail equipment, we will not address in detail the issues of connecting it to 1C.
Currently, the 1C software range can be clearly divided into two parts: configurations based on regular and managed applications. They are easy to distinguish by appearance, the internal differences are just as significant and therefore, despite the continuity, the approaches to working with retail equipment in regular and managed applications differ and will be considered separately. Before continuing reading, we recommend brushing up on the principles of interaction between retail equipment and 1C by reading the article:.
Regular application
This type of configuration includes Trade Management 10.3 and Retail 1.0; in the future, we will use Retail as an example, although the methods for connecting equipment in any configuration of this type are the same.
First of all, connect all the necessary commercial equipment to the PC, switch it to the required mode (for example, RS-232 emulation) and install the necessary drivers for operating system. After this, you can proceed to connecting the equipment directly to the configuration. To successfully complete this task, we will need two more things: service processing and a vending equipment driver.
As we already wrote in the previous article, service processing is an external component of the 1C:Enterprise platform, which is responsible for the interaction of the configuration with the retail equipment driver, which is a dynamic library directly responsible for interacting with the equipment and implementing specified functions.
 With drivers it’s a little more complicated; here you first need to establish who exactly is supporting the equipment: 1C or third-party manufacturers. For a regular application, 1C drivers exist only for barcode scanners and are also available on the update service. The rest will have to be found on the manufacturers' websites. Also keep in mind that many commercial equipment drivers are paid, for example, ATOL.
What if you don’t know where to get the driver? There is a little trick that we will talk about later, but for now you can skip this step and go directly to connecting the equipment. In 1C: Retail we will open Service - Trade equipment - Connecting and setting up trade equipment(in other configurations the path may be slightly different). In the window that opens, we will see all the equipment connected to the workplace, distributed into groups.
 Please note that the equipment is configured for each computer separately, binding is carried out by host name, so if you rename the computer, the equipment will have to be configured again. Information about equipment connected to different computers is stored in the Trade Equipment information register.
 There are two ways to connect the equipment: manually or through an assistant, we recommend using an assistant who will quickly guide you through all the necessary steps, while manual installation requires some experience and knowledge.
 Everything is simple here - select the desired type of equipment and click Further. On the next screen we will see all the service processing loaded for this type of equipment. If the list is empty or the required processing is missing, then it must be loaded by selecting the appropriate item.
 To download, specify the directory containing the service processing and click the button Get list, in this case all processing will be loaded, and not just for the type of equipment being installed, i.e. It is enough to perform this operation once.
 After loading, return to the previous screen and select the required processing. The choice depends on the installed drivers for commercial equipment, for example, for a barcode scanner, processing is offered for the driver from 1C and input device drivers from ATOL. Each processing has its own list of supported equipment, from which you should select the desired model. Scanners are simple, in fact they are standard equipment, so let’s take something more complex, for example a customer display Gigatek DSP-820.
First of all, let’s visit the page http://v8.1c.ru/retail/300/vs_drivers.htm and find out that this model is supported by ATOL (paid) and Scancode (free)

It is quite logical to choose a free driver. Therefore, we go to the Scancode website, download the TO driver in the support section and install it.
 Then in 1C we select Scancode service processing
 Clicking Further we will see previously created devices for our processing, since the required model is not there, then we select Add a new device.
 And in the list of supported equipment, select the desired model, here we indicate its name (substituted automatically) and the cash register on which this device will be used.

It is enough to create any device once, after which it can be used to connect similar equipment at other workplaces. The created devices are stored in the Trade Equipment directory and, as is not difficult to notice, represent lists of compliance with the device model and service processing.

If you use the same model of equipment, but in different modifications, then it makes sense to create a duplicate position, clearly reflecting this in the name. For example, Voyager 1250 Barcode Scanner (USB) and Voyager 1250 Barcode Scanner (RS-232), directly indicating the physical interface of the device, instead of an impersonal Barcode Scanner (generic). Why is this necessary, if from the point of view of 1C these are absolutely identical devices? And so that, without getting up from your workplace, just by looking at the register, you can tell exactly what equipment is installed at each workplace.
Finally, having selected or added the required device, we proceed directly to setting it up. The setup, as we have already said, is done for each computer separately. Depending on the type of equipment, the number of available options may vary. Below is a typical settings window, let's look at it in more detail.
 First of all, review the driver information and driver version. It must be installed and have a compatible version; we will touch on compatibility below, but for now we’ll just make sure that the driver is available and available for the application. If the driver is not installed, then you did something wrong, you may need to register it the required library manually, or restart the program if the driver was installed while 1C was open.
Above we talked about a little trick. At the bottom of this block there is a link to latest version drivers and if you are using the current configuration release, then the link will also be relevant. So, if you don’t know where to get the TO driver or didn’t find it on the supplier’s website, then you can continue without installing it up to this point, and then go and download it from this link.
Below are the connection parameters: port and speed. If everything is clear with the port, then in order to find out the speed, refer to the documentation for the device. In the case of this display, the default speed value is 19200 bps and if you leave the value at 9600 bps, then instead of letters the display will display " "Kryakozyabra."
Now let's talk about compatibility. IT is a rapidly changing industry, so it may happen that you have more recent versions of drivers than are listed in the processing compatibility list. What to do in this case?
In most cases, the drivers are made backwards compatible and everything should work. But the situation should not be left to chance. First, run the test built into the processing and make sure that the device at least just works.
 Then carry out a test run by performing a full cycle of operations for this device in both modes (RMK and normal). So, for example, with the driver from 1C version 8.0.17.x, the METROLOGIC MS7120 "Orbit" barcode scanner works normally, and the METROLOGIC 1250G "Voyager" calls up a selection form with each reading.
If any defects are found in the operation, then you should roll back to a compatible version of the driver, but if everything works fine, then we leave it as is. To avoid the annoying message about driver version mismatch, you can correct the service processing code. Open it with the configurator and find the section responsible for checking the driver version, then replace the version of the compatible driver with yours.

After this, update the maintenance handling in the configuration.

Managed Application
New configurations are being created based on the managed application, today these are Trade Management 11 and Retail 2.1, which have significant differences from conventional configurations, both externally and internally. But there is also a large degree of continuity. If you know how to work with commercial equipment in a regular application, then without special labor deal with the managed.
The main difference is in the unification of the approach; now, instead of separate external service processing, the Plug-in Equipment Library (BPO) technology is used, which provides a single code base and libraries for working with retail equipment at the platform level. The BPO also includes certified drivers for commercial equipment, which makes it easier to find a compatible version.
All connected equipment is divided into certified, support for all components of the bundle Equipment - TO Driver - Configuration carried out by 1C and the equipment is supported by the driver manufacturer, which works with 1C Configurations at the level TO drivers provided by its manufacturer. There is not much difference between these lists, except who you will have to contact for support if problems arise, and you should also remember that third-party TO drivers are usually paid.
Please note that in a managed application, service processing is not used, and the subsystem of the same name is used to work with connected equipment. At the same time, the scheme of interaction with the equipment has not changed radically, it’s just that the code from the 1C side was unified within the BPO and included in the configuration.
 We will not delve into internal differences; those who are interested can independently deepen their knowledge on the topic of Connected Equipment Libraries, but let’s move on to changes in the user part of the settings.
One of the important innovations is Workplaces. A workplace is a combination of a computer and an information base user. This allows you to have different sets of connected hardware for different users on the same computer. For example, for a cashier we set up a full set of equipment, but for a merchandiser we leave only a barcode scanner and add a TSD.
 Workplaces also allow you, by checking the appropriate box, to work with the settings of equipment connected to other computers. This is convenient when you need to centrally change equipment settings at several workstations at once. For example, you changed the IP address of the scales with label printing, now you don’t have to run to all the workstations from which you work with the scales; you can change the settings for them from your computer.
 The connection and setup process itself has changed slightly and has become simpler. But there is one subtlety, since TO drivers are now included in the configuration and are installed automatically, while setting up commercial equipment the program should be run as an administrator, otherwise you may encounter a situation where the application will not be able to register the libraries and you will receive an error.

The full list of drivers available in the configuration can be found by clicking the link Hardware Drivers at the top of the form Connecting and setting up equipment.

In addition to satisfying curiosity, this list is also useful because any driver can be downloaded and then used separately, for example, for configurations based on a regular application, so as not to search for it on the Internet.
 Connecting commercial equipment has also become easier, there is no connection assistant, but there is no need for it, all you need to select is the type of equipment, driver and workplace.
 Then you should write down the changes and, by clicking on the button Tune, specify the connection parameters for this piece of equipment.
 It should be noted that error messages have become more informative; in our case, the system already had driver 8.0.15.1 for Retail 1.0 and we received a strong recommendation to update it to at least 8.0.17.1. Moreover, you can do this literally “without leaving the cash register”, select Functions - Install driver(we remind you that for this operation to be successful, 1C must be run as Administrator).

But what about equipment that is not supported in the configuration? In a normal application, it was enough to receive service processing and install the appropriate driver. Nothing has fundamentally changed in the managed application; to connect unsupported equipment, the manufacturer must provide the component with BPO technology, which must be loaded into the configuration.
For example, let's take a label printer, which is supported by Scancode. A similar component is presented on the support page for this model.
 Connecting the components should not cause any difficulties, open the list of drivers and select the option Add new driver from file, point to the downloaded archive.
 As you can see, nothing complicated. We hope that this material will help you acquire the initial skills of connecting retail equipment to 1C:Enterprise and in the future we will not focus on this issue, considering that the reader already has basic knowledge.
Tags:
Equipment in 1C: The enterprise is installed in order to automate the work of retail outlets using this software. To get started the subject entrepreneurial activity must necessarily connect the trading equipment to a personal computer. After this, you will need to install the appropriate drivers for your specific OS. Having connected the commercial equipment to the PC, the business entity must proceed to configure it, taking into account the configurations used by the software.
Full setup and installation
Setting up existing equipment for the operation of an enterprise involves the following activities being carried out by the business entity: processing maintenance and installing drivers.
Trading companies using 1C: Enterprise 8.2 software in their work must understand what service processing is. This term can be deciphered as follows. Equipment processing is an external component of the 1C platform. It is responsible for the interaction of drivers with software configurations.
Such maintenance processing must be included in each delivery of 1C software configurations. They must be located inside the appropriate directory, which is placed in the template store.
As for the drivers, without which it is impossible to configure the equipment, the business entity needs to decide who will provide technical support for the software. In this case we're talking about about third-party manufacturers or about the company that developed the 1C: Enterprise system.
How is receiving and installation carried out?
A business entity can receive equipment (only original devices should be taken for installation) in two ways: through a special assistant or manually. The installation process begins after the equipment arrives at trading company from the supplier's warehouse. After this, the user of the local computer can connect external equipment using the necessary cables and ports.
It is important to note that for smooth operation point of sale A business entity must have certain requirements for technology:
Ergonomics;
Build quality;
Compliance with the technical parameters declared by the manufacturer;
Possibility of integration into 1C software, etc.
The automation of trade processes will have a positive impact on the work of any store. The task of each manager is to acquire high-quality equipment, as well as to carry out its installation. First you need to conduct testing. Any malfunctions must be immediately taken into account and corrected. If a business entity cannot carry out installation activities on its own, professional programmers should be involved in them. This decision will be correct, because it guarantees positive results and proper operation of the system.
If you have difficulty setting up, we recommend contacting our company. Our specialists will connect the devices and set up work in 1C in as soon as possible and on top level quality.
Setting up maintenance for a specific 1C user for any standard configuration follows approximately the same principle. Let's look at the example configuration 1C: Trade management 11.2.
First you need to go to the section "Administration" and select a subsection "RMK and equipment". In other configurations this may be partitions "Settings" or "Service", and the subsection - "Connected equipment".
Then you need to check the box "Use connected equipment" and follow the link "Connected equipment."
 In the window that opens, first of all, you need to specify this computer as a workplace and select a specific 1C user.


The next step is choice necessary equipment from the proposed list and its creation. In the window that opens, you need to select the type of equipment and driver handler for your device, in this case for a barcode scanner, and then click on the button “Record and close.”

After creating the connected TO, click on the button "Tune" and, if you have not previously installed drivers, install them.

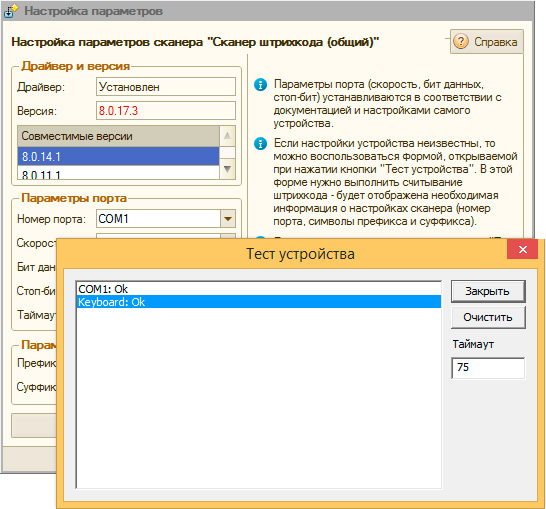
After installing the drivers, go to the tab again "Tune" and indicate the port that we use to convert data from TO to our PC. If you are using a USB port, you must select the port name "Keyboard". Next we record and close.

The equipment is connected. In order to check the functionality of the device, it is necessary to test it.
As a result, you should see a window with the result of the testing:

We have moved on to the knowledge section about the “1C: Enterprise Accounting 8.2” configuration, which, it would seem, is completely inaccessible not only for a novice user, but also for an experienced employee. Yes, in this section we will talk about drivers, ports and other things that are not very clear to a simple accountant. But even if you do not have a deep understanding of computer terminology, much less the structure of a computer, you will be able to independently connect any retail equipment compatible with the 1C:Enterprise 8 platform.
The fact is that the program developers took care of simplifying the process of connecting commercial equipment by introducing an equipment connection assistant into the program. In this section of the chapter we will look at using this assistant. However, we should still start from one point, without which all our attempts to use the mentioned assistant will be in vain.
So, the first thing you need to do when connecting new commercial equipment is to install the drivers for this device on your computer and connect the equipment directly to the computer. As a rule, the equipment comes complete with very detailed instructions on installation. If you have difficulty installing drivers and connecting your device, contact your system administrator for assistance.
Let's say your commercial equipment is connected and the drivers are successfully installed. But that's it preparatory stage connection of commercial equipment has not yet been completed. All that remains is to upload it to some directory on your computer or to another location in your local network equipment maintenance processing. These treatments should be supplied complete with retail equipment designed to work in the 1C:Enterprise 8 environment, so you will find them without problems.
Now you can proceed directly to setting up the equipment in the 1C: Enterprise Accounting 8.2 program.
> Select the main menu command Operations? Treatment. The Select Object: Processing dialog will appear on the screen.
> Find the line Connecting and setting up commercial equipment in the list of this dialog and click the OK button. The Connecting and setting up retail equipment window will appear (Fig. 7.30).
Rice. 7.30. Window Connecting and setting up commercial equipment
Initially, it is necessary to download maintenance processing from the catalog,
which we talked about above.
> To do this, click on the Maintenance Processes button and in the submenu that opens, select the Load all maintenance processes from the catalog command. The Windows dialog box opens Specify the directory containing the maintenance processing.
> Select the directory in which you saved equipment maintenance processing for your model of retail equipment and click on the Open button. The processing will be loaded, the progress of which will be displayed in the status bar of the Importing maintenance processing dialog that appears.
At the end of the download operation, a Service Messages window will appear at the bottom of the program window, which will display a download report.
Now we can move on to using the equipment connection assistant.
> Click on the Connection Assistant button. The Assistant for connecting and setting up commercial equipment will open, the first page of which will provide brief information about the purpose of the assistant and where you can get detailed help on connecting the equipment.
Here you need to enable the Add new maintenance processing switch and click Next again. The following assistant page will open - Adding driver maintenance processing.
> In the Directory field on this page, specify the directory where you saved the maintenance processing for your model of retail equipment, and then click the Open button in the Windows dialog box Specify the directory containing the maintenance processing. The contents of the directory will be processed and all processing files found in it will be loaded.
The download result will be displayed in the table of the Adding Driver Maintenance Processing page described.
> Select the processing you need in this table and click the Next button. It will open, for example. Processing “Shtrikh-M: Fiscal registrars” (Fig. 7.31).

Rice. 7.31. Processing "Shtrikh-M: Fiscal registrars"
> When you have finished configuring the equipment, click the OK button. Processing will close.
If everything was done correctly, the new equipment will appear in the list of connected equipment in the Connecting and setting up trade equipment window (Fig. 7.30).
> Click on the button Check all connected equipment. The correct connection of the equipment will be checked, and if successful, you will be informed about this in the Service messages display.
With this we will finish our consideration of the procedure for connecting new commercial equipment, and together with this topic we will complete our work with the entire chapter.
During the consideration of the questions in this chapter, we completed the following work:
s became familiar with the procedure for accounting for transactions related to wholesale trade;
s reviewed the procedure for creating documents for the receipt of goods at warehouses, for accounting for the import of goods, the return of goods to suppliers, as well as documents for the sale of goods;
s operations with containers were identified as a subject for a separate discussion. It was noted that in order to account for returnable packaging in the program, it is necessary to correctly configure the container accounting parameters;
s examined the features of accounting for retail and commission trade; s touched upon issues of paperwork related to warehouse operations; s got acquainted with the procedure for connecting and setting up commercial equipment.


