How to make a birdhouse: from boards and logs for different birds. Birdhouse made of cardboard
At the moment, there are few hollow trees in big cities, and it is difficult for birds to find a home. Let's help them and make a birdhouse with our own hands. In this way we will save the birds from the cold. In this article we will look at: how to make a birdhouse with your own hands?
- Use linen gloves to avoid driving the splinter.
- Wear safety glasses to prevent sawdust from getting into your eyes.
- The working tool (knife, saw) must be sharp. Remember that a blunt tool can easily injure you; it is poorly fixed in the wood and tends to slip off.
- Check the functionality of power tools.
- Use a ladder when hanging the finished birdhouse.
- If you want to paint the birdhouse, use unscented, water-based paint that is not bright in color. Try to make the bird house invisible to predators.
The best material for making a birdhouse is natural hardwood, for example: oak, aspen, linden, birch. Also suitable for a birdhouse are fiberboard (fibreboard), chipboard (chipboard), and plywood. You can use thick cardboard, but such a birdhouse will only last a couple of months. You should not use coniferous wood, as it produces sticky resin and negatively affects the health of the birds.
You will need: untreated hardwood boards, nails 4 cm long, impregnation or odorless, non-toxic water-based paint (optional), hacksaw or jigsaw, tape measure, hammer, pencil, drill with a 5 cm cutter, brush.

Birdhouse drawings
We present to your attention options for drawings of future birdhouses. When assembling the birdhouse, do not neglect the safety rules described above.
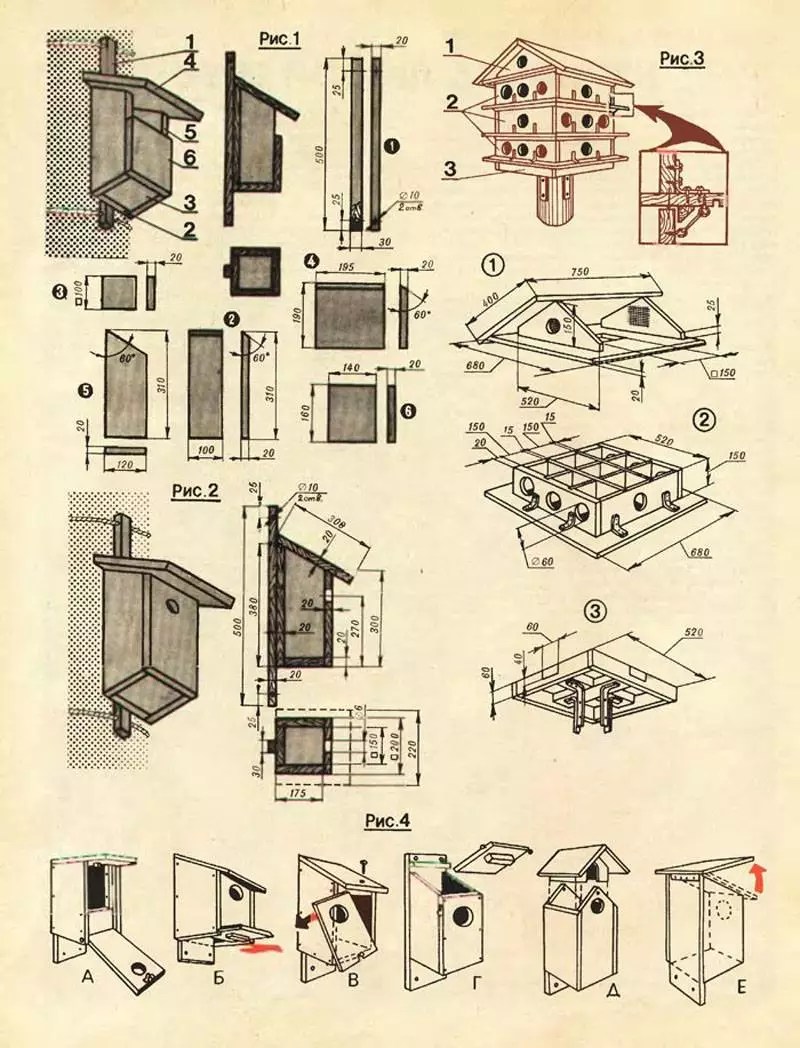
Drawing No. 1 Birdhouse with a slope to the back wall
Drawing No. 2 Birdhouse with a pitched roof
Drawing No. 3 Birdhouse with a gable roof
- Connect the front wall to the side walls, hammer nails along the edges and center of the board. (You should get a U-shaped design).
- Assemble the back wall and bottom of the structure using the same method.
- Nail a wooden bead to the bottom to round the internal corners.
- Do not forget to fix all the elements of the future birdhouse with nails.
- Make a removable birdhouse roof for later cleaning of the birdhouse. It should consist of two parts: the main part and the bushing.
- The roof of the birdhouse should protrude beyond the dimensions of the birdhouse itself from the facade, so that precipitation does not get inside the birdhouse.
- Place a board or perch in front of the entrance to the house.
- Choose a place to install the birdhouse; it can be a tree, a pole, or the roof of a house.
- The mounting height of the birdhouse must be at least 3 meters.
- When securing the birdhouse, tilt it forward to prevent moisture from getting inside.
- It is better to attach the birdhouse to a living tree using wire or rope.
- You can attach the birdhouse to other surfaces using nails and a hammer.
- The birdhouse should be in the shade so that it is not exposed to direct sunlight and the birdhouse does not heat up.
- The tap hole should be directed in the opposite direction from the wind.
- Do not install birdhouses nearby - starlings do not like neighbors.
Ideas for birdhouses made from scrap materials
It’s hard not to appreciate a birdhouse made from wine corks! To create such beauty you will need: a ready-made birdhouse, wine corks, a glue gun, a sharp knife. Glue the wine corks horizontally to the walls of the birdhouse, then vertically - in the center where the entrance hole is located. Cut wine corks into thin circles and glue them to the roof of the birdhouse like tiles.
Paint the birdhouse with waterproof paints, and it will look stylish, bright and exclusive!
A birdhouse made of wicker is the most interesting house for birds!
Don't rush to throw away your old shoes! After all, even from it you can make a house for birds.
Remove the pulp from the pumpkin, dry it and make a birdhouse!
You can decorate the birdhouse in any way you like, the main thing is to show your imagination!
Making a birdhouse from cardboard is not difficult. And for birds, such a house will last a whole season. Protect the birdhouse from moisture by coating the cardboard with varnish.
Don't rush to throw away plastic bottles and make a birdhouse. It won’t take you much time to create such a birdhouse! Get creative and create a good home for birds of any shape. Create with passion and love, then everything will work out!

Attract birds to your local area- this is a pleasant and useful activity. After all, birds not only delight our ears with their trills, but also eat harmful insects.
How to make a birdhouse with your own hands - this is what our article is about.

Source materials
The starting material is exclusively wood. It is recommended to use only wood from deciduous trees, since coniferous trees emit resin, which can lead to the premature death of the feathered resident.

You cannot make birdhouses from plywood sheets, chipboard and OSB. The glue and special impregnation contained in such materials repel feathered guests.

As a result, assembly and fastening of workpieces should be carried out only with nails and self-tapping screws, without the use of adhesive.

Usually, to make a birdhouse from wood, unplaned boards with a thickness of at least 2 cm are used. This thickness allows you to maintain a constant temperature regime inside the bird house.
To prevent cracks from appearing on the boards when fastening, it is necessary to pre-drill holes for the screws.

How to choose the size of a birdhouse
The size of the birdhouse depends on what birds it is intended for. Different types of birdhouses differ in their proportions and the length of the entrance.

For example, for starlings the required dimensions are: 10 × 10 × 40 cm, the entrance hole is 5 cm. For tits and flycatchers, sparrows - 10 × 12 × 30 cm, the entrance hole is 3-3.5 cm. And the semi-dutch should be 10 × 8 × 20 cm with a taphole 3.3-5 cm high across the entire width of the wall.

Usually only the height of the birdhouse changes.

Half-loops can also attract squirrels.
Some birds prefer to live in nesting boxes made from part of a log using the hollowing method. The bottom and roof of such structures are made of boards.


To make the birdhouse habitable again, you need to remove the old nesting box from it and scald it with boiling water. An additional measure could be treatment with potassium permanganate.

How to make a birdhouse a safe place to live
To avoid the destruction of a birdhouse by cats and woodpeckers, you can take the following measures:
- Increase the roof overhang;
- Stick the roof with nails;
- Finish the taphole with a tin sheet;
- Drive nails around the tap hole;
- Attach a wooden overlay with horizontal fibers near the taphole;
- Make special protective belts from strips of tin or from “brooms”, and you must strictly adhere to the required distances between them.

Important: there should be no twigs, feeders or other possible supports between the protective belts and the birdhouse.
How to choose the right place for a birdhouse
Birdhouses should be hung on trees at a height of at least 3 m. It is not advisable for busy paths or benches to be located near these places.
Note!


When choosing a place on a tree, you need to take into account that there are no large branches near the entrance. The birdhouse should be installed facing south so that there is a slight tilt forward.

Making a birdhouse
It is necessary to take untreated hardwood boards with a thickness of at least 2 cm. You will also need gloves. Next, we take the birdhouse drawings and cut out the component parts. It is necessary to cut carefully and evenly, at an angle of 90°, so that there are no gaps in the future.

It is better to choose nails with a diameter of 1.5-2 mm and a length of no more than 40-50 mm. Let's start assembly. We apply the side parts to the facade at an angle of 90° and nail them. It is recommended to use 3-4 nails per each.

We turn it over, install the bottom, and nail it to the sides. Next, we insert the back wall and also secure it with nails with the bottom and sides.
Let's turn it over again. We fasten the bottom on the other side as well. We install the roof so that the overhang is at least 5 cm. Preferably 10 cm. We nail it down.

Note!

We inspect the resulting birdhouse and bend all the protruding nails.

Whether to install a perch is up to you.

Nowadays, on the Internet you can easily find a variety of ideas on how to make a birdhouse in the country or near your home.

Some of them are quite unusual. Therefore, feel free to make houses for birds.

After all, an original birdhouse can become a real decoration of your garden.

Note!

Photo of a birdhouse with your own hands


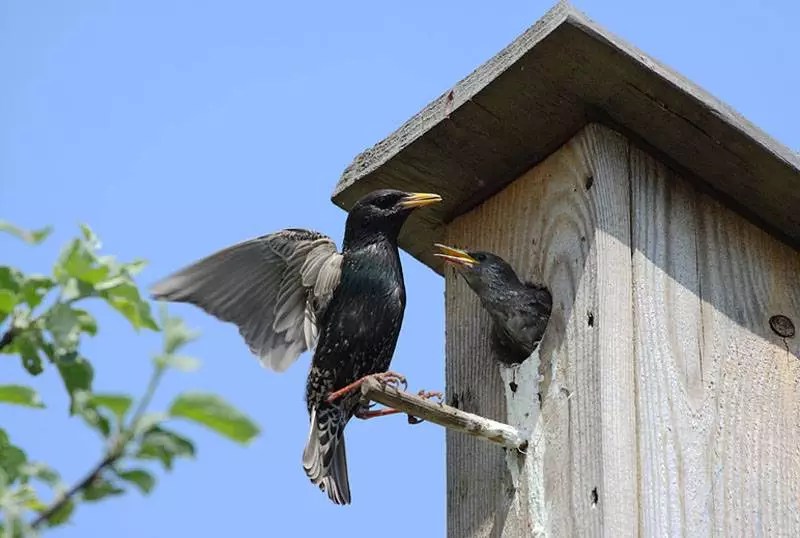
All over the world there is a tradition of hanging birdhouses on Bird Day. This fashion came to us during the time of Peter the Great, who first saw bird houses in Europe. In terms of nests, starlings are unpretentious and therefore can settle in crevices of buildings, burrows or hollows.
In fairness, it must be said that these beautiful birds are very grateful creatures that provide invaluable assistance to gardeners in pest control. Therefore, many owners of household plots specifically attract starlings by making birdhouses with their own hands. Having the appropriate drawings and studying the video instructions, anyone can make bird houses.
The most desirable and most common inhabitants of birdhouses are common starlings. These are quite large birds, so the house for them must be extended upward, have the appropriate dimensions, a removable roof, a solid bottom, a notch (hole) and a pole.
The size of the house for feathered friends depends on the type of birds for which it is intended. Standard sizes birdhouse:
- 20−40 cm - height;
- 13−15 cm - bottom width;
- 3.8−5 cm is the diameter of the tap hole.
It is not recommended to make a more spacious structure. Of course, a large house will accommodate many chicks, but it will be quite difficult for parents to go out and feed them. Only two or three chicks can fit in a compact birdhouse, but they will grow up healthy and capable of long-distance flights.
Roof needed make it removable so that you can easily inspect and clean the house in the fall. Of all the birds that can settle in it, only starlings, nuthatches and tits do “spring cleaning”. The rest of the birds leave behind garbage, and in untidy housing next year maybe no one will move in.
Materials for making a birdhouse
It is advisable that the bird house be made with your own hands from natural materials. Most often, dry boards are used, prepared made of oak or birch. Trees coniferous species It is not recommended to use them as they emit resin.
Boards should be rough at least on the inside, so there is no need to sand them. It will be difficult for birds to get out on smooth boards, so the sanded material should be scratched with a knife. The thickness of the board should be from 20 mm, in this case the birdhouse will retain heat well.
It is not recommended to use laminated or compressed wood for construction, since it toxic and short-lived. Plywood is also not suitable for construction. It retains heat poorly and practically does not allow sounds, which are very important for birds, to pass through.
DIY birdhouse: stages of work, video
 The design of the house depends on where it will be hung. If to a pole, balcony or under the roof of a house, then in order for feathered friends to have a place to walk, it is necessary to provide additional perches in the form of a triangular shelf or thin sticks.
For a birdhouse hanging on a tree, such perches need not be made, so the birds will sit on the branches and delight their owners with chirping.
To build a convenient and compact birdhouse with your own hands, the drawing of which must be prepared in advance, you will need the following materials and tools:
- Boards.
- Wood glue.
- Nails or screws.
- Two blocks and steel wire for hanging the house.
- Chisel.
- Hammer.
- Wood drill.
- Drill.
- hacksaw for wood.
- Ruler.
- A simple pencil.
Work on making a tower for starlings should be carried out in several stages.
Stage No. 1 - preparing wooden elements with your own hands
On the prepared boards, according to the drawing, using a simple pencil and a ruler, mark the dimensions of the walls, bottom, roof and hole. In this case, you must follow some recommendations:
- The roof must be made with a slope, so the front wall must be made four cm longer than the back, and the side walls on top must be cut downward.
- The bottom should be made in the form of a square with a side of 13 cm.
- The roof is made from two different elements. One of them should look like the bottom of a birdhouse, and the other should be made in the form of a large rectangle, with the help of which a canopy will be created.
Having drawn and checked all the design details with the drawing, you can start cutting them out. To ensure that paired elements have the same dimensions, they are recommended prepare sequentially.
To make the starling house look beautiful from the outside, the boards on one side can be additionally planed.
Tray preferred make it round, because then it will look like a hollow, in natural conditions birds live. To protect the chicks from encroachment by cats, the entrance to the birdhouse must be located five cm from the top edge.
Stage No. 2 - assembling a house for starlings with your own hands
 First of all it is necessary fasten the front facade and side walls designs. This is done using wood glue, and as it dries, the elements are additionally fixed with screws or nails.
Next, using the same principle, the side ends of the birdhouse bottom are attached to the side and front walls. Lastly, it is glued to the structure and the back wall is nailed. During work, it is necessary to ensure that there are no gaps between the elements.
If the roof is removable, then its parts are attached only to each other. There is no need to glue or nail it to the birdhouse. It is installed on the structure using rubber or door hinges. In this case the birds will protected from visits from cats.
Stage No. 3 - installing a birdhouse
The finished bird house can be tied with wire or nailed to the selected surface. To make it easier for the chicks to exit and additional protection design recommended lean forward a little. If the birdhouse will be installed on a tree, then it is better to wrap it with wire.
Basic rules for placing an “apartment” for birds:
- optimal height - 3−5 meters per summer cottage or in the village and from 8 to 10 meters in the city;
- the birdhouse should not be exposed to direct sunlight in the midday heat;
- the entrance to the house should be turned to the side with a minimum amount of wind;
- tilting the structure backwards is not allowed;
- it is necessary to ensure that there are no branches near the birdhouse through which a cat can get to the birds’ home;
- It is recommended to install houses for feathered friends in early April.
The birdhouse was made and installed with your own hands, all that remains is to wait for the residents to move in. But what to do if there are no boards, but you want to make a house for birds? In this case, materials that are always at hand will come to the rescue.
Birdhouse made from plastic bottles
 To make such a birdhouse you will only need one large plastic bottle, scissors, wire, paper or paint.
You will need to make two holes in the bottle cap for the wire with which the house will be suspended. At the top it should be cut a hole for entry. To make your home comfortable and cozy, the outside of the bottle can be painted or covered with paper.
You can make a birdhouse with your own hands in much the same way. from juice boxes or milk, the capacity of which is more than one liter. When using such materials, they must first be prepared. To do this, the container is thoroughly washed and dried.
Having made a birdhouse with your own hands, you should keep in mind that birds may not move into it right away. It will take some time to settle into the new housing. There is no need to worry about this. Sooner or later, the starlings will appreciate your work, and after they move in, you will be able to enjoy the singing and bustle of the birds, and not worry about your harvest.
(17
ratings, average: 4,35
out of 5)
 Small birds have always been held in high esteem by people. It's nice to have helpful neighbors who sing and fuss, catch insects and delight the ears with their singing. True, they thought of building houses for them quite recently, about 300 years ago.
No one is building large-scale housing complexes for birds, and no one needs it. In nature, everything should be in moderation, including comfort. If we talk about birdhouses, then there are certain subtleties of their construction.
DIY birdhouse
The bird house needs disinfection. And a person can help with this. Having made a removable roof for the birdhouse, you can always remove it and pour boiling water over the inside of the wall. After waiting for the chicks to fly out, and emptying the contents of the house.
People have thought of making more than fifty varieties bird houses. But today’s publication is about a classic house – a birdhouse.
He came to us from Western Europe. And the reason for its creation is banal - food should be at hand. In Europe they ate starlings and their eggs. Peter the Great saw them and ordered, without fail, to start making and hanging houses for birds, for fun.
When building a birdhouse, there is no need to tinker very spacious house. It should be crowded; starlings will only feed two or three chicks. In this case, each chick will be healthy and strong. In spacious apartments, starlings will hatch five chicks, but will not be able to feed them. They will be sick and weak carriers of epizootics.
There is no need to be zealous and hang a lot of birdhouses, it is enough to hang one next to the house, or another one within sight. If there will be a lot of birds, the balance will be disrupted and they will not have enough food, as a result, all the birds will leave your area.
One more thing: it is necessary to protect the house from cats, they climb everywhere. You can protect it in two ways:
- A tall birdhouse, the entrance is on top, the cat’s paw cannot reach the chicks.
- The birdhouse is hung on a pole, in the middle of the pole there is a plywood circle with a diameter of 50 cm, the cat does not overcome the obstacle.
Cozy house made from a bottle
 In winter, the cold weather has a hard time for feathered friends. Increasingly, small birds fly to a person’s home and knock on the window, asking for crumbs. Even in winter, a warm bird house will be in demand.
The time to take care of the birds is in the spring. Birds return from warm countries, looking for a mate and a suitable place for a brood.
Let's get started
We make a birdhouse for birds with our own hands from wood.

Step one. Let's prepare
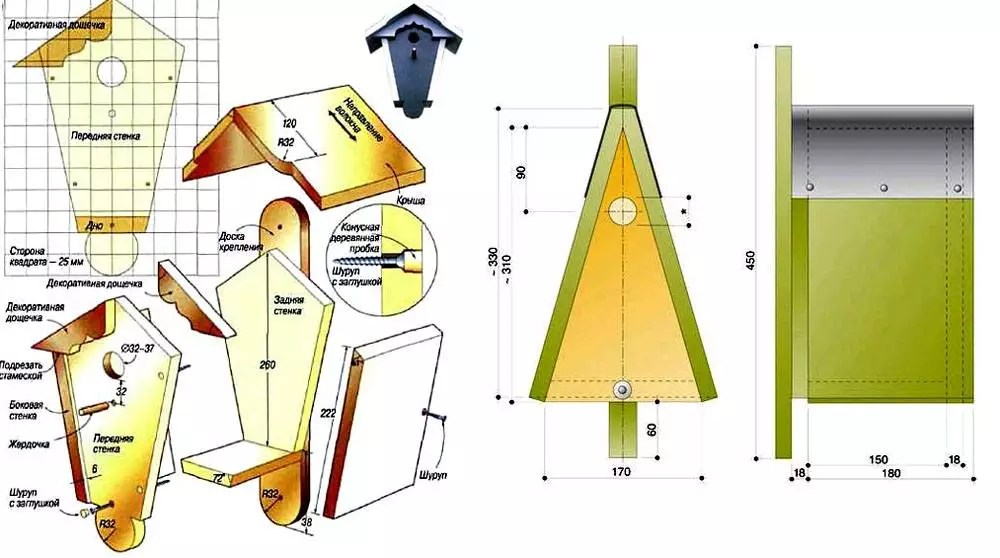
You will need boards 20 mm thick, the birdhouse will have seven elements and a perch. We take a drawing of a birdhouse, a pencil and mark each part of the house on the boards: the canopy and bottom of the lid, bottom, back, front and two side walls.
The bottom of the lid and the bottom are the same, 13 cm square perimeter. The front wall and rear walls differ in height by 4 cm, creating an angle of inclination of the roof canopy. For this reason bevels are made on the side walls. Two different sized parts are made for the roof.
Step two. We cut it out.
 It is advisable to cut out the elements together to ensure consistency sizes of paired parts. Plan the front part of the house with a plane or on a machine; it will look more beautiful. Carefully, using a drill or chisel, make a hole in the front part. Its diameter is 3.8 cm, an increase of up to 5 cm is allowed.
Under the entrance, we drill a through hole 3 cm, this is where the arrival perch will be placed.
In nature, the entrance is a natural hollow; it is round in shape. Based on this, preference is given to a round hole, but if there is no choice, then make it square. We place it 5 cm below the top point of the facade.
Step three. We collect.
 To avoid drafts, glue three sides with carpentry or PVA glue, without the back wall. We knock down the sides of the birdhouse with nails or screws. We glue and nail the bottom to the walls, and lastly we attach the back side. This assembly eliminates the appearance of cracks.
We insert arrival perch, pencil or just long stick. A two-sided ledge of 5 cm will be very comfortable for the bird.
We make the roof removable, this will make it easier to clean the birdhouse after hatching. As already mentioned, pour out the contents and pour boiling water over it, you can treat it with potassium permanganate. Temporarily attaching it with self-tapping screws will protect it from the wind and cats. Two roof parts fasten together.
Step four. We install.
 The structure is secured nails or wire. If you are fastening it with nails, you must first nail a plank to the back of the house, 50 cm longer than the birdhouse itself, and then nail it to the tree.
It is easier to secure the birdhouse with wire. The wire does not harm the trees, for bark protection is needed place wooden pads under the wire. Place the birdhouse with the entrance to the east or south, at a height of 3–5 meters.
Build a birdhouse do it yourself from wood or plywood is easy. It is necessary to have the mood, desire and have a drawing of the object itself.
 If you decide to hang a birdhouse on your property, then you should think about its decorative design. Let it look nice from the outside. Any birds feel good even in painted houses.
As a rule, a standard birdhouse is taken as a basis, and only then it is painted and decorated as desired. Craftsmen put up a fence with feeder in shape verandas.
I once saw a master’s work in the garden: a two-story house with a dining room and feeding trough on the ground floor. There is a bird house on the second floor. This entire structure, the feeder and birdhouse, is made of plywood.
It happens that the birds do not immediately like the “apartment”. We'll have to wait a year, and next spring everyone will be happy. The birds will settle in and merrily run around the area in search of food.
We invite the birds
 By building and hanging birdhouses, we make life easier for birds and help them find shelter for a while. By hanging a house in the garden, we provide security for the residents and add joy to ourselves observations of natural life.
The birds thank us for this, catch midges and mosquitoes, and collect pests from the beds. But different birds are looking for completely different housing, the size of the bottom and the height of the wall, the size of the entrance, and much more matter.
They carefully study the location of the future nest. At what altitude is the house located, what’s inside and what does it smell like. If all elements are taken into account by us, done DIY apartments filled with bird life.
It is important to make them comfortable for birds, not only beautiful for our eyes, otherwise they will remain empty.
Different birds - different houses
 Small birds live in small houses. Tit sparrow, flycatcher, choose a small hole for entry 2.7–3.5 cm. The bottom is small, compressed 10–13 cm. In the absence of a perch jump from the bottom to a height of up to 15 cm.
Starling, wagtail, hoopoe, whirligig or woodpecker prefer an entrance hole of 5–5.5 cm, the bottom is also wider than 13–15 cm. The entrance is located at a height of 25 cm from the floor, and the front wall is 32 cm. Swifts and swallows look for special structures . They need a rectangular bottom 18 x 13 cm. An oval entrance under the roof itself is 6 x 3.7 cm; the front wall is up to 13 cm high.
An interesting fact: if a small bird inhabits a large house, then over time it will have to give way to a larger bird. If this happens on your site, you should cover the entrance hole with clay and give it the desired size.
How to place birdhouses
A safe height of four meters is considered. It is good when the birdhouse is in the shade and faces east. The distance between the houses is at least 30 meters. Starlings are social birds, they can be placed closer, but other birds require territoriality.
You can find an interesting solution without wasting time and money on materials. It’s pretty quick to make a birdhouse from a plastic bottle, and if you decorate it, it turns out pretty good.
Plastic houses
Large plastic house
 A large five-liter water bottle will make an excellent summer home for small birds and for larger friends.
On top of the bottle you need to make a hole suitable in size for the bird. You will have to paint the entire bottle with paints; sunlight should not get inside. Cats will not be able to stay on plastic, so there is no need to be afraid of them.
If you make a through hole with an awl, you can insert a perch for the convenience of the birds. The same bottle makes very good feeders.
A square hole is made on both sides, the plastic is cut on three sides. The plastic is bent upward, creating a canopy over the tap hole. Such a house or feeder can easily be hung from the branches by the handle.
Device inside the house
You can make such houses from bottles, just like from wood, together with your children. Children will quietly get used to the idea of nature and take care of the world around them. Have a great time.
The house can be decorated with paints, but you can simply decorate it with bright ribbons or leave it transparent. It is worth sprinkling the bottom of the bottle with sand, putting hay and dry twigs on top. So, it will become much more comfortable and attractive for birds.
The tenants themselves will figure out what will be useful to them. It is worth thinking about the quiet life of birds and hanging the house higher.
DIY bird house
 We take a two-liter drink bottle, this will be the basis for the house, then:
- Pliers;
- Drill and two different drills;
- Stationery knife;
- Paint brush or piece of sponge;
- Old CDs;
- Scissors;
- Wire;
- Glue for plastic;
- Scotch tape, or maybe electrical tape;
- Dowel and screw.
In addition to all this, you need acrylic paint:
- black;
- beige;
- green;
- brown;
- light brown.
All this can practically be found at home or in the garage.
How to build a birdhouse with your own hands
 In a two-liter plastic bottle, at a height of 6 cm from the bottom, cut out a round hole for the tap hole with a stationery knife.
We drill a 3 mm hole two cm below and screw the plastic dowel with a screw from the inside. It turned out to be an excellent perch for the starling. He will greet others by singing, sitting in front of the entrance to the house.
We cover the bottle with brown paint twice, paint carefully, without gaps. We create comfort and darkness in the house.
Use a thin drill to drill through the neck of the bottle horizontally. A wire is threaded through the hole and twisted. It makes a good loop for hanging a bottle.
The finished home can be left and hung in the garden, but a couple more operations can be performed for beauty.
Bird house decoration
We cut out a window model from paper and glue it onto the bottle.
We heat the CD, so it’s easier to cut it, and divide it into parts like a cake. This is what we got as tiles for the house. You can paint the tiles brown or decorate them with all colors, making the roof multi-colored.
We begin to cover the bottle with tiles from the bottom row; you can also secure it with tape for strength. Each subsequent layer is attached only with glue.
The house is ready!
We arrange your home comfortably
 Is it possible to make a plastic house more comfortable? A starling is a bird that independently searches for suitable material for its nest.
And who told you that the starling is the only representative of birds that can live in a built house. That is why you should worry about the comfort of future guests.
The bottom of the home can be lined with rags, cotton wool, hay and down. Any birds will not refuse such help in arranging a nest. They will delight others with their singing and chirping.
Where are birdhouses hung?
The higher above the ground, the safer it is, so the birds think. The first requirement that birds need is safety. We go into the garden, hang it higher, securely fasten it to good trees.
It is better to place it so that it is not particularly visible. Extra eyes can interfere with the growth of chicks. The main destroyers of bird nests are cats and children, and we hide bird nests from them.
Be sure to try making such a house with your children. Good activity for kindergarten, simple execution and helps develop love for the world.
Instead of questionable chemical compounds, you can use safe “environmentally friendly” products. To effectively combat caterpillars, beetles and other pests, it is enough to attract starlings. These and some other bird species are capable of destroying not only insects, but also larvae. The only thing you need is a high-quality, hand-made birdhouse. Design drawings and dimensions, manufacturing technologies and useful tips you will find in this article.
Read in the article
What to make a birdhouse from: the best materials
To clarify the dimensions of the birdhouse, a drawing for starlings must be created taking into account the characteristics of their habitat in natural conditions. It is recommended to take into account the following facts:
- Usually these birds make nests or use a hollow hollowed out by a woodpecker in a tree. They do not need excessive space, so it is enough to create a small interior space for the home.
- To raise chicks, you will need the absence of drafts, good heat and.
- We should not forget about natural enemies. Sufficient protection against .
- It is necessary to ensure ease of entry into the birdhouse and free flight.
- Unpleasant odors and fumes harmful to biological organisms should be avoided.
- The design should not contain sharp protrusions or defects that could injure the bird.
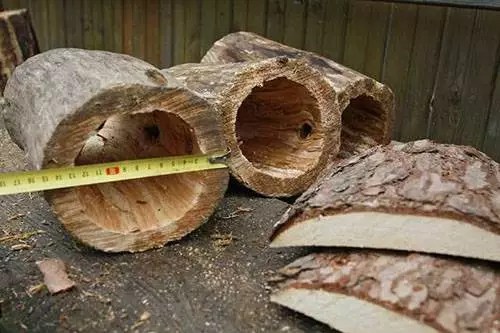
This photo shows that the birds like the unsightly-looking structure. It is made from natural natural materials, without varnishes and paints. In terms of its parameters, the housing turned out to be close to natural conditions, which is why the corresponding structures are called “loops”. Manufacturing is not accompanied by unnecessary difficulties. In a suitable log, remove the core and cut out a hole for the tap hole. Boards are nailed from below and above.

Birdhouse made of wood: in harmony with nature
This material is used most often, since its parameters are well suited for bird housing. However, please be aware of the following limitations.

- To obtain acceptable results, it is necessary to use sufficiently thick sheets (from 20 mm or more). It is permissible to create type-setting walls.
- Moisture-resistant varieties are suitable for outdoor use. These materials are more expensive than standard ones. But products made from them will retain their shape for a long service life.
- You should make sure that there are no adhesives or other chemical compounds that are harmful to birds or create unpleasant odors.
Birdhouse out of the box: a ready-made solution

This kit contains wooden blanks made using factory techniques. They differ high quality processing, precise dimensions. Paints and a special decorative overlay are useful for creating an aesthetic appearance. The assembly instructions will help you complete necessary actions Right.
Important! As a rule, such kits do not include tools. They will have to be purchased separately.

This cardboard birdhouse can be assembled in just a few minutes. Special cutouts are designed to create connections. The advantages include low cost, speed of installation operations, and the possibility of disassembly. To determine the shortcomings of such a model, it is enough to carefully study the picture:
- Lack of an additional layer that protects against moisture.
- The bird hole is too big.
- Low strength of connecting nodes.
- Overly modest appearance.

Birdhouse dimensions: what you need to consider
Above we discussed in detail questions about how to correctly make a structure using different materials. After a comprehensive analysis, it is not difficult to draw a conclusion about the advantages of natural wood:
- it is an environmentally friendly, inexpensive material;
- it has high strength and good insulating characteristics;
- it is not too difficult to process it at home with your own hands using simple tools.
The last item on this list deserves special attention. Prudent owners make their homes attractive to certain species of birds. That is why it is necessary to take into account not only the physiological differences between starlings and tits, their special habits and preferences.
It should be noted right away that it will not be possible to build such a miniature object according to GOST. There are no standard reference parameters developed for the birdhouse.

Important! What dimensions of products should be are discussed below. Requirements for other parameters, taking into account behavioral characteristics, are also given there. different birds. Individual changes can be made to any drawing. But it is better if they relate only to the aesthetic parameters of the products.
Dimensions of a birdhouse for starlings
Typical design parameters are given in the following table:

When the feathered neighbors have mastered the new home, this one is removed. After this, the birds will begin to destroy harmful insects.
Titmouse: drawing and dimensions
The dimensions of the birdhouse for tits are slightly different from the previous version:
House for a wagtail: drawing and dimensions
To make the birds comfortable, the following parameters must be taken into account:
You can create drawings yourself based on the data provided in the table. But we must remember that the wagtail’s legs are better suited for running than for clinging to vertical surfaces. It is difficult for this bird to penetrate the entrance of a standard birdhouse. For this purpose, the structure is supplemented with a “threshold”, a special platform with a width of 80 to 120 mm.

How to make a birdhouse step by step
After familiarizing yourself with the theory, you can move on to practice. This table shows an algorithm that will help you correctly create birdhouses for birds with your own hands. Blueprints, Consumables, tools must be prepared in advance.
| Photo | Procedure and Important Notes |
 | To make a relatively simple house for birds at home with your own hands, the following drawing of a birdhouse with dimensions is suitable. |
 | In accordance with the design documentation data, the dimensions are transferred to . |
 | Wooden blanks are cut using or with an electric drive. |
 | To make it easier for birds to move, the internal surfaces are made rough. If necessary, special notches are applied in the taphole area. |
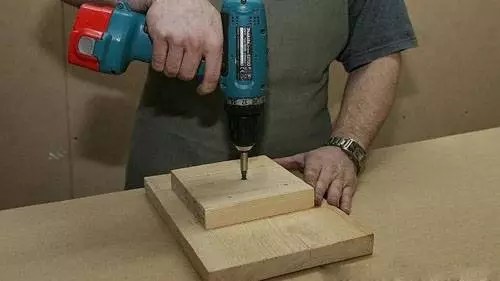
 | The hole is made using an electric drill. Use a cutter attachment of the required size. |
 | To simplify the assembly process, thin holes are drilled at the marked points or small recesses are made. Screws are screwed into them. With the help of such fasteners, reliable connections are obtained. |
 | Assembly is performed sequentially. The workpieces are installed so that during the process of fastening them they do not create additional loads on the structure. For the product in the example, three screws on one connection line are sufficient. This is not indicated in the photo, but some craftsmen install special inserts in the inner corners. They are used to round the shape internal space, make it similar to an ordinary hollow. |
 | A wooden rectangle with dimensions slightly smaller than the free part of the inner contour of the walls is fixed in the central part of the lid. It is fixed with five screws. |
 | Check the ease of installation and removal of the cover. If necessary, use a chisel to give the optimal shape to the parts. |
 | If you create several birdhouses, the garden will be better protected from harmful insects. To extend its service life, the product is impregnated on the outside with specialized compounds. |
Using this video, you can find out how to make a functional and beautiful birdhouse yourself:
Important! When creating any type of house, it is necessary to seal the cracks. You can use hemp for this. Working operations are performed using specialized tools and blades.
How to build a birdhouse with your own hands: step-by-step instructions
If you buy a ready-made kit, you can make your own birdhouse for birds quickly and accurately. Such kits contain precisely fitted blanks and consumables. Detailed instructions manufacturers explain how to make a birdhouse correctly. But much more interesting are the original designs.


How to decorate a birdhouse with your own hands
Questions often arise: is it possible to paint such structures? The application of impregnations and decorative coatings protects the wood from moisture and harmful bark beetles. This treatment allows the same design to be used for many years without repair. But be sure to make sure that the paints do not contain bird-repellent odors. On the other hand, they should not be overly bright so as not to attract predators.
When used correctly original ideas It will be possible to turn a functional object into an expressive design element. It’s easier to figure out how to decorate a bird house using a photo. specific examples.
1 of 6
Unusual birdhouses (pictured) can be created using relatively complex technologies (1) and available materials (2) An unusual option is a good illustration of the widest possibilities creative person. Metal linings, like the stones in the previous version, perform certain protective functions. In order not to think about how to paint the walls, you can use ready-made images or photo printing for decoration
Article