Preparing children for school writing. Developing fine motor skills: preparing the hand for writing. Development of fine motor skills in preparation for writing
All children entering school have to write. And not everyone, unfortunately, does it equally well. The fact is that writing is a difficult skill that requires good preparation of the small muscles of the child’s hand to perform clear, well-coordinated movements, as well as the ability to control one’s own actions for quite a long time.
Preparation for school. Hand placement.
Not all children, for various reasons, have strong and developed arm muscles. That is why it is necessary to take action from an early age certain actions to “position” the child’s hand. You will be surprised, but you can start with 3 summer age. The favorite toy of all kids, the spinning top, will help you with this.
Yula is inexpensive, but brings incredible benefits to the little ones in strengthening muscles. Yula can teach several ways to grip her handle, which will come in handy later in the process of learning to write. While playing with the spinning top, the baby needs to strain his arms and make certain power movements at a fairly fast pace. If you see that your three or four year old child is having difficulty playing with a spinning top, be wary. This means that the baby’s muscles are weakened, perhaps not forming correctly, and without certain preparatory exercises the child will have difficulty learning to write.
Therefore, before teaching children to write, you need to prepare their hands for the writing process itself, since these tasks are completely different from each other. Various assistants can help in this matter - books, toys, manuals, which can be purchased both on the manufacturer’s website and in stores.
Preparing your hand for writing contains several stages:
- teaching manual labor (various types). This means: the development of motor skills, eye, spatial orientation, attention, the ability to work carefully, to finish any task, and not abandon it halfway.
- formation of a sense of rhythm - learning to coordinate movement and words in compliance with a certain rhythm;
- teaching drawing and graphic work - coloring, drawing in cells, shading, etc.
- formation of correct orientation in space - orientation on the working surface (for example, on a sheet of paper).
Hand exercises to prepare your hand for writing
There are a number of effective exercises to prepare your baby's hand for the writing process. Here are some of them.
Exercise "Pianist"
The baby places his hands on the hard surface of the table, palms down. You need to raise your fingers one by one. First we raise the fingers of one hand, then the other. We repeat the exercise in reverse, i.e. from the other hand.
Exercise "New wave"
The baby’s hands lie on a hard surface, as in exercise 1. Only now you need to raise your fingers one after another different hands at the same time. You should start with your little fingers.

Exercise "Paper clip"
The baby should tense his middle and index fingers and hold the pencil between them so that it does not slip out. Then you need to lower and raise your fingers, trying to prevent the pencil from slipping out.

Exercise "Magic wands"
Place counting sticks, pencils, tubes, pens in the amount of 10 or 15 pieces on a hard surface. The child needs dexterity to collect all the sticks one by one, using only one hand, and then place them again one by one on the work surface. It is important to collect and lay out the sticks one at a time. And you can’t help yourself with your other hand.

Exercise "Nimble steps"
Tighten your middle and index fingers again and hold the pencil between them so that it does not slip out (as in exercise 3). It is better to hold the writing instrument at the level of the second phalanges of the fingers. Now, with this pencil, so that it does not fall, we make very small movements (steps) with our fingers along the working surface of the table. You need to “go through the entire accessible surface within the territory where the baby’s hand can reach.

Exercise "Mill"
Tighten your index and middle fingers again and hold the pencil between them, but only the very tip. The baby is required to turn his hand so that he can grab the other, free, tip of the pencil with his other hand. The pencil appears to be rotating. In this case, the direction of the writing instrument should be observed from the chest. It is necessary to ensure that the baby makes at least 7 revolutions. But the more the better.

Exercise "Ball"
The baby needs to use his imagination and imagine that he has a ball in his hands small sizes. Now this imaginary ball needs to be rolled from side to side.

Very often, when learning to write, children experience the so-called “writer’s cramp.” This is when, in the process of writing, their fingers begin to go numb and painful conditions appear, which discourages the future first-grader from learning to write at all. This phenomenon can be prevented with a simple exercise.
Exercise "Friendship"
In a sitting position, the baby should place his hands at eye level, connecting his palms to each other. Then you need to move one palm down a little, and bend the fingers of the other hand and, as it were, hug the fingers of the palm moved down. Before performing such manual “hugs,” we inhale through our nose and exhale directly during the exercise. You need to do the exercise with both hands in turn, 10–15 times.

We also consider it necessary to mention that before teaching your baby, you need to determine his dominant hand. Now left-handedness or hidden left-handedness is much more common than it was before. This is important because in left-handed people the distribution of functions between the hemispheres of the brain occurs completely differently.
What is hidden left-handedness?
This term describes children who write with their right hand, but their leading hemisphere remains the right, like those children who write with their left hand. It is hidden left-handers who most often experience difficulties in learning at school.
Right-handed or left-handed?
There are many ways to determine a child's dominant hand. For example, you can ask your baby to unscrew the cap on a bottle, erase something with an eraser, hand him a spoon or some object and ask him to take it, use scissors, or move something from one box to another. Experts advise giving children tasks that are unusual and unexpected for them, which they were not taught, in order to see a more natural reaction on the part of the children. That is, it is assumed that in an unprepared situation the child will perform the task in a way that is convenient for him.
The hand with which the baby will perform such tasks is his leading one.
Left-handed children, latent left-handers and those who use both their right and left hands require special attention in the process of preparing and teaching writing.
It should be remembered that exercises with preschoolers must be performed using a simple pencil where it is required.
What helps prepare your hand for writing?
We invite you to familiarize yourself with the list of the most effective activities in preparing your baby’s hand for writing:
- mosaic games;
- construction sets (especially those where you can screw in various screws and nuts);
- working with paper, wire (beads, crafts, garlands, origami, etc.);
- weaving bracelets, laces, beading, etc.;
- crocheting and knitting;
- embroidery;
- sewing and sewing on (buttons, for example);
- cutting with scissors;
- use of coloring books, drawing (including with chalk);
- manual labor: burning, sawing, sculpting, .
How do you know if a child’s hand is ready or not ready to write?
Your child has not yet received sufficient training if:
- does not know how to shade images without going beyond the boundaries of the drawing;
- cannot repeat the drawing of a circle after you: it depicts an oval with many trembling broken lines or it turns out to be a small circle;
- fixes the brush motionless on a sheet of paper;
- Constantly flips images.
If you see that your child is not ready for the process of learning to write, continue to regularly perform with him the exercises that we suggest in this article.
How to hold a pen correctly
It is also important to pay attention to how to hold the pen correctly. Invite your child to write something and watch him pick up the pencil. False if the child:
- holds his fingers as if he wants to add salt to the food, i.e. a pinch;
- clasps the pen in his fist;
- the writing instrument is located on the surface of the index finger, instead of the middle one;
- the end of the writing instrument points to the side, and not to the shoulder of the writer;
- The child’s fingers are located at the wrong distance from the stylus (close or, conversely, far from it).
A distorted hand position when writing will interfere with the correct development of this important process, so it is necessary to begin training to correct the situation. We bring to your attention a very effective corrective exercise for such a case called “House for Letters”.
Exercise “House for letters”
An adult needs to take the pen correctly, but only move the fingers a little higher from the stylus (approximately 2 cm). After this, you need to release your index finger so that the pencil is held only by your middle and thumb. And at this time the index finger can perform any free movements and even tap on the surface of the writing instrument. Invite your child to repeat the same thing. We are confident that such clarity will be most understandable for the child, and the problem will be removed before it even appears.

To successfully master school skills, a child needs to have a well-developed hand, since a large load on the hand at school can cause a feeling of fatigue, tension and disruption in the formation of handwriting.
Mastering writing skills is a long and complex process. Without the help of adults, it is very difficult to learn to write, to visually control the direction of the hand when writing, while maintaining the duration and consistency of movements.
Modern schools place great demands on children entering the first grade. At the first stage of education, children most often experience difficulty with writing: their hands quickly get tired, the working line is lost, they cannot write correct writing letters, the child does not fit into the general pace of work.
Developed children's hands are needed not only for school, but also for the entire subsequent life of children. Therefore, the surest way is not to wait for school, but to prepare for it.
All proposed tasks on writing skills can be printed and practiced with your child.
COOPERATIONS FOR PRE-SCHOOL CHILDREN AND FIRST-GRADER CHILDREN
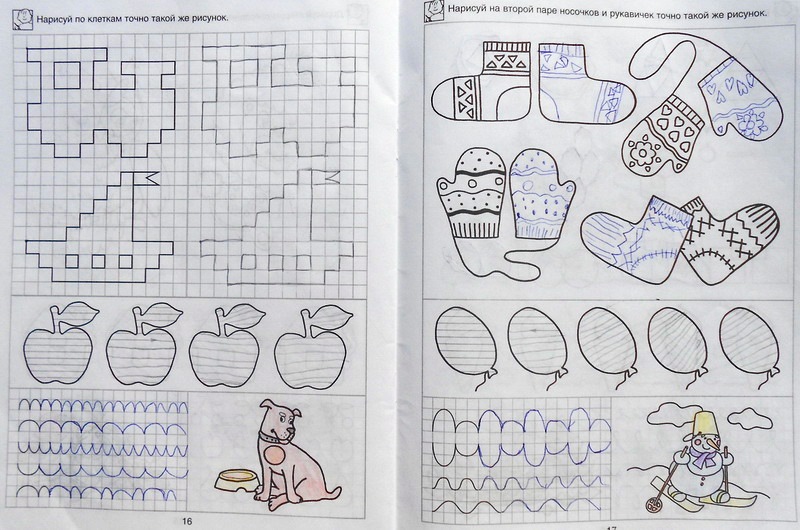
DRAWING BY CELLS (part 1)
DRAWING BY CELLS (part 2)
These exercises will help the preschooler master the skills of orienting on a sheet of paper in a square, copying drawings, and copying figures by dots.
Irina Irizbaeva
Preparing the hand for writing in older preschoolers
Writing is a difficult skill, including the performance of finely coordinated graphic skills. Technique letters requires coordinated work of the small muscles of the hand and the entire hands, correct coordination of body movement, visual concentration for voluntary regulation of activity, as well as a certain functional maturity of the cerebral cortex.
After 5-6 years in children, in the cerebral cortex, according to the laws of the formation of conditioned reflexes, the conditioned reflex functions of reading and letters.
At the age of 6 - 7 years is a sensitive period for hand development hands. At this age, organizing different kinds activities, systematically using training exercises, you can achieve good results in the development of hand motor skills (coordination, accuracy, flexibility). Mastery by letter - long, a labor-intensive process.
Work on preparing your hand for writing must be systematic and comprehensive. Stages preparing your hand for writing:
Preparatory;
Basic;
Final.
Preparatory stage includes myself:
Special physical exercises;
Visual activities;
Development fine motor skills hands
Special physical exercises. Exercises and games using a variety of sports equipment (balls, hoops, pins, ribbons) and other items, toys in the classroom physical culture and outside of activities with children (morning exercises, physical education minutes, outdoor games for a walk) open up wide opportunities for developing preschoolers coordinated movements of all units hands and small muscle training hands. Development of fine movements hands promote physical exercises based on grasping movements and developing hand strength. Climbing, moving from apparatus to apparatus, and swinging on a rope contribute to the development of precision in hand movements and teach you how to dose your efforts.
On preparing your hand for writing fine art influences well activity: modeling, drawing, and specially selected exercises: outlining and shading geometric shapes and outline images of vegetables, fruits, leaves, etc.
Of particular importance is decorative drawing - drawing ornaments and patterns. At the same time, the child practically masters the representation of various elements on a plane, and later on convex planes; learns to correctly determine the direction of lines and movement hands, gets acquainted with the rhythmic, compositional construction of ornaments, develops an eye. All this is directly related to preparation for writing.
Positive impact on preparing a child's hand for writing also provides coloring. Ready-made coloring albums can be used for this purpose. It is necessary to draw children's attention to ensure that the image is painted over thoroughly, evenly, and neatly. We need to teach children not to rush, to color diligently, in several stages to avoid overwork.
Development of fine motor skills hands
Finger games
Finger games help the hands acquire good mobility, flexibility, stiffness of movements disappears, which will facilitate the acquisition of skills in the future. letters.
Original crafts from affordable material: napkins, egg shells, boxes. Such activities promote the active development of fine motor skills and help strengthen the most important skills of planning, control and self-esteem.
"Rug for a doll"
Stringing: buttons, beads, horns and pasta, dryers, cardboard circles, tree leaves, rowan berries.
Laying out letters from seeds and sticks.
Cutting out various figures.
Outlining flat shapes. You can circle All: the bottom of a glass, an inverted saucer, your own palm, a flat toy, etc.
We build a fence, house, tree, etc. - from counting sticks
Wonderful bag” - identify vegetables and fruits by touch
Bird tracks on the sand - we draw on the sand with our fingers, we draw large and small objects, imitation of the process of birds pecking at grains.
The main stage includes myself:
Hygiene letters;
Form the correct grip of a pencil;
Hatching;
Learning to navigate on a sheet of paper;
Hygiene letters
Landing at letter. The desk, table and chair must correspond to the height of the child. The inclined position of the desk lid is conducive to preserving vision when letter, helps reduce fatigue in the neck and back muscles. The torso should be kept straight, shoulders straightened and at the same height. Chest does not touch the table (the distance from the table to the chest is approximately the width of the palm). The legs, bent at the knees at a right angle, rest the entire foot on the floor or on a stand.
Hand position when letter. The writer's hand should lie on the table so that the right elbow hands protruded slightly beyond the edge of the table, and the right hand moved freely along the line, and the left hand lay on the table and held the worksheet from below. The left hand should under no circumstances rest on the knees - this leads to the raising of the writer’s shoulder. hands, which contributes to the occurrence of poor posture.
Writing brush position hands. Right hand hands Most of the palm should be facing the table surface; the fulcrum points are the nail phalanx of the slightly bent little finger and the lower part of the palm.
Notebook position. Not only the clarity of handwriting depends on the position of the notebook, but also the ability to sit correctly when letter. In order to choose the correct distance to the notebook, the child needs to place his palms on the table (desk, with his thumbs down along the edge of the table. The notebook should be placed at the tips of his outstretched fingers, moved slightly to the right and lowered the left edge. The inclined position of the notebook contributes to the inclined position of the letters At first, the notebook is supported by the left hand from below.As the page is filled, the notebook moves up, and the left hand holds it from above.
Form a correct pencil grip. Free movement of the writing hands is ensured primarily by how the child takes the pencil. It should be held on the left side of the middle finger. The thumb supports the handle on the left, and the index finger on top. The ring finger and little finger can be inside the palm or lie freely at the base of the fingers, with the upper end of the handle directed towards the writer’s shoulder. The distance from the tip of the rod to the index finger is about two centimeters. When the handle is positioned correctly, the index finger can be lifted up easily and the handle does not fall off. At the same time, the pen must be held freely so that all joints of the index finger are raised. The bending of the first joint of the index finger indicates excessive tension when holding the handle. The consequence of this is premature fatigue and a decrease in pace. letters. The optimal handle length is 15 centimeters. It is better not to use very short, excessively long and thick handles for letters.
Special pen simulators can help a child learn to hold a pen correctly. They come in two types. The device is a silicone fish that can be attached to any pencil or pen. The fins of this fish have three indentations for the fingers. Take the fish to hands It's almost impossible to get it wrong.
Triangular colored pencils are made using the principle of a cone trainer. This the best option pencils that you can choose for your baby. First of all, they are thick. Due to this, it is convenient for the child to hold them in his hand. Secondly, they are triangular. This allows you to hold the pencils correctly. Thirdly, they are soft. It doesn’t take much effort for a child to paint, draw, and write.
To develop the skill of holding a pencil, finger games are used (especially with the thumb and index finger, exercises with a pencil (Twist the pencil with two fingers, three fingers, game exercises like Salt the soup.
Exercises to relax your fingers and hands hands:
“Let's pet the kitten” - smooth movements illustrating the corresponding action, performed first with one hand, then with the other. (3-5 times).
“Jolly painters” - synchronous movements of both hands up and down with simultaneous connection of the wrist swing (3 times, then left - right (3 times).
“Bunny” – i. p.: the hand rests on the elbow; The index and middle fingers are straightened and spread apart, the remaining fingers are clenched into a fist.
“Ring” – i. n. the same; The thumb and index fingers are connected into a ring, the remaining fingers are straightened and spread apart.
Then, exercises in combining speech with movement, for example, with nursery rhymes, are effective.
Various tasks related to shading play a major role in the development of graphic skills. Hatching is performed under the guidance of a teacher. He shows how it is performed, controls the parallelism of the lines, their direction, the child’s posture and how he holds the pencil. The rules must be followed shading:
Hatch in a given direction
Do not go beyond the contours of the figure
Keep the lines parallel
Do not bring the strokes closer together; the distance between them should be 0.5 cm.
For shading, ready-made contour images of objects, drawing images followed by shading, and children tracing ready-made stencils can be used.
Simultaneously with the development of motor and muscular capabilities of the fingers hands The child must be introduced to the image of a particular letter, creating a model of it in memory. To do this you need the finest sandpaper (or velvet) cut out the letters and stick them on a piece of cardboard. Leading index finger hands the child traces the contours of the letters, remembers their images and elements. The work of perceiving the shape of a letter through tactile and kinesthetic sensations was first proposed by the Italian teacher M. Montessori. And it became widespread already in the 20s of the 20th century.
In addition, hand-eye coordination is developed through activities in which you need to draw lines from one drawing to another. "Tracks" along a straight, wavy line or through a labyrinth, in which it is necessary to determine "What is drawn", connecting all the dots.
Various tasks: “Complete the left (right) side of the object" “Complete the drawing, following the sequence”, "Continue the series", “Draw the same one”, “Complete the pattern” and etc.
Learning to navigate on a sheet of paper.
Formation of graphic skill as a technical side letters largely depends on the child’s ability to navigate on a sheet of paper. This is due to the fact that the letter shapes (To letter which the child will begin in the future) are determined not only by the composition of the elements included in them, but also by their quantity, size and location relative to the working line. Consequently, in order for a child to acquire graphic skills, he must consciously assimilate the visual image of a letter, clearly imagine what elements it consists of and in what spatial and quantitative relationships these elements are combined in each individual letter.
Many children preschool ages are difficult to navigate on a sheet of paper. Therefore, it is advisable to conduct exercises with them to develop visual and spatial perception. They help develop and improve orientation on a sheet of paper and the skill of moving along it. hands.
Exercises, games, and various tasks to develop graphic skills are one of the areas of correctional work. The purpose of graphic exercises is to develop the ability to “enter” a cell, outline it, draw straight lines from top to bottom and from left to right along the line; place a circle inside the cell; connect the corners of the cells diagonally; draw wavy lines without lifting the pencil from the sheet of paper and without going beyond the horizontal lines of the ruler.
By performing graphic exercises, children not only acquire the necessary graphic skills, but also learn to navigate in a limited plane (a line in a squared notebook, develop mental activity, attention, and memory.
One of the effective techniques is the so-called "graphic dictation". At the first stages, children examine the finished composition of the ornament, analyze it and reproduce it from memory. Another one may be offered option: children create an ornament from dictation. On squared paper, children draw segments under dictation, counting a certain number of squares in the indicated direction. If the child has made no mistakes, he will create a pattern or drawing.
When preparing your child for school, you can also carry out such tasks. Children are offered cards with different shapes (square, circle, dot, cross) and tasks for them. For example:
Draw a figure to the right or left of the vertical line.
Place a circle, draw a cross to the right of it, and put a dot to the left of the cross.
Draw a dot, below the dot - a cross, to the right of the dot - a circle.
Draw a square, a cross to the right of it, and a dot above the cross.
Determining the right and left sides of an object. Hold the book with both hands and then show the right and left sides of the book. Determine the right and left sides of the object that lies on the table.
The final stage is typing letters
In order for the child to successfully prepared for the letter, it is necessary to regularly and systematically conduct classes on the development of fine motor skills, sensorimotor coordination, teach how to navigate in space and on a sheet of paper, practice with shading, and typing letters. It is very important to follow hygiene rules letters to maintain the child’s posture and health.
Nowadays, schools are interested in ensuring that children enter 1st grade prepared, able to write and count.
On initial stage In learning, many children most often have difficulties with writing: the hand quickly gets tired and “does not obey”, letters, numbers and their elements turn out ugly, uneven, the child does not fit into the time allotted for completing the task.
These difficulties are caused by insufficient development of fine motor skills of the fingers and insufficiently developed skills of visual-motor coordination, attention, and analytical perception. This negatively affects children’s learning of the school curriculum.
To prevent this from happening, it is very important to start preparing the child’s hand for writing in advance.
What are fine motor skills and why develop them?
Fine motor skills are a set of coordinated actions of the nervous, muscular and skeletal systems, often in combination with the visual system in making small and precise movements of the hands and fingers.
Physiologists confirm the connection between hand development and brain development. Scientists have proven that from an anatomical point of view, about a third of the total area of the motor projection of the cerebral cortex is occupied by the projection of the hand, located very close to the speech zone. Therefore, the development of a child’s speech and intelligence depends on the development of fine motor skills of his hands. The famous teacher V. A Sukhomlinsky argued that “the child’s mind is at the tip of his fingers,”
The development of fine motor skills affects the overall development of the child, his mental activity, visual and motor memory, attention, coordination, imagination, and speech. This is also important because in our daily lives we constantly need precise coordinated movements of the fingers and hands in order to eat, dress, write, do needlework, play the musical instruments, etc. Therefore, a lot depends on the degree of development of fine motor skills.
And, of course, when preparing a child for school, in order for him to successfully master writing skills, it is simply necessary that the fine motor skills of his hands be sufficiently developed for this!
When a child enters 1st grade with insufficiently developed fine motor skills, this most often indicates some lag in his overall development. Child with with great difficulty graphic tasks will be given, it will be difficult for him to hold a pencil or pen for a long time, the movements of his hand while writing will be awkward. And of course, this will affect not only handwriting, but also academic success and the development of various work skills.
At what age should you start preparing your child’s hand for writing?
Preparing a child’s hand for writing, which means training the fine motor skills of a child’s hands, can begin from an early age.
At a very early age, fine motor skills develop naturally: the baby first learns to take objects with his hand, then to transfer them from one hand to another, etc.
From 3-4 months, you can begin to massage the baby’s hands, bend and straighten his fingers, influence the baby’s arms and fingers sensory: stroking them, running a fur or knitted toy over them, etc.
It is very important that these classes take place with a positive emotional background, bring joy to the child, and are a game for him. To do this, our wise ancestors did finger gymnastics with the kids, accompanied by nursery rhymes, i.e. played finger games, such as: “Finger-boy, where have you been”, “Magpie-crow”, etc.
Finger gymnastics “finger games” is a staging of small stories and fairy tales using fingers poetic form. Finger games are an important part of developing fine motor skills with children. of different ages: from toddlers to first grade students.
For greater efficiency in finger games, separate movements of each of the fingers should be used, and movements for squeezing, stretching, and relaxing the hand should be alternated.
Duration finger gymnastics increases with age: for children under 3-4 years old, the recommended time is from 3 to 5 minutes, for older children - 10-15 minutes a day.
Finger games are easy to find on the Internet through search engines.
From 8 months, it is recommended to train the child’s hands more actively: under the supervision of adults, let him touch and play with various objects, initially large, and over time smaller ones: parts of construction sets, mosaics or puzzles, as well as pebbles, shells, small sticks, buttons, stationery paper clips, counting sticks, cereal, etc.
As a child grows up, the number of activities and games available to him to develop fine motor skills becomes much larger, and they themselves become more diverse.
What activities help prepare your hand for writing?
Children's creativity
Creative activities with children: drawing, applique, cutting, sculpting, etc., are very helpful in training the muscles of the hands and fingers, developing manual dexterity and skill, coordinating the movements of both hands, etc., and also actively influence areas of the brain , responsible for the overall development of the child.
Examples of other activities and games
Activities such as:
- Drawing. You can draw anywhere and with anything, especially children love unconventional materials and drawing techniques, for example, children can be offered finger painting on a tray with sand, semolina or other grains (for this, a thin layer of semolina is poured onto the tray, for example, and the child draws her finger)
- games with balls, cubes, pyramids, sorters, mosaics, construction sets, puzzles, etc.,
- fastening and unfastening buttons, snaps, hooks,
- stringing beads and buttons,
- lacing,
- weaving ribbons or ropes, weaving braids from them, tying and untying knots and bows,
- unscrewing and screwing caps plastic bottles, cans, vials,
- attaching and detaching clothespins,
- searching for small objects (Kinder toys, etc.) in a bowl or bag of cereal,
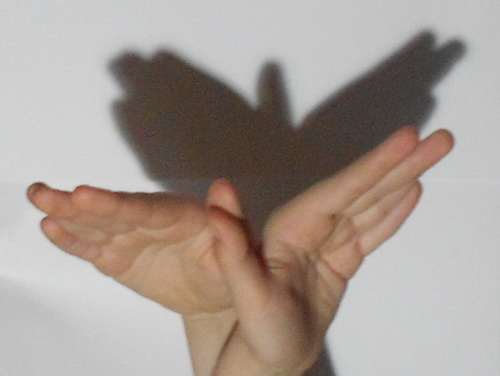
- shadow theater of hands and fingers
- etc.
Massage and self-massage of hands
 Massage or self-massage of the hands is very useful. It needs to be done 2-3 times every day. This can be done as follows.
The simplest massage: movements are performed in the direction of the lymph nodes: from the fingertips to the wrist and from the hand to the elbow. Movements: stroking, rubbing, light pressure, light pinching, patting, bending and straightening the fingers, and all together, and in turn.
The massage (self-massage) begins with rubbing the fingers from the pads to the palms, first on one hand, and then on the other. Then the thumb of one hand rubs the palm of the other hand from the center to the edges.
Then various movements are performed, after each of which relaxing stroking or shaking of the hands is done:
- warming up your hands - vigorously rub your palms together to make your hands hot,
- movements like when washing hands,
- clench all your fingers into a fist and unclench sharply,
- rub your thumb on the other fingers in turn: on the index finger, on the middle finger, on the ring finger, on the little finger. The exercise is performed with both hands simultaneously,
- clench one hand into a fist, then insert the fingers of the other hand into it one by one and scroll several times.
- make “sawing” movements with the edge of one palm on the other,
- use the knuckles of the fingers of one hand clenched into a fist to move up and down the palm and fingers of the other hand.
Complete the self-massage by relaxing your hands, to do this you need to shake them.
To prevent the massage from being boring, it can be accompanied by poems, an example of poems for hand massage from the site.
Self-massage can be carried out using various small objects, for example, rolling a ribbed pencil, bead, pea, cone or nut between your palms or with one hand on the table. This can be done with the words:
“I’m going, I’m going, to my grandmother, to my grandfather,
On a horse, in a red hat,
On a flat path
On one leg"
Graphic tasks
In senior preschool age(5-6 years) the development of fine motor skills and hand coordination becomes one of the main stages of preparation for school and, in particular, for writing.
At this age, it is important to pay attention to the following activities:
- coloring paper or closed contours in different directions for different drawings (in each drawing the strokes should be in only one direction),
- hatching in different directions with different pressure forces and stroke lengths,
- tracing the drawing along the contour,
- creating an image using templates or tracing various objects (a glass, a jar, your own palm, etc.),
- drawing by points;
- drawing by cells according to the model and by ear,
- completing images with and without cells,
- various graphic dictations (for example),
- writing elements of capital letters.
Most of these tasks are in various manuals for preparing children 5-6-7 years old for school.
Introduction to hygiene rules for writing
 Teaching a child to sit correctly when writing or drawing and to hold a pen correctly should begin in advance, before he goes to school. Because it will be very difficult to retrain him, especially in a very difficult period for him, when he will have to do a lot of new and difficult activities for him - writing.
Hygienic rules for writing are the following skills:
- Sit correctly when writing.
- Hold the pen correctly.
- Correctly coordinate the movements of the fingers, hand, forearm, and shoulder when writing.
Compliance with these rules allows you to form the correct writing technique, making it more convenient, easier, beautiful and faster.
Moreover, an adult must show the child exactly how to do this correctly. He must monitor their implementation, because... the child himself, concentrating on completing the task, forgets about them within a few minutes.
Crafts with preschool children
So, being creative and making crafts greatly contributes to the development of fine motor skills in children, as well as the acquisition of skills that children will need at school.
There are a lot of different techniques and ways to create crafts. Let's consider the most basic and necessary for preparing for school.
Cutting with scissors. Unfortunately, there are quite a few children who go to 1st grade without knowing how to cut at all. But carving trains the muscles of children’s fingers well and develops coordination of movements. It is necessary to pay attention to the child’s ability to cut along straight, broken or curved lines, the ability to cut various shapes: triangle, circle, oval, etc.
Application. The cut out figures can be glued onto a paper or cardboard background to create an applique. You can do appliqué with young children who do not yet know how to use scissors, if you invite them to glue what they have torn into pieces. colored paper or ready-made cut-out figures from self-adhesive paper, as well as images cut out by adults from old magazines or figures made with figured hole punches.
 Working with paper and cardboard. Origami. From paper (paper patterns), by making a couple of folds (more complex models may require glue), you can get various paper toys. Figures and toys can also be made by folding paper (origami). You can make many different crafts from paper and cardboard that have practical benefits: postcards, gifts and souvenirs, Christmas tree decorations and decorations, bookmarks.
 Modeling. You can sculpt from plasticine, salt dough, clay, modeling mass. First you need to learn how to sculpt basic shapes: balls, sausages, circles, and then assemble them into various figures, letters, numbers. It is useful to knead plasticine (dough, clay, mass) in your hands, pinch off pieces (you can also cut them with a thread or a stack) and then put them back together into one whole. With pieces of plasticine you can lay out the outlines of drawings on cardboard or a background, on which you can then create an image using grains.
 To develop fine motor skills, as well as the necessary skills in cutting, applique and sculpting, more interesting for a child, you can invite him to play.
An example of a game with plasticine or salt dough: invite your child to roll a small sausage - it will be a worm (snake), and then fantasize about where the worm will go, what he will see, who he will meet, etc.: “Once upon a time there was a worm. His name was (let the child come up with a name). The worm loved to travel. One day he crawls, crawls (we give the worm’s body characteristic curves) and sees a river (the child rolls a thick sausage out of blue plasticine and flattens it). But the worm can't swim. How can he get across to the other side? (listen to the child’s answers) That’s right, we need a bridge. But the worm is so small, he won’t be able to throw a log across the river himself, we need to help him make a bridge! (the child makes a bridge: he rolls out brown plasticine with a sausage and places it across the “river”). Do you hear the worm tell you, “Thank you very, very much for your help!” The worm crawled to the other side, and there was a beautiful flower (roll 7 balls of the same size, place the rest around one of them, flatten). And next to the flower sits a chicken (roll 2 yellow balls, one larger, the other smaller, connect them to each other, draw eyes on the smaller one, draw or glue a beak). Figure out what the chicken did, whether the worm hid from him or made friends with him, and what happened next.
In a similar way, you can play not with sculpted, but with paper figures. Only all the characters will need to be drawn (at least in outline) and then cut out of paper.
You can practice cutting in other ways: play in a shopping center, where the child (seller) must issue receipts for purchases. The check must be double, and the seller must cut it exactly in half along the intended line in order to give one part to the buyer and keep the second for reporting.
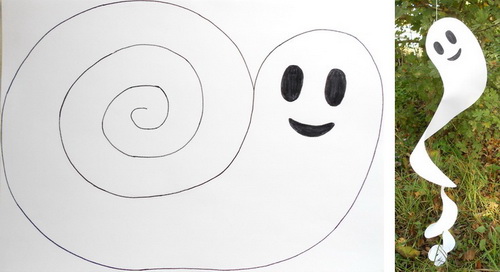 You can invite your child to release a ghost that really wants to fly, but it can’t, because... enchanted. To disenchant it, you need to cut it out and tie it to a small branch - children love to run down the street with such toys on a string. And what if they are made with your own hands! In order to get such a ghost, on a sheet of paper you need to draw a spiral line rounded at the end with eyes and a mouth.
- Thematic set of graphic tasks


