Do-it-yourself chicken coop in the garden drawings. How to build a chicken coop with your own hands - step-by-step instructions and unique photo ideas. Material for building a chicken coop
Have you decided to start breeding laying hens, but don’t know how to build a suitable building for them? Our article provides a step-by-step guide to building a chicken coop, from choosing a building design to the correct placement of perches and feeders.
Choosing a suitable location
The chicken coop must be installed in a quiet place, away from the noise of traffic and pedestrian roads. The place should be sufficiently lit and well ventilated, but without drafts (and the place where the chickens will roam should be shaded). The ideal option is if the chicken coop and walking area are located in the shade of trees or next to berry bushes.
If you live in a humid climate, you need to take care of draining the soil under the chicken coop or raising the building itself to an elevated position.
Housing for chickens must be correctly oriented to the cardinal points. It is advisable to place the windows on the eastern wall of the building, and the entrance on the southern wall. To ensure the safety of the birds, the chicken coop and walking area are fenced off.
Creating a building project
When designing a chicken coop, you need to decide on the dimensions of the structure, which depend on the number of chickens: for each chicken you need to allocate 1 m2 of internal area of the chicken coop and at least 3 m2 for the run.
Optimal temperature for chickens: 25 °C in summer and 12 °C in winter. Therefore, it is necessary to provide shutters on the windows to protect from the hot sun in the summer or from the cold wind in the autumn-winter period. If the chicken coop will be used in winter, the structure must be insulated. It would not be a bad idea to install electricity there to improve the illumination of the chicken coop when the days become short (good lighting has a positive effect on the egg production of chickens).
Plan two entrances to the house - one for you and one for the chickens. Doors must open outwards. Dimensions for chicken entrance: 20 cm wide and 30 cm high.
Let's look at how you can quickly and inexpensively build a reliable and spacious chicken coop for 10 chickens.
Table. List of consumables
| Name of materials | Unit price, cu. e. | Quantity | Cost, y. e. |
| Wooden beams 50x100x6000 | 3.65 USD e./piece | 15 pcs. | 54,75 |
| Wooden beams 50x100x3000 | 1.88 USD e./piece | 40 pcs. | 75,20 |
| OSB-3 board moisture resistant 10 mm 1250x2500 | 7.80 USD e./piece | 25 pcs. | 195,00 |
| Ruberoid | 0.28 USD e./m2 | 32 m2 | 8,96 |
| Metal plaster mesh 5x5x0.7 | 2.20 USD e./m2 | 10 m2 | 22,00 |
| Profiled sheeting 1100x3000 | 14.00 USD e./sheet | 10 sheets | 140,00 |
| Concrete blocks 200x200x400 | 1.15 USD e./piece | 6 pcs. | 6,90 |
| Foam plastic PSB-50 mm 500x1000 | 52.50 USD u./m 3 | 2 m 3 | 105,00 |
| Vapor barrier film | 0.48 USD e./m2 | 25 m2 | 12,00 |
| Expanded clay 10-20 mm | 45.00 USD u./m 3 | 1 m 3 | 45,00 |
| Total: | 664,80 |
Note: for a more budget-friendly construction, the OSB board can be replaced with plywood, the corrugated sheeting can be replaced with slate, and sawdust or rye straw can be used instead of insulation.
Tools required for work:
- Screwdriver.
- Hammer.
- Nails/screws.
- Self-tapping screws.
- Saw.
- Level.
- Plumb.
- Roulette.
Construction of the foundation and base of the building
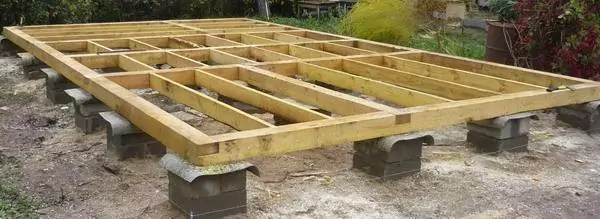
A chicken coop is a lightweight frame structure that does not require a solid foundation. You need to start by marking the territory, after which you need to clear an area of 2.5x4 m for the building, removing 10-15 cm of the top layer of soil, and thoroughly level everything.
Concrete blocks must be placed one at a time in the four corners of the base and in the center of the long side and covered with roofing felt.
The area under the floor is covered with a thick layer of sand or gravel - this will provide additional water drainage.
The base of the chicken coop is assembled from 50x100 pine beams. The perimeter piping is made from spliced beams, then transverse beams are attached to them. The step between the crossbars on the short side of the base is 40-50 cm, the step on the long side is 1 m. All wooden structural elements are fastened with screws or nails.

After the base frame is ready, it needs to be covered with a plaster mesh and sheathed with plywood or OSB board.
Next, the base structure needs to be turned over and the niches in the frame need to be filled with expanded clay. Cover the entire floor area with a vapor barrier and sheath it with OSB boards.

Walling
It is more convenient to assemble the wall frame separately, on the ground. The assembly is similar to the base: first you need to make a wall frame, and then secure additional jumpers in it. The distance between the jumpers is 50 cm.
The finished frame is installed on the base and secured with screws. The verticality of the wall installation is checked with a plumb line. In addition, temporary supports can be placed on the wall.

When the frame is ready, you can install windows and doors. For the summer version of the chicken coop, the window openings can simply be covered with metal mesh, and dampers or shutters can be provided on the outside. For the cold season, windows with double frames are needed.
Roof construction
After all the walls are installed, you need to build the upper crown from double beams. Then the ceiling sheathing is attached to it in increments of 50 cm. After installing the roof, the sheathing will need to be covered with a vapor barrier, insulated and sheathed with OSB.
The length of the rafter legs is 3 m, they need to be laid in increments of 60-80 cm. A cut must be made in each rafter for reliable fixation on the outer wall.


At this stage, you need to take care of the ventilation of the room. The best option is supply and exhaust ventilation. Two wooden boxes should be placed in opposite corners of the building. One ventilation hole must be located under the ceiling, and the second - 50 cm below the first. To regulate the amount of supply air, the boxes must be equipped with dampers, and the other end of each box must be brought out.
A sheathing of cross beams is laid on the rafters. The distance between the crossbars is 50 cm. The sheathing is covered with roofing felt and then with corrugated sheeting. Profiled sheets are attached to the sheathing with self-tapping screws and a gasket.
Interior arrangement of the chicken coop
After completing the assembly of the frame, the finished walls need to be sheathed with OSB boards inside and out, and the cavities insulated with foam plastic.
50x60 beams are suitable for perches. The bars must first be sanded and the corners rounded. The perches should be placed at a height of 40-50 cm. The distance between adjacent beams is 40-50 cm, and between the last beam and the wall of the chicken coop is 25 cm. Under the perches you can place trays that will be convenient to remove and clean - this will greatly facilitate the procedure for cleaning the poultry house . The total length of the roosts depends on the number of chickens. One chicken needs at least 30 cm of free space.

It is also necessary to build nests for birds. To do this, you can use old wicker baskets or put together several boxes from plywood. Box dimensions WxHxD: 30x30x40 cm, a small threshold (3-5 cm) is required. One nest is built for 5 birds. Nests are installed in a distant, secluded corner.

To illuminate the chicken coop, an incandescent lamp with a power of up to 100 W is used. You need to place it high under the ceiling in a place where birds definitely cannot reach.
At the final stage of construction, you need to arrange drinkers and feeders, cover the floor with hay or sawdust, and add a lot of hay to the nests to keep the eggs intact.
So, all stages of construction have been considered, materials have been calculated. All that remains is to get excited about the idea and see in practice that a frame chicken coop is a reliable and prefabricated structure in which the birds will be warm and comfortable in any weather conditions.
Raising poultry, including chickens, is a fairly promising activity. Especially considering that the cost of their meat is retail networks and even in the markets it is steadily going up. But in order not to be disappointed with the result of your efforts, you need to carefully prepare for this process.

Construction requirements
You should not be afraid that the work of erecting a chicken coop will be very difficult and overwhelming, as is sometimes believed for some reason. If you have a suitable set of materials, tools, free space and free time at the ready, no problems should arise. The construction of a chicken coop begins with determining the number of future inhabitants. In order to complete everything as clearly and competently as possible, it is worth consulting with those who have already built similar bird houses. Personal experience cannot be replaced by any general instructions.
When thinking about the design of a chicken coop, you need to take into account:
- protection from various types of predators;
- draft prevention;
- the possibility of illuminating the room in winter and when cloudy weather occurs;
- creation of high-quality thermal insulation;
- organization of powerful ventilation of the poultry house.


When determining the area, it is necessary to take into account both the area for the chicken coop itself and the area where the bird will stretch its legs. It is unacceptable to build a pen in a lowland, since there it will constantly get wet from precipitation and fog. But some elevation wouldn't hurt. But if it is not there or such a place cannot be used, a flat area will do. When calculating the required space, it is usually assumed that every 5 laying hens will require a minimum of 3 square meters. m.
For 3 birds or less, a pen with an area of 1 m2 is enough. These dimensions were not chosen by chance, since they allow the chickens to move fully. The more active these animals are, the more eggs you can get. Fenced areas for 5 birds should occupy 6-7 square meters. m. It is advisable to place walking areas and exits to it from the south.
These areas need to be protected from the piercing wind. To prevent the rain from dripping on the chickens, so that the sun does not burn, you need to equip a canopy. On level ground, an elevation is organized artificially; it is made by filling it with sand and crushed stone. Laying a layer of clay mixed with glass fragments on the mound helps prevent rodents from trying to get to the chicken coop.


From the very beginning, it is worth choosing the optimal approach to lighting the chicken coop - most often they place a door facing southeast.
The typical ceiling height is 2-2.2 m. This parameter provides the largest total air volume. When the window is located separately from the doors, it is placed at a height of 110-120 cm above the floor. In this case, the overall dimensions will be at least 50x50 cm. In summer, it will be easier to remove eggs if the nests are located in the outer part of the poultry house, and passages for chickens are prepared in the walls.
Each nest should occupy a minimum of 40x40 cm. When a frame structure is being built, there is no need for a concrete foundation. You can limit yourself to the embankment. But in this situation, you will have to raise the building above the surface of the embankment by about 30 cm or more. The vacated gap is covered with a chain-link mesh to prevent small predators from getting inside.


Kinds
Besides general requirements, you need to understand the types of chicken coops. Setting up a portable option is quite simple, and this solution is optimal for owners of small plots. It's also good for the chickens themselves, as it allows them to enjoy fresh grass. Most often, a mobile chicken coop is prepared in the form of a multi-tiered structure. The topmost “floor” is then made of wood, and a mesh is stretched below, which is equipped with a wooden door.
A more modern option, which is gradually gaining popularity, is equipped with a roof with a natural lawn. The natural environment is imitated as effectively as possible, and the birds are completely protected from the negative effects of the sun. It is recommended to move the house to a new location not at your own discretion, but approximately once every 4 hours. In addition, mobile designs differ much best view than most conventional bird houses.


Besides, portable chicken coop allows you to protect animals from predators, no matter where the chickens are at a particular moment. Additional benefit is the possibility of biological treatment of beds. Grazing chickens allows you to increase the aeration of the land. At the same time, it is guaranteed to be destroyed a large number of larvae and caterpillars. And the overall quality of the soil increases noticeably due to natural fertilizer.

But still, most people prefer full-fledged stationary chicken coops. They are divided into summer and winter groups. Inside a room designed to keep poultry during the cold season, not only the air must be warm, but also sufficiently dry. The best temperature when the bird feels great and lays a lot of eggs is from 15 to 23 degrees. Of course, it should be supported not at any specific point in time, but around the clock.

Therefore, a real chicken coop is always thoroughly insulated for winter. There should not be the slightest cracks in any surface. It is necessary to eliminate cold bridges. The winter poultry house must also be equipped with reliable lighting devices. Places for walking birds in the cold season must have a roof and be protected from the wind, no matter from which direction it blows.
If these requirements for the walking area are met, you can let the chickens outside even in fairly severe frosts. As for the structures that will be used in the summer, such capital buildings will not be required.
But the required elements still remain:
- the barn itself;
- feeding and drinking areas with appropriate facilities;
- a separate area where chickens can roam;
- nests;
- perch pole.


Often walks take place right under the house itself. In this case, it is raised above the surface of the earth. But no matter where the walk is, it requires certain lighting and dryness. A bird that goes out for a walk in a heavily shaded, damp area will become ill, or at least lose performance.

It is best when the selected area is in partial shade, which is created by trees or a special canopy.
If you are going to breed chickens on a large scale, prefabricated structures based on sandwich blocks are preferable. Such structures are characterized by a modular design. If required, they can always be increased for short term. Specially selected materials are not prone to rotting and corrosion processes. On personal plots, small prefabricated models based on high-quality wood are much more practical.


Projects
The formation of a project begins with drawing up drawings and studying photographs. You can also take ready-made drawings from standard projects. All dimensions and distances must be marked on the drawings; The doors always open towards the inside of the coop. Cleaning will be much easier.
During the design process, you need to find out how much is required:
- drinking bowl;
- places for feeding;
- roosts


They figure out in advance how to heat the chicken coop, how to light it and provide ventilation. Floors are formed from clay or earth. The design of the base depends solely on how large the load is from above. The design must take into account the insulation material used and its layer.
If necessary, do not deviate from standard schemes.
Place
Birds do not tolerate noise well. Therefore, it is necessary to remove the chicken barn as much as possible from all its sources. Most often, such sources are automobile and railways, industrial facilities. As already mentioned, you need to think about ensuring that the chosen site does not turn out to be a source of dampness. It is advisable to place the aviary in the same place as the poultry house itself.
The doors are oriented to the west or east. But for technical reasons, it is allowed to direct the windows strictly to the south. The minimum distance to a residential building should be 3 m. Of course, given the increased sanitary risks, the place where chickens are kept should be kept away from wells and other open bodies of water.


And one more thing - you need to provide a convenient approach for yourself in order to use the building without unnecessary difficulties.
Dimensions
With all the variety of designs for chicken pens, there are very clear requirements for their selection and use. Thus, structures that are close in shape to a rectangle or exactly correspond to it are oriented from east to west. The usual recommended proportion involves placing 2 chickens per 1 square meter. m. If this space is not provided, egg collection is reduced.
It is important to remember that the population will almost always grow over time. And therefore the need for free space also increases. The required area greatly depends on which adult birds or broiler chickens are planned to be kept. So, for the egg breed this figure is 4 adults. And for those who give, along with eggs, also meat - only 3.
In the vast majority of cases, private chicken coops are designed for 20 or 50 birds. 100 chickens or more are very rare in one place. For every 20 chickens, a minimum of 5 square meters is allocated. m of the main room, and with a walk or vestibule it turns out to be no less than 15 square meters. m. Any of the walls is made with a length of 300 cm. It is along this wall that the nests will be built, which are placed in 4 tiers.


The usual 5 nests will take up approximately 240 cm. In addition to this, you will need to leave a distance of about 0.3 m from the perimeter of the tiers to the walls. This gap greatly facilitates maintenance and subsequent disinfection. The minimum width of any chicken coop is 150 cm. The recommended dimensions change if a design for 50 heads is being considered.
In this option, the area of the main part of the chicken coop is at least 15 m2. The size of the enclosure is at least 20 m2. Nests are placed along walls at least 6 m long. The height of a large farm chicken coop is at least 2 m. This is necessary for convenience.


Materials
A chicken coop can be built:
- made of polycarbonate (it is used in roofing);
- made of wood;
- made of brick;
- from pallets;
- from cinder blocks;
- from shell rock;
- from foam blocks.


Foam concrete is considered one of optimal options. It is relatively easy to install products made from it; heat retention does not cause any problems. However, the high cost makes it very difficult to use foam blocks. The greatest savings are achieved through the use of wood. In rural areas, wooden chicken coops are very good and safe, and blend harmoniously into the surrounding landscapes.
But the weakness of the tree in this case is the careful implementation of fire safety standards. An intermediate option in terms of cost is the use of brick or slag concrete. However, brick chicken coops will certainly have to be insulated. The fairly widespread use of pallets is due to their availability and ease of use. Depending on the choice of builders, pallets are disassembled into individual parts or used as finished components.


The first option is more flexible, while the second allows you to save significant time. But a full-fledged pen for chickens based on pallets will only be possible as an extension to the main building. Below you will have to build a strong foundation on piles and a frame based on timber. If this rule is not followed, the structure turns out to be dangerous for birds.
To prevent the structure from collapsing under its own load, special supports are placed inside to take the main load.

Chicken coops based on pallets must have a frame and roof made of reliable materials. As a result, the total fee increases significantly. And in any case, the structure will need to be sheathed with boards and thoroughly insulated if you plan to keep the bird all year round. Taking into account the peculiarities of the construction, all pallets and other wooden structures must be treated with antiseptic mixtures.
A frame chicken coop based on pallets is built:
- knocking together the base and frame;
- forming a gable roof;
- covering the walls with clapboard or siding panels;
- hanging the door;
- covering the roof.


In most cases, pallets for construction purposes measuring 1.27 x 2.54 m are used. The roof can be made from the most different materials, the choice is made individually. We need to focus on the most cheap option, because there is still no significant difference in practical characteristics. Returning to the construction of walls, it is worth noting that shell rock is no worse than all the listed materials. A strip foundation is laid under the structure.
The shell rock itself is used in the form of masonry, which is held together with a combination of clay and sand. Next, the surface of the walls is plastered with a combination of sand and cement. This coating prevents clay from leaving the joints. Floors are most often formed from railway sleepers. But in this case, only old parts that are free of creosote are used.


Chicken coops made from cinder block or foam block are much warmer than those built from logs. In addition, these two materials have excellent fire resistance. Therefore, the reliability of buildings made of foam blocks turns out to be quite decent. It is recommended to use blocks whose grade is at least D400. In the European part of Russia, one concrete element is used, and in the Urals, Siberia and Far East requires laying in a couple of rows.
The logs in this case are formed from wood. But saving on the quality of tiles is unacceptable. The fact is that the passage of moisture will devalue all the advantages of chicken coops made of foam concrete. A mandatory point is the use of foundation waterproofing. It is advisable to glue foam concrete using special cement, which helps prevent freezing.


A classic frame pen is made on the basis of small-section timber. Sheathing the frame can be done not only with boards, but also with plywood sheets and other similar materials. The frame also needs to be sewn up from the inside. Steel mesh helps prevent small rodents from penetrating into the insulating material. Required condition when selecting it, the size of the cells is small.


When choosing a particular material, you should always take into account that each of them has positive and negative sides. And you can understand this topic more deeply if you take into account the characteristics of a specific part of the chicken coop.
The grillage is created from a wooden beam with a cross-section of 200x200 mm or from concrete of the M500 category. Wood is cheap and easy to use. However, concrete structures are characterized by increased reliability and durability.
The floor is made to match the type of base. The following are most often used over piles and pillars:
- edged boards;
- beam;
- cement particle boards.


Concrete floors with reinforcing materials are installed above the strip foundation. As for the selection of materials for walls, the main thing here is adaptation to the size of the building and the technology used. The easiest way is to use timber or oriented slabs. When timber or boards of large thickness (minimum 2.2 cm) are used, they are ideal for preparing a frame, which is later sheathed with oriented slabs on both sides. There are other materials and structures suitable for permanent walls.
The already mentioned shell rock has low thermal conductivity and is excellent for housing 25-30 chickens. A typical element of this kind has a rectangular shape, its size is 18x18x38 cm. The approach to work is approximately the same as that of a cinder block or foam block. The advantage of foam concrete is its environmental safety and suitability for the construction of chicken coops of any size. The classic option for construction is brick; it lasts a long time and transmits little heat, but is mainly intended for the construction of capital pens for 50 birds and more.


Whether to use a full-weight or hollow type of brick is up to the builders themselves to decide. When there is no special experience in poultry farming, it is best to use wooden beam and oriented strand boards. Later, the structure can be dismantled or its boundaries expanded by making a small extension. All permanent buildings, with rare exceptions, are made of brick and foam blocks.
As for insulation, they use:
- expanded clay;
- sawdust;
- dried hay.


These three options are the cheapest and most accessible. But there is also a significant difference. Thus, expanded clay is needed to form thermal protection in the ceiling and floor, and hay and sawdust are used to retain heat in the walls. Of synthetic materials, foam is often recommended, which has reduced thermal conductivity. In this regard, he is far ahead of the already described “natural trinity”.
Polystyrene foam also surpasses mineral wool and brick in its qualities. It is supplied as slabs of various sizes. You can install them without special labor on ceilings and walls.
To prevent rodent aggression, you need to cover foam-insulated walls with protective boards. Another option is mineral wool; it is slightly worse than polystyrene foam, but is of no interest to mice and rats.


Cotton insulating layers are often supplemented with membranes with reflective properties. These elements allow for increased protection against heat loss by radiation. Another option is stizol. This material is coated with a metal layer, thanks to which it retains heat better.
Stizol:
- resistant to water;
- mechanically strong;
- performed with various types of facial shell.


Extruded polystyrene foam has earned no less positive assessment from professionals. It is characterized by a closed structure created by cells made of foamed polystyrene. Its performance properties and service life are quite decent, as are its environmental characteristics. In terms of their properties, EPS boards are clearly better than mineral wool, polystyrene foam and other insulating elements.
When choosing an insulating material, attention should be paid to its price: even the best options, if they are too expensive, deprive the chicken coop of any meaning. In small structures, products based on foamed polyethylene are used. The best choice among them is stizol. But when you plan to house fifty or more chickens, you need to use special combinations. They allow you to save money by using in each place only such material that has a balanced ratio of quality and price.


Construction
The approach to building a chicken coop varies greatly depending on how it will be used. It is advisable to add wheels to structures that remain empty in winter. Such an improvised trailer can be easily moved to where it is really needed. As for geometry, the simplest pens for chickens can be made in the shape of a triangle or a semicircle. Already on the initial drawing you should mark where all the windows will be located, and in the future it is unreasonable to deviate from these decisions.


Foundation
Let's look at step-by-step instructions for building a frame chicken coop with your own hands. This is the most practical option compared to ordering construction services or purchasing a finished product. Execute necessary work Anyone who has at least minimal carpentry and carpentry skills can do it. Log houses and boxes made of foam blocks are much more difficult to build.
To build a foundation correctly, you need to consider:
- how severe floods can be;
- Is the groundwater high?
- direction of movement of rainwater.

If the ground is very saturated with water, you will have to use bored or wood piles. A pile type of support must also be made in the case when the enclosure is located below the main room. The terrain of the area is also taken into account. On loams, the solution is simpler - you need to organize liquid drainage over the surface, as well as install pillars. The site is marked using a building level, tape measure and special cords.
The standard layout grid is 100x100 cm. At key points, fertile soil is removed and miniature pits with sides 300x400 mm are dug. Such recesses are needed so that the pillars can be cast. Crushed stone and sand are poured into the base of the pits. Once this is done, the formwork must be installed.
It must be made in the form of a box made of plastic lining. The laid product is poured on top with a concrete solution. A pin or anchor bolt is placed on top. These parts allow you to secure the harness under the frame. When 24 hours have passed, the formwork must be removed and work on the walls must begin.


The pillar foundation must be tied with a 9x7 cm beam. These products are laid out on poles installed around the perimeter, the connection is made using the locking method “into half a tree”. In any case, it is necessary to strengthen the joints with metal overlays. Transverse beams are installed using a similar method. At the bottom, the timber frame is sheathed with clapboard; in addition, thick polyethylene is used for flooring.
When choosing a pillar foundation, the main supports are mounted along the outer boundary of the building. The choice of concrete mortar or foam blocks for construction depends on personal preference. Mount pile foundations inappropriate. All the same, such elements are needed for a heaving and easily moveable type of soil. It is strictly not recommended to build chicken coops in such places.


If, for some reason, there is no other choice, you should choose steel piles rather than wooden ones.
Even the most durable wood, impregnated with special compounds, openly succumbs to high humidity. And the likelihood that the ground will become wet is quite high, and sooner or later this will inevitably happen. The combined base, in which, along with piles, a grillage is used, allows you to build a foam block chicken coop. If reliability is critical, there are no options - only high-quality M500 concrete tape.

Walls
It is the construction of vertical supports that is considered the most difficult moment of construction work. The corner supports are installed first. In this case, a beam of increased thickness is used - 7x7 or 7x9 cm. The supports from below are attached with self-tapping screws to the timber frame. Next, you need to level the structure and secure it using struts.
When the placement of the racks is completed, apply horizontal strapping in the center. It is made from boards or small timber. A beam is used to connect the heads of the supports. It additionally acts as a mauerlat under a gable roof.
The intersections of parts of the beam at the corners need to be made stronger using:
- corners;
- steel overlay plates;
- metal brackets.


When the frame is assembled, its parts are connected using self-tapping screws, the length of which is 7 and 12 cm (according to the specific situation). All nodes used for joining must be supplemented with corners or a steel profile plate. The fastening itself is carried out using self-tapping screws for carpentry work, the length of which is 2.5-3 cm. The breaks in the vertical wall studs are provided in a checkerboard pattern with horizontal jumpers. Their goal is to increase the rigidity of the entire room.
An additional function of the jumpers is to reliably retain the insulating material and the vapor barrier. The outside walls and ceilings are covered with wooden clapboard. If you have available funds, you can use moisture-resistant varieties of oriented slabs. Professionals do not see any real differences between them. This completes the work of arranging the walls.
Sometimes the walls are assembled separately. When they are ready, these elements are immediately installed. In each wall you need to prepare holes for doors, windows and a box for collecting eggs. Having formed the openings, you need to fold the blanks and align them strictly according to the markings. It is necessary to knock down the walls so that there is no slightest distortion.


Roof
The formation of rafter complexes occurs most easily at the bottom, where there is more space for work and all parts are accessible. They begin work by cutting out 5 or 6 pairs of rafter legs. Next, you will need a well-thought-out template, according to which these structures are connected into arches of a triangular configuration. Once the individual arch is ready, it is raised to the desired position. Installation naturally proceeds from the front elements; they are attached to the rafter frame (temporarily) using board fastenings.
Therefore, it is necessary to carefully align the roof structure. Only after making sure that the given configuration is correct, do they use a ridge beam and struts to fix it. Then comes the turn of installing the sheathing. The last step is to form a water barrier from roofing felt and lay the face roofing covering. It is standard practice to clap the gables with high-quality clapboard.


Considering the inevitable contact of the roof with atmospheric moisture and precipitation, everything needs to be treated with antiseptic preparations. Additionally, fire retardant treatment is carried out. These substances can create bad odors. Therefore, before “moving” the birds there, they wait until the chicken coop is thoroughly dry in the sun. Hot rays will quickly remove all harmful components from it.
Floor
Particular attention should be paid to the construction of floors in chicken coops. It is no secret that they are subject to constant merciless influence. Therefore, it is necessary to use only reliable materials and ensure well-functioning sewage systems. You can reduce heat loss through the floor to a minimum by sprinkling it with sawdust and shavings. You also need to think in advance about how to ensure proper cleaning.
It is advisable to decorate the floor with boards 5 cm thick. The flooring is made in 2 layers, which are separated by insulation. The beam must have a cross-section of 100x100 mm. The exception is the lowest plank, which is 2.6 cm thick. It is very important to level the surface and clean it using a plane.


You need to make a rectangular recess at the base. This will allow the chickens to come in and out. Further movement occurs along an inclined ramp, which must be approved. It is imperative to protect the tree with a special mixture or lime, after which high-density litter is laid out. The covering layer is often formed from straw, crushed peat and sawdust with a total thickness of 50 mm.


How to heat?
This question is very important if you plan to receive eggs and meat all year round. In any case, it is irrational to use conventional ovens; this entails significant costs. A prerequisite for success is covering the walls with thick layers of insulating materials. Thanks to them, in winter it is possible to withstand temperatures of at least 15 degrees Celsius. Another important requirement is the use of additional frames in winter.
But all these points, as well as covering the attic floor with straw, only protect the existing heat. They cannot increase its quantity, and special techniques help solve this problem. It is best to install heaters on the ceiling above the perch. After all, this is where chickens congregate most during the colder months. Special heaters are used when the walls are made of bricks or concrete blocks.


To fully warm a large chicken coop all year round, you need to use several techniques. The roof is made in two layers. Structures made from logs are thoroughly caulked. Additional heating is carried out using powerful lamps or air heaters. The choice between them is largely determined by personal preference.
Heaters for chicken coops are mainly chosen as oil, infrared, or in the form of film-coated plates. Fastening is done in the same way on the ceiling. All other options can be considered only when the above schemes cannot be applied. Ceramic heating panels are similar to convectors, but the movement of air is forced. Therefore, high power fans have to be used.


With the help of an electric heater, warming up the chicken coop in a matter of minutes is not difficult. But there are also problems: both the system itself and the energy source are expensive. In addition, all installation work must be carried out very carefully, taking into account electrical safety requirements. It’s also bad that the air becomes too dry. And one more thing - air heaters, even their best models, make a lot of noise.
Oil heaters are much safer in terms of fire resistance and consume little energy. Such a system lasts much longer than a heater and does not irritate laying hens with extraneous sounds. Drying air and the appearance of bad odors are eliminated.
However, there are also serious weaknesses:
- the chicken coop will warm up only over a long period of time, and unevenly;
- there is a risk of oil release;
- The heating device is characterized by its large mass and minimal mobility.


The convector uses the convection effect and works due to the action of the heating element, therefore there is no need for additional elements that supply heat. Difficulties may arise from the fact that Electric Energy It doesn’t arrive everywhere without interruption.
It’s also worth considering that you can’t always get by with just one heater. And if the device turns off, the air will cool down in a short time.


Interior rules
The hole that the birds will use is usually placed on the south side of the shelter. Its width is from 3 cm. The height must be at least 4 cm. It is allowed to combine the manhole with the entrance door. Then it is cut out at the very bottom of the opening.
Products that provide birds with food are prepared with their own hands or purchased. Hopper-type feeders are made from pipes in which holes are prepared along the entire length. Such products should be mounted 150-200 mm from the floor. In this case, the bird will not have to rummage through the grain and scatter it around. But when the feeder is on the floor, it can cause the accumulation of dampness.
Structures that supply food are made of wooden slats or plastic containers. Experienced farmers use containers with sides with a height of 20 mm or more. In addition to this, a reservoir for sand or shell rock is formed. The chickens will continuously peck at the mixture. They need this to better digest food.


The apparent simplicity of arranging perches is deceptive. For their production, timber with dimensions of 0.2x0.2 m is used. If a round-shaped profile is used, its cross-section is most often 28 mm and its length is 220 mm. When thinking about arranging nests and putting the idea into practice, we must not forget that one bird requires 300-350 mm of space. Regardless of the breed of the animal, the height should be in the corridor from 50 to 70 cm.
Where exactly to place the perch cannot be decided in advance and for all occasions. Only the builders themselves know where there is sufficient free space. But for the sake of saving energy and the health of the birds themselves, it is necessary to prefer areas near windows.


As for the supports, most often these are boards 0.5 m long, fixed to the opposite walls of the chicken coop. You will have to install a pole, so you need to cut 30x30 mm recesses.
It is mechanically impractical to rely on a simple connection between the poles. It is necessary to attach it with nails or self-tapping screws. The distance between individual perches should not be less than 0.25 and more than 0.3 m. Further, although the chickens are winged, it will be easier for them to climb to the perch by installing a small wooden ladder. To avoid mistakes, you need to measure the required distance in advance.
The optimal type of nest is based on a partially open box. It is made of timber and sheathed on the outside with oriented particle boards. First of all, a frame is prepared, for which a 2x2 cm beam is used. To connect the workpieces together, it is recommended to take 3 cm long self-tapping screws and steel corners. All nests that will be raised upward must be equipped with legs from below.


A nest is considered spacious if it has a depth of 0.4 m. In this case, the height and width are at least 0.3 m. This “chicken cell” should definitely be lined with special bedding. It should be as soft as possible so that the bird feels comfortable and calm. Most often, each nest is designed for 4 hens.
All poles and other wooden parts of structures must be secured. Be sure to remove any deviations from the round shape with a plane. Any workpiece must be sanded using sandpaper. Even the slightest burrs are categorically unacceptable. To make the job easier, it is recommended to use shovel cuttings.
Selecting ready-made feeders in specialized stores is not so difficult. However, not all of them are equally valuable. The best options, judging by the experience of a large number of people, are those equipped with a dividing mesh. Chickens will be able to stick only their heads inside and not rake out the grain.


Having eaten, the chicken also needs to drink. Some poultry farmers use improvised drinking bowls from old pots and other unnecessary containers. There seems to be nothing wrong with this, but you will need to change the water very often. After all, the drinking bowl will constantly become clogged with droppings. There are two ways out - buy the desired product in a store or make it yourself from plastic bottles.


Ventilation
Natural ventilation (as well as lighting) is provided by doors and windows. However, constantly opening openings, thereby creating drafts, is very harmful for birds. That's why special designs are used. Ventilating a chicken coop through a draft means installing a draft pipe raised above the roof. The inflow pipe is placed in the opposite corner at a height of 200-300 mm above the floor; Due to the natural flow of air, this solution reduces humidity in the room.
Two spatially distributed ventilation ducts – best solution, which has been worked out for many decades. Ventilation holes are mainly prepared in the shape of a square. To get them, it is recommended to use an electric jigsaw. Typically, the second (outlet) holes are sawn identical in size to the input ones, but 400 mm lower.
Considering the significant intensity of the bad odor in the room where chickens are kept, it is advisable to use special fans.


Lighting
Lighting plays a big role in increasing the number of eggs. In summer this circumstance is not too important. However, most of the year in Russia is characterized by short daylight hours. Therefore, it is necessary to artificially increase its duration to 14 hours per day. As soon as the time for active molting comes, this time is reduced to 9 hours.
It is advisable to use lamps whose current consumption is 50 or 60 W. Such lamps are placed on top of the feeders. Sockets should be placed in a sealed shield. The best lamps are red or with fluorescent light sources. The generally accepted consumption rate is 5 W per 1 sq. m.


The advantage of red lamps is that they do not dry out the air: only those areas where the rays hit will become heated. But there are still more advanced elements - strips based on LEDs. They are much more economical and look more attractive - this is very important for the own mood of the chicken coop owners. Of course, you can combine all this: install a couple of fluorescent light bulbs and place a strip with a white backlight tone. Electrical wiring must be mounted in a corrugated plastic, and the electricity itself is supplied through a copper cable line.

Beautiful examples
A modern chicken coop is not just a utilitarian product, it must be elegant. Only careful integration into the design allows you to avoid emotional inconvenience. The photo below shows a small wooden chicken coop with a gable green roof. The attractive alternation of convex wooden parts and depressions makes appearance more original. And even the windows are not simple, but divided crosswise into 4 parts.

And here a more classic and balanced solution is shown. The developers were clearly inspired by pastoral landscapes and rural houses. That's why they preferred the characteristic style of the entrance, walls, and roofing made of metal tiles. The colors were chosen as calm as possible, even an imitation of a chimney was created. The part reserved for the enclosure is fenced with a net.

A simpler option is with two rectangular windows on the facade. The roof is raised above the wall, so this solution can be considered more suitable for summer. The top with one slope is directed back, which facilitates the outflow of rainwater.

This original approach is also worthy of attention - a chicken coop, complemented by a ladder. The size allows us to say that this is a structure for a small number of birds.

To learn how to make a chicken coop for 20 chickens with your own hands, see the following video.
It is no secret to many that the comfort of keeping affects the health of chickens, especially in winter. Comfort in a chicken coop is created by proper lighting, ventilation, sufficient space for walking, convenient location of nests, feeders and drinkers. All this together allows birds to lay eggs in more. Therefore, during the cold period it is necessary to build a warm room for chickens, the independent construction of which will not be difficult.
Is it really necessary to build a warm chicken coop?
From the end of autumn to the first month of spring, unfavorable conditions for chickens begin, which creates difficulties for poultry owners.
If in spring and summer period The chicken is active: it moves, digs in the ground, bathes in water, but in winter, due to many factors, its activity decreases.
The summer chicken coop does not require additional insulation and lighting
When temperatures drop and daylight hours shorten, birds' ability to lay eggs decreases or even stops completely. That’s why it’s so important to make a chicken coop that will provide:
- temperature level of at least 12 degrees and low humidity;
- artificial lighting - to increase daylight hours;
- the presence of low perches and egg-laying sites;
- the internal area of the room is 1 m2 for 1–7 individuals (depending on the breed).
Meeting these requirements will allow poultry to comfortably overwinter without losing weight and laying eggs daily.
A properly built chicken coop can significantly increase the egg production of birds.
Options for warm chicken coops for the winter
A standard chicken coop is a utility room, next to which there is a place for birds to walk.
The site has a fence made of chain-link mesh with cells small size, protecting chickens from predators. If the farm has no more than one and a half dozen birds, then this is an ideal option. It is possible to arrange a chicken coop with a greater level of comfort, with external and internal walking areas, but then it will take up a large area. This option is not suitable for small plots of land.
Winter chicken coop It is built on a foundation on which a thick wooden floor is laid, and the walking area is covered with a roof.
Considering the number of individuals, the following types of chicken coops are used:
- From 10 to 15 individuals - a mini-chicken coop up to 10 m2 with a walking area of 4 m2. Such an area will ensure free movement of both adult birds and young animals in the case of breeding chicks. It is also required to be equipped with a window and a ventilation grill.
The mini-chicken coop is equipped with a covered run and a box for collecting eggs.
- From 20 to 30 individuals - a full-fledged room up to 20 m2, a height of 1.8 m and a walking area of 6 m2. These dimensions allow you to build a perch in several tiers and install up to 7 nests. If the area of your personal plot is sufficient, then it is better to build a chicken coop with a vestibule: it will provide the required temperature in the main room in winter.
It is advisable to build a winter chicken coop with a vestibule to protect chickens from drafts
- More than 50 individuals - a room of about 40 2, up to 2 meters high and a walking area of 12 m 2. Such a chicken coop requires additional thermal insulation, ventilation and installation of heating equipment. It is better to place the perches opposite the windows, and the nests (up to 10 pieces) in the back of the room.
Large chicken coops are built on high stilts, and the walking area is made under the premises
If the area of the personal plot allows, then the chicken coop will be equipped in a completely enclosed room, inside of which there will be a walking area, which will prevent the birds from hypothermia and ensure their free movement even at low air temperatures in winter.
The winter poultry house can be completely enclosed, providing the chickens with a warm place to roam
When you need a chicken coop at minimal cost, there is an option to build it like a dugout. The height of the walls does not exceed 0.5 m, and for insulation they are covered with earth. The roof is also insulated. The southern wall is equipped with windows with multi-layer glass. And the fallen snow additionally provides thermal insulation.
Another low-cost option is a poultry house made using frame technology: from small-section timber, sheathed with plywood sheets, OSB, planed boards. Thermal insulation material is laid between them; its thickness depends on the climate. To protect against rodents, the insulation is covered with a metal mesh. This increases costs, but subsequently removing rodents is even more expensive. During construction, it is better to follow the rules for constructing frame houses.
In winter, it is mandatory to regulate the humidity level in the chicken coop, which is ensured by installing ventilation.
Video: fully autonomous warm poultry house on stilts (with bottom rung)
Material selection
The best option for a warm poultry house is wood. During frame construction, the timber is covered with dense rows of OSB sheets, hiding the cracks. When construction is carried out using brick or cinder block, good thermal insulation is necessary, since brick has high level thermal conductivity. What material will be used for the chicken coop depends on preferences and financial capabilities.
An insufficiently insulated roof will become a source of heat loss and increased humidity in the room, and the cost of heating the chicken coop will increase. For insulation, it is recommended to line the inside with foam plastic or felt. A permanent roof is made over the winter walking area - a continuation of the roof of the chicken coop itself.
For the winter period, it is preferable to have a chicken coop with a gable roof so that snow does not accumulate on it.
Wood is often used in the construction of poultry house walls due to its environmental friendliness and low thermal conductivity. Even if the frame is erected from metal, it is better to use plank cladding.
The metal frame is always sheathed with wood so that the desired temperature balance is maintained indoors in winter.
To facilitate constant cleaning inside the chicken coop, its floor is made by pouring concrete. The service life of such a floor is long, but it requires good thermal insulation so that the birds do not freeze. In winter, the wooden floor is additionally treated with special moisture-resistant compounds, and the top is covered with a thick layer of straw and hay bedding.
The floor in the chicken coop can be made of concrete, but be sure to cover it with a thick layer of straw
To give the entire structure of the chicken coop rigidity and strength, to avoid distortions of the walls and the appearance of gaps, as well as to raise the walls themselves above the ground, a light strip foundation is used. This also helps keep you warm in winter.
The following materials are used to build a main wall:
- Shell rock is a porous limestone of natural origin with a low level of thermal conductivity. Most suitable for building a chicken coop for 25–30 birds. Standard size the block is 18x18x38 cm. It is laid using the technology of laying foam blocks or cinder blocks.
Walls made of shell rock are erected quickly and retain heat well
- Foam concrete is a common material that is harmless to health. There are no restrictions on the size of the building. The optimal material for wall construction is D400 foam concrete, the block size of which is 20x30x60 centimeters. The thickness of the masonry is determined by the climate of the area.
You can build a chicken coop from foam concrete very quickly, following masonry technology
- Brick is a building material with a low level of thermal conductivity and is durable. It is optimal to build large chicken coops from brick. The brick can be either solid or hollow.
The brick walls of the chicken coop can be lined with boards from the inside
Taking into account the service life of the chicken coop, the material from which the walls will be built is determined. For the beginner poultry farmer best choice there will be wood and plywood. Over time, you can dismantle the structure or, conversely, add additional space. But if you are breeding a large number of poultry and building a chicken coop for a long time, then it is better to choose brick or foam concrete. You will also definitely need thermal insulation - foam sheets, mineral wool rolls or other modern material.
For the purpose of thermal insulation of the structure, natural insulating materials are also used: the walls are insulated with straw and hay, and the floor and ceiling are insulated with coarse expanded clay. There is only one negative side to the use of such insulation in comparison with modern materials- these insulation materials have high thermal conductivity, which requires their use in large quantities. And this is difficult when building a poultry house.
Detailed characteristics of modern building materials for thermal insulation:
- Polystyrene foam is a material with good insulating properties. Has a cellular structure. Thermal conductivity is only 0.047 W/mK, which is lower than that of foam concrete, brick and wool. Sold in sheets of different sizes. Easy to attach. Main disadvantage- susceptible to damage by rodents. To solve this problem, the foam is sheathed with sheets of plywood or OSB.
Polystyrene foam has good thermal insulation characteristics and is often used as wall insulation
- Mineral wool - has heat and sound insulation properties. It has a fibrous structure. Thermal conductivity is slightly greater than that of polystyrene foam, but it is not susceptible to damage by rodents. It is recommended to use in conjunction with waterproof and windproof film.
Mineral wool is resistant to damage by rodents, but absorbs moisture from the environment
- Extruded polystyrene foam is a material with a closed cellular structure, produced by polystyrene foaming. It has a long service life and excellent insulating characteristics. Its properties surpass almost all existing thermal insulation materials.
Expanded polystyrene has a long service life, but if used indoors for a long time, it causes harm to health through the respiratory system
- Stizol is a foamed polyethylene. It has high thermal insulation and sound insulation properties, is not susceptible to moisture, and is durable. Produced on the basis of metallized film, foil or non-woven fabric. The optimal thickness for use is about 1 mm.
Stizol is used in construction as sheet insulation.
When choosing insulation, it is important to consider how much area it will cover. If the structure is small, use stizol or any polyethylene foam material. For structures accommodating 50 or more birds, it is advisable to combine materials: if the wall is insulated with expanded polystyrene, then the floors are insulated with expanded clay. And when minimal construction costs are required, polystyrene foam and mineral wool are used.
When creating a project to build a chicken coop, you need to determine in what place the insulation will be installed: if it is planned as interior decoration, then when making calculations you need to increase the overall dimensions of the structure by the thickness of the material being laid.
Video: warm chicken coop with your own hands in 4 days
Preparatory work
The width of the foundation being laid should slightly exceed the thickness of the future wall. In this case, the wall is installed exactly in the center of the foundation. A concrete foundation will additionally provide thermal insulation and provide protection from:
- exposure to moisture on wooden structural elements, increasing the service life of the building;
- access to the chicken coop for predators and rodents, which can easily dig a hole underground.
There are other possible ways to protect against uninvited predators getting inside:
- make a foundation up to 30 cm high;
- place the structure on concrete pillars, raising the floor to a height of 25 cm from the ground;
- cover the walls with metal sheets, burying one edge of the sheet to a depth of 35 cm.
On the schematic image of the chicken coop you need to indicate the location of all parts of the building and internal equipment
During construction, it is imperative to install several windows on the south side of the chicken coop for natural light. But they should not be a source of draft.
Since in winter, chickens try to be as close to each other as possible, their placement is organized based on the rule: 1 m2 - for 4–7 individuals. If a meat breed is raised: 1 m 2 - for 3 individuals. For laying hens: 2.5 m2 - for 10 individuals. The height of the room is no more than 1.8 m.
The size of the chicken coop depends on the number of birds
To build a warm chicken coop yourself, you will need the following:
- poultry house design with precise drawings and dimensions;
- building materials for installing formwork and pouring the foundation;
- plumbing and construction tools;
- building materials for the construction of a bird house.
Video: tricks in building and arranging a winter chicken coop
Making your own chicken coop: step-by-step instructions
At the very beginning of construction, markings are made for the foundation (base) of the chicken coop using wooden pegs and a rope stretched between them. The foundation of the fencing of the walking area is carried out at the same time as the foundation of the chicken coop.
Base
Sequence of work:
- A trench is dug for the foundation. The structure of the chicken coop does not have much mass, so the foundation is made of strip or columnar to a depth of no more than 45 cm. However, the use of a columnar foundation will lead to high costs for thermal insulation of floors.
The foundation for a chicken coop can be strip or columnar.
- First, crushed stone and then sand are poured and compacted at the bottom of the trench, creating a so-called cushion (the thickness of the total layer should not exceed 5–10 cm).
- The formwork is being installed for pouring the foundation. The height of the formwork is equal to the height of the foundation. The upper edge of the formwork serves to level the poured concrete.
The foundation must be made according to all the rules so that it does not warp or crack after drying.
- Reinforcement is placed inside the formwork and tied at the corners with steel wire.
- Concrete is poured into the formwork, leveled over the surface until cement laitance forms and covered with film. It needs to be watered daily for a week to prevent cracks from appearing.
After 20–28 days, when the foundation has gained the required strength, you can begin constructing the chicken coop structure. A layer of waterproofing is laid on top of the foundation to protect the structure from moisture.
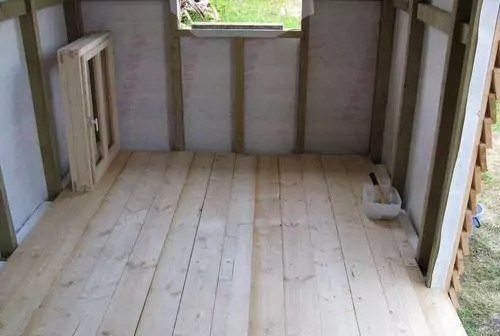
Floor
From the place above which the floor of the chicken coop will be located, the top layer of soil is removed, then sand is poured there and compacted, and a layer of expanded clay is laid as insulation. A mesh is rolled out over the expanded clay and a screed is made using cement mortar. The thickness of the floor screed should be at least 2 cm. For several days, while the screed hardens, you need to water it with water. It is recommended to make the screed with a slope of several degrees, which will ensure free flow of water when cleaning inside the chicken coop.
For comfortable living of chickens, the floors in the chicken coop are covered with boards.
The arrangement of the walking area is carried out in different ways: either it is poured with concrete or covered with boards.
Sawdust, straw, and hay are used as bedding. Usually, during the cold period, the litter does not change, and each time a new dry layer is poured on top of it. This results in natural heating of the floor due to warm droppings mixed with dry bedding.
Another option for arranging a walking area is to preserve the natural soil, which will allow the bird to look for insects, seeds and stones in the future.
You need to think in advance what kind of floor there will be in the bird walking area.
Frame
The sequence of work is as follows:

Roof
A sheathing made of unedged boards or sheets of plywood is nailed to the rafters. A special vapor barrier film or polyethylene is laid and secured along the sheathing. The film is spread in overlapping layers, and the seams are sealed with adhesive tape. Thermal insulation material (mineral wool board) is laid on it, and covered with waterproofing on top.
Most often, the roof of a chicken coop is made pitched due to the simplicity of its construction.
Next, through the waterproofing, transverse strips are nailed to the rafters with the required spacing, which depends on the type and size of the roofing material. If a soft roof is used, then plywood or OSB sheets must be laid on top of the slats, along which roofing material spreads. If slate is used, then wood cladding is not needed.
After completion of the roofing work, the frame and internal wall cladding are insulated.
Insulation of walls and floors
The work is carried out in the following sequence:

Polyurethane foam is also sometimes used as a thermal insulation material. But for its installation, specialists with equipment are involved, with the help of which this insulation is applied to the surface of the walls. The use of polyurethane foam is expensive, but the application process is not labor-intensive and provides maximum protection from the cold.
You can sheathe the outside of a winter chicken coop with edged boards or other facade material, except plastic, since it does not tolerate severe frosts well.
A concrete floor, even with an expanded clay cushion, does not ensure heat retention inside the chicken coop in winter. For this purpose, the floors are additionally insulated.
You can lay infrared film on the floor and use a cement mortar screed on it. This heating system operates both periodically and regularly, ensuring the desired temperature in the chicken coop. Or you can use a less expensive option: cover the floor with wooden panels. These shields are boards tightly fitted to each other, attached to the joists. In winter, plant litter up to 15 cm thick is laid on them to increase floor insulation, and in summer they are removed from the chicken coop, cleaned and disinfected.
The arrangement of the chicken coop should be such that the birds are comfortable both in winter and in summer.
Sometimes electric heating devices are placed on the walls inside the chicken coop, and the installation sites are protected with heat-resistant material. But more often infrared lamps are suspended from the ceiling.
Lighting
The design of the poultry house must have windows. Despite the fact that they are a source of heat loss, their presence cannot be abandoned, since the supply of sunlight is required to maintain the health of the birds. Therefore, triple glazing is built into the windows, and a mesh is installed on the glass for the safety of birds.
In winter, it is imperative to ensure that the daylight hours are at least 14 hours. This is done with the help of artificial lighting. And when installing an automatic on/off system, you get rid of the unnecessary hassle of maintenance, although you will spend additional money on it.
Lighting devices can serve as heating, but must be safe for birds
At first, individual individuals will roost for the night directly on the floor. This is not dangerous if the floor is insulated and covered with shavings or hay. Over time, the birds will get used to it and, at nightfall, will begin to move to their roost. But you can do it differently: wake up the birds early in the morning, turning on the lighting for this, and allow them to fall asleep at sunset.
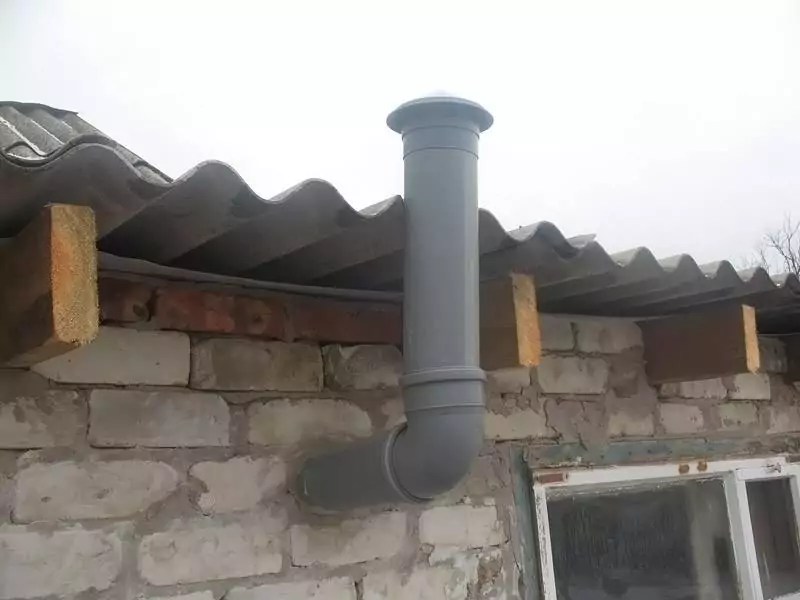
Ventilation
In a warm chicken coop, a ventilation device is required to remove excess moisture. To do this, a piece of plastic pipeline is installed in the ceiling, which rises 1 meter above the roof. This way ventilation will be carried out naturally due to the existing pressure difference. If the air flow is weak, then an additional channel is made at the floor level (far from the nests), which must be covered with a grille. And the damper installed on it will allow you to regulate the ventilation speed. You can also install an electric fan in the wall.
The ideal humidity level is 65%. A decrease or increase in this indicator negatively affects the activity and health of the bird. To increase humidity, it is enough to install a container with water, and to reduce it, install a hood and hang an infrared lamp: it dries surfaces well.
The chicken coop must be equipped with ventilation so that the birds do not get cold from rising humidity.
Making perches
The perch is made of timber with a cross-section of approximately 4x4 cm or 6x4 cm.
All corners are ground into a rounded shape, and the surface is cleaned to a smooth state so that the birds do not injure their paws. You can also use a tree branch as a perch.
If several perches are installed, then the distance between adjacent planks should be about 30 cm in width and 20 cm in height. For convenience, a small ladder is attached to the lower perch.
Perches are mounted either between two walls, or in the form of a ladder installed across the room
To install perches, you must:
- Determine the location and height of the perch - attach one or more planks near the window at a height of 0.5–0.7 m from the floor level.
- Measure the width of the chicken coop and cut it required amount timber.
- On opposite walls, nail 0.5 m pieces of board with cut grooves for perches.
- Place perches in the grooves and secure with self-tapping screws.
Nests for laying eggs are made in the form of a semi-open box assembled from timber, boards or plywood. And sometimes ready-made plastic boxes are used as nests. If the nests rise to a certain height, then they are mounted on supports.
A ladder is provided to the nests for ease of movement of birds.
Video: do-it-yourself warm chicken coop
Tips for setting up a chicken coop in cellars or basements
There are some features of arranging a chicken coop in the basement:
- Use of bedding - sawdust or hay is used. The sawdust bedding is replaced once every 6–7 days, and the hay bedding – once every 3–4 days.
- Lighting - an electric lamp with LEDs with a power of more than 5 W is mounted. Using a lamp, the required length of daylight hours is ensured: the longer it is, the more chickens will lay eggs.
- Insulation - use cotton wool or any roll insulation with a thickness of at least 5 cm. The use of a waterproofing film is mandatory.
- Ventilation - intake and exhaust ducts are installed. Direct ventilation of the premises is carried out periodically.
- Internal arrangement - the nests are made of timber covered with plywood. One nest is used for several chickens and is approximately 40x40 cm. The perches are attached at a height of at least 50 centimeters. It is allowed to connect the perch and nest by placing a board between them.
There are certain rules for arranging a winter chicken coop that must be followed.
Care after winter: how to treat walls
Sanitation of the poultry house is carried out annually with the onset of warm weather. This prevents the spread of infectious diseases among chickens.
During disinfection the following is carried out:
- Cleaning - all surfaces of the walls, ceiling, floor, perches and nests are cleaned of dirt with a stiff brush and broom, and then washed with a solution of soda ash in hot water.
- Surface treatment - special means are used (two percent solution of caustic soda or four percent xylonaftha emulsion). When preparing solutions, you must strictly adhere to the recipe and be sure to use personal protective equipment.
After treatment, allow the chicken coop to dry completely for 5-6 hours, thoroughly ventilating the room.
There is always an opportunity to work on decorating the chicken coop
Construction of a chicken coop is a simple task and can be completely solved independently, without involving the services of third-party specialists. You just need to study it well these instructions, and also read the advice of other people involved in poultry breeding.
Many owners breed poultry. Most the best option- these are chickens. They are undemanding in terms of living conditions, but it is necessary to build good chicken coop. For a small family, it is enough to have 10 laying hens. To do this, you will need to make a chicken coop with your own hands for 10 chickens. Drawings and detailed instructions will help you build a quality structure.
You can make a beautiful and spacious chicken coop yourself
Read in the article
How to make a chicken coop with your own hands for 10 chickens: drawings and requirements
To get started construction work, you should familiarize yourself with the basic requirements for such a structure:
- placement of the building. A rectangular chicken coop should be placed from east to west. Chickens lay eggs better if there is enough daylight, so windows should face south;
- When creating a warm chicken coop with your own hands, it is worth remembering that the room should not be hot, since at temperatures above 25 degrees the chickens will not lay eggs. But even in winter it is necessary to create warmth. In cold weather you will also need a structure. The temperature must be at least 12 degrees;
- it is better to locate the building away from noisy places;
- high humidity can cause poultry diseases, so ventilation is necessary;
- The dimensions of the room are selected taking into account the fact that two chickens can be accommodated per square meter. In cramped conditions, chickens lay eggs worse.
Helpful advice! When designing a poultry house, you need to take into account that over time the number of individuals may increase and more space will be required.

When arranging a room, it is worth equipping the windows with shutters made of, and for walking, provide an area under a tree or under.
chicken coop cage
Features of chicken coop design
Drawings and photos will help you create a competent project for a chicken coop with your own hands. It is important to choose the right size of the building, which depends on the planned number of birds. The type of structure depends on how many birds will live in it and on the types of materials.

When designing, it is worth planning to open the door inward, and the floor should be arranged with a slope towards the entrance. This will make the cleaning process easier. Worth considering interior design premises. There must be a sufficient number of drinking bowls and perches. For such a structure it is worth considering heating, lighting, etc.
Features of installing the simplest chicken coop at the dacha with your own hands: stages of construction and photos
When deciding how to make a chicken coop with your own hands, you should familiarize yourself with the main stages of installation.
The table shows the main steps in constructing a simple poultry house.
| Image | Stages |
 | Construction (only for structures with large livestock) |
 | |
 | Selection and installation of flooring |
 | |
 |
You can build a chicken coop from scrap materials. To save money, you can use the room without construction or use a base on posts, for which leftovers or cobblestones will do. The floor can be made of adobe or earthen, and the roof is made of durable plastic, tin or remnants of slate.

Nuances of creating a foundation
For a do-it-yourself chicken coop for 20 chickens, a photo of which can be seen in this review, you will need a more durable one. Depending on its type: or columnar - you will need a concrete mixture, a composition of or.

The foundation is erected in accordance with certain rules:
- the area is cleared and the top layer of soil is removed, about 25-55 cm;
- Sand and gravel are used as a cushion;
- the formwork is made of boards, its width is 25 cm;
- rods are used for;
- Concrete grade M300 is used.

Construction of the building can begin after the concrete mass has hardened. It is worth considering that the size of the site should be equal to the dimensions of the future chicken coop.
To create a columnar base, you will need markings, which are done using metal rods and rope. Then, cabinets are installed around the perimeter, which are placed at a distance of a meter. In this case, the supports should protrude 25-30 cm from the ground. They are strengthened with cement mortar bricks.
Chicken coop walls
When building a chicken coop with your own hands for 10 chickens, you need to prepare drawings of the walls. Wood is in demand as a raw material for walls. They are used for cladding walls. In this case, the joints must be thermally insulated. In addition to boards, you can use plywood or clapboard. Adobe brick is considered a good material. The combination of straw and clay allows you to retain heat.

Installed according to the standard pattern. As insulation to separate the foundation and beams, roofing material is used, which is laid in two layers. Floor joists are also made of timber, which is laid edgewise. In this case, voids and cracks are sealed with remnants of timber and flax-jute fiber.

Roof, ceiling and floor of the building
To create a winter chicken coop with your own hands for 10-20 chickens, high-quality floors and roofing are of great importance.

The arrangement has some features:
- it is better to use a gable roof, which will protect against the accumulation of moisture and snow;
- coating material: roofing felt or slate;
- thermal insulation is performed using mineral wool or.
In a gable roof, you can build a small attic where you can store bedding for chickens and feed. After installing the ceiling beams, the ceiling covering is laid. In this case, boards are used, and expanded clay and coal slag are used for insulation.

When building a chicken coop you need to do well. If they freeze, the room will be cold. It is recommended to use thick boards for the floor. First, untreated boards are laid, then a layer of vapor barrier material is laid, and treated boards are placed on top.
Note! When arranging a pitched roof, it is necessary to ensure that the slope does not point towards the poultry walking area.

How to make ventilation for a chicken coop for 20 chickens with your own hands: drawings
Particular attention should be paid to a do-it-yourself chicken coop. The ventilation device is responsible for supplying fresh air. This is especially important in the cold season, since birds are rarely outdoors. A budget and simple option is natural ventilation, which consists of ventilating the building. In this case, the exhaust window should be small and located on the ceiling or above the door. Such a scheme has many disadvantages, since along with air masses Warmth will also leave the room. At the same time, heating will require a large amount of resources.
A more reliable option is an exhaust system. It makes sense to install it if there are at least 20 chickens in the chicken coop. You can build such a structure with your own hands:
- two holes are made for pipes; the entrance for air passage should be located away from the perches;
- Instead of a pipe, you can make special wooden boxes, but they need to be painted and;
- pipes for supplying fresh air are located at a distance of 35-40 cm from the roof, and the pipe for exhaust rises 1.5 meters above the roof;
- To protect against precipitation, the upper ends of the pipes are equipped with small umbrellas.

For uniform circulation, it is better to place pipes on opposite sides of the room. In this case, it is used, which is mounted in the window. You need to turn on such a system manually. There are also special sensors that allow you to control the humidity in the room.

How to arrange a chicken coop inside?
After completion of the main work, the interior of the room is arranged. The construction of comfortable perches is of great importance. In this case, the length of the perches and their number are calculated. These elements are best made from . The perches are ground to a rounded shape so that the chickens do not get injured. Perches should be installed at a height of 65-75 cm, and 55-65 cm should remain between perches. It is recommended to place special pallets or trays under the perches. This will make the cleaning process easier. It is better to make the perches removable to make sanitization convenient.

It is worth equipping nests in the form of boxes, which should be darkened. They are installed in a separate place, and the drawers are covered from above. A separate entrance is recommended for changing bedding and collecting eggs.

Another important element is the feeders. They can be made of wood and installed on a small hill. Bedding is made of peat, straw or sawdust. They come in different depths. When soiled, deeper bedding is dug up. In addition, bedding is optional for the chicken coop in winter.

Lighting Features
Good food ensures the growth and physiological development of birds. You can create a well-equipped and lit chicken coop with your own hands for 10 chickens: drawings, detailed diagrams and photos will help you do this. High-quality lighting affects the following parameters:
- number, size, density and weight of eggs;
- chick development;
- digestibility of consumed feed;
- periods of egg laying and their duration.
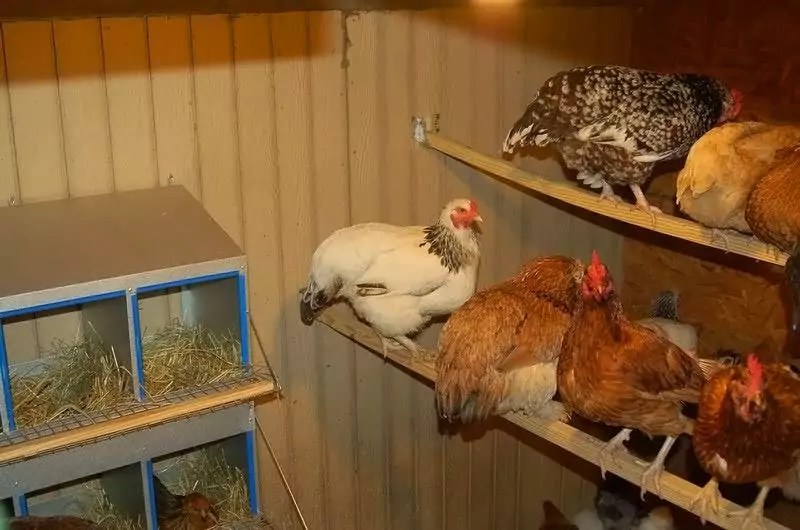
When planning a lighting system, you need to know some features. Chickens do not see well in the dark, so in the evening, do not turn off all the lamps at once. When all the birds are settled on the perches, you need to turn off the remaining lamps.
For hatched chicks, lighting with a brightness of 35-45 lux is required. Then, as the bird grows, the light intensity gradually decreases to 6-8 lux. An adult bird will need a light of 10 lux.
A device for smooth switching on of the light is recommended, since if the light is turned off abruptly, the bird may become frightened. This is especially true for breeds that are bred to produce eggs. Chickens should also be accustomed to the dark from the third day of life, so that if the lights go out, the birds will not trample each other.
Helpful advice! If birds behave aggressively and pluck each other's feathers, then a reduced lighting intensity can solve this problem.

Heating
Before choosing, you need to take care of the insulation of the fences. There should be no drafts in the poultry house, so if the walls and roof are blown, they will not help.

It is worth insulating doors and windows, since most of the heat escapes through these openings. It is also worth building a deep litter. This design consists of a layer of slaked lime and 10 cm of shavings, sawdust and straw. Natural heat-insulating materials are also used: peat, foliage and even manure. Natural composting allows heat to be released.

If you approach the construction of a chicken coop responsibly, then this building can be made cozy and reliable. Using inexpensive materials, you can create a high-quality and well-equipped house for birds.
Different buildings are possible - the design depends on the number of inhabitants, time of use ( summer season or all year), terrain conditions, available materials. It is important to draw up detailed drawings - they will help you not forget anything and will reduce construction time.
How to build a chicken coop with your own hands
To properly build a poultry house, it is important to meet a number of conditions.
Requirements for a home barn for chickens
- Temperature. In winter, thermal insulation and heating are required; the ideal temperature for this season is 12 C°. In addition, the room should not be ventilated, as drafts are dangerous for birds. In the summer, the chicken coop should not be hotter than 25 C°, otherwise egg production will drop by half. At 30 C°, chickens will not lay eggs. When setting up a chicken coop, it is worth putting shutters on the plywood windows, and providing a run in the shade of a tree or building or under a canopy. Polycarbonate is one of the most affordable and simple materials that can be used for a canopy. Find out how to choose a polycarbonate greenhouse.
- Dryness. High humidity, especially during cold weather, can lead to illness in chickens. For large buildings, the problem can be solved by making small barred windows opposite the main ones. It is possible to install ventilation in the form of two wooden boxes at different ends. Another option is two pipes, under the roof and at a distance of 30-35 cm from it. Both boxes and roofs must have dampers that allow air flow to be regulated. What a wooden children's house for a summer cottage is is described.
- Light. Affects the egg production of birds. Light is important for chicken egg production, so you will have to equip the room with warm yellow lamps (preferably with shades - for fire safety). You can install a relay that turns on the lighting. It is important to place all equipment and wires out of reach of the bird. Windows are especially important in winter. Place windows behind a layer of metal mesh or wooden bars to prevent chickens from breaking them. Feeders and drinkers require better lighting. The chicken coop yard can be equipped.
- Peace. For the bird to feel safe, there should be no sources of strong noise around. The chicken coop should be built at the far end of the yard, where people and animals usually do not go. You can place the room behind a hedge, which gives the bird protection from the wind, shade and food in the form of insects.
- Protection from predators. Uninvited guests entering a room with chickens will probably harm the birds or spoil the eggs. Rodents are carriers of diseases dangerous to chickens. Under the foundation or walls it is worth sketching sharp metal fragments, wires, glass. They can also be used to strew the ground under the floor, if it is not earthen. In the absence of a foundation, the bottom of the walls is covered with tin.
To secure the chicken coop, lower the foundation or metal mesh 30 cm into the ground (the mesh, filled with a special solution, can be located below the foundation).
How to properly build a chicken coop in the country
Construction materials
- The foundation will require concrete or cement and brick, depending on the type (strip or column).
- The timber is used to construct the frame; walls made of timber are possible. You can also build a log chicken coop. Brick, foam and cinder blocks, and adobe are also used for walls. The latter is preferable and retains heat on a par with logs and beams. Read also about making a brick tandoor with your own hands.
- Boards for cladding.
- Insulation can be used for walls, located between two layers of boards. In this case, protection from rodents is mandatory. Moss or jute is needed to caulk cracks in a log chicken coop.
- Sheet plywood is suitable for lining the inside of a room and building nests.
- Ruberoid, metal tiles, slate, tin, etc. go to the roof. Two layers of roofing felt are laid between the foundation and the first crown of the walls to protect them from rotting (wooden).
- Nails and screws.
- Metal fastenings and mesh.
Calculations and dimensions
Immediately provide a place for feeders, drinkers, nests, boxes of sand (needed so that the chickens can maintain hygiene by lying in it) - all this reduces the free space for the bird. 
- For 2-4 birds, an area of 1 m² is comfortable (meat breeds require more space). On the roost, one chicken occupies about 30 cm; in winter this distance is less.
- There should be at least 40 cm between adjacent poles, 30 cm between the perch and the wall. The height of the poles is 50 cm.
- The room should not be lower than 1.8 meters. This height will allow the owner to freely enter the chicken coop. The run is built at a minimum of 1-3 m² per bird.
- Nests can be made measuring 30x30x40 cm (40 cm depth). They are placed 40 cm from the floor. For ten chickens you need 3-4 nests.
Please note that a separate nook must be provided for keeping chickens in the chicken coop. It is better to separate young animals and adults.
Drawings for winter (warm) and summer
SNiP 30-02-97 standards that you need to rely on when calculating the size of the chicken coop:
- on one summer cottage You can keep no more than 40 birds.
- The minimum distance from the chicken coop to the border of the territory is 4 meters.
- if the building is adjacent to the house, it must have a separate entrance at least 7 m from the door to the living space. You can also install .
- the project must be coordinated with the architectural commission - this will avoid complaints and proceedings in the future.
In the village, if chickens are kept for personal use, there are no requirements– local government rules apply.
How to make a doghouse will tell you.
Location
- Movement is important for chickens, their egg production and weight gain, so it makes sense to build a mesh-fenced enclosure adjacent to the chicken coop if there is no other area for the birds to move freely. It is also useful to take into account a possible increase in the number of livestock in advance. We also recommend that you familiarize yourself with the construction of a children's playground for a summer residence.
- The chicken coop should be built on a hill, and drainage ditches should be dug around it. Right choice space will ensure both the dryness of the room and the ability to release chickens into the enclosure without waiting for the snow to melt in the lowlands or the mud to dry. And the tree will rot less. The elevation can be filled independently from gravel, crushed stone, etc.
- A rectangular chicken coop should be positioned from west to east with windows on the south side for the best lighting. From the south, a door, a hole and an aviary are built - for protection from cold winds. The walls on the windward side must be solid and not blown through.

Perches and floor
- The perches are made of 4x6 cm timber with rounded edges. The bird should not injure its paws while sitting on them. Please note that on perches that are too small and completely round, it is more difficult for chickens to stay on.
- You should not place the bars at different levels - the lower ones will be empty, and droppings will fall on the chickens remaining on them. It is better to make the perches removable - for sanitation.
- Sawdust, straw, and peat are very suitable for bedding. The litter can be deep (50-100 cm) or shallow. The first one is simply dug up when it gets dirty, the second one is changed as soon as it becomes wet. Litter is an additional insulation for.
The floor is made of two layers of boards, between which there will be insulation. This provides protection from freezing and blowing. A 100x100 mm beam and a 25 mm thick bottom board are used. There is bedding on top. Pay attention to how to make cleaning the chicken coop easier. You can make the floor sloping or place pallets under perches. The perch should be comfortable for the chickens, and it is better that it is removable for easy cleaning.
Nests, drinkers and feeders
- in order for the bird to fly well, they must be secluded and darkened;
- there should be bedding inside;
- nests are made in the form of boxes, closed at the top - the bird should not sit on their edges, otherwise the eggs will end up in the droppings.
The dimensions of a chicken coop for 10 chickens are outlined.
It is very convenient to equip the nests with a separate lockable entrance for collecting eggs and changing the litter.
- It is logical to place feeders and drinking bowls in a place that is easily accessible for both the chickens and the owner;
- Feeders and drinkers should be installed at the height of the bird’s back - this way she will have to stretch her neck, but she will not be able to scatter food on the floor with her paws;
- There should be enough feeders and drinkers so that all the chickens can eat at the same time. This will ensure equal development of the bird.
Cheap chicken coop made from scrap materials
It’s easy to build a chicken coop using what you have on hand. The costs in this case will be minimal. Some materials can be reused or asked from neighbors who do not need them.
- quite suitable for chickens even in a room without a foundation;
- a cheap foundation on pillars, in which you can use the remains of old brick;
- Various cobblestones, etc. are also suitable;
- the floor can be earthen or adobe, made of several layers of rich clay. This will reduce the cost of floorboards;
- Remnants of slate, tin, and durable plastic are used for the roof;
- The walls can be covered with any boards that are found on the farm. For example, material from an old fence, removed and left idle, would also be suitable.

How to insulate a chicken room
If you plan to keep birds year-round, you need to consider some features. In the case of a winter chicken coop, a large size can lead to big problems. To maintain warmth, birds huddle together, taking up not much space on the perches. But it is not so easy to heat a large room; the costs of thermal insulation will also be high.
- it is necessary to cover the walls with a layer of heat-insulating material to maintain the room temperature at 15 degrees;
- The log chicken coop must be carefully caulked. The floor can be covered with deep litter;
- Second frames are installed in the windows for the winter period, which are removed in the summer;
- it is recommended to make the roof under which warm air collects two layers;
- if the chicken coop has an attic, its floor should be covered with a layer of straw or sawdust;
- the vestibule in front of the door or manhole will not allow cold air to penetrate directly into the chicken coop;
- For heating, powerful lamps or a heater that meets safety requirements are suitable.
Video
The video will tell you how to properly build a chicken coop with your own hands using scrap materials and imagination.
It is possible that you may need to know how to build.
Various chicken coop projects photos
Building a chicken coop with your own hands is not at all difficult, just carefully study the materials on this topic and find a suitable project.
We invite you to look at a selection of photographs that will help you build an interesting chicken coop for your household. yard
Read about how to make a cage for rabbits.

A good-quality chicken coop that is easy to build with your own hands

Chicken coop with closed range, suitable for small areas

A winter chicken coop with an enclosed range is an excellent option for our winters

A chicken coop can also be an interesting decoration for a household yard
As you can see, building a chicken coop is not so difficult if you approach this matter creatively and with imagination. Surely there will be suitable materials on your site to build a comfortable house for poultry.