Retail accounting in 1s. Accounting for trade operations in NTT. Sales in manual retail outlets
Step-by-step instruction how to reflect transactions retail in 1C 8.3 "Enterprise Accounting 3.0".
NTT include trade objects in which it is not possible to install a computer or establish a connection with common base data. This is, for example, a stall, or away trade.
Receipt of goods to the organization
As a rule, before entering a retail warehouse or NTT warehouse, the goods are delivered to a wholesale warehouse. It is processed at the wholesale warehouse and then moved to retail.
Let's give an example of filling out a 1C document so that further actions are clear:
Setting item prices in 1C for retail
After receipt, you need to set retail prices for goods in 1C. For this purpose, use the document “Setting item prices“. It is entered in the “Warehouse” section. Let's create a document based on the receipt document. Let’s go to the previously created goods receipt document and click the “Create based on” button. In the drop-down list, select the item “Set item prices”.
A new document window will open, where the basic details will already be filled in; all that remains is to indicate the price type. In order not to return to this section, we will create two such documents at once, where we will assign prices for the “Retail” and “Retail price” types. We will make the prices the same. Here is an example document:

By clicking the “Change” button, special options for manipulating the price are also available. For example, increase or decrease by a specified percentage.
Transfer of goods from wholesale to retail warehouse
Now you can move goods from a wholesale warehouse to retail. To do this, the program uses the document “Movement of Goods”. It is located in the “Warehouses” section.
Before making a move, you need to create two warehouses - one with the “Retail” warehouse type, the second with the “Manual retail outlet” attribute.
Warehouses are created in the section “Directories” – “Warehouses”.
Let's call the first warehouse “Store No. 2”, the type of warehouse is “Retail store”. We select the price type from the directory “Item Price Types”:

Let the second one be called “ Shopping room" “Warehouse type” – “Manual retail outlet”, Price type “Retail”, product group – “Products”.
We will also create two 1C 8.3 documents: transfer to warehouses “Store No. 2” and “Trading Hall”. We will also create documents based on the goods receipt document. In this case, we only have to fill in the details “Warehouse – recipient” and the quantity of goods:

As a result, the product has a price and is in retail warehouses. You can start registering the sale of goods.
Retail sales report in 1C for a store
To reflect the sale of goods in retail, you will need the document “Report on Retail Sales” from the “Sales” section. First, we will issue a sales document from the retail warehouse. It is not much different from the document “Implementation (acts, invoices). The only difference is that the counterparty is not indicated, and the proceeds from the sale can be immediately reflected.
To do this, select a cash register account. For analytics in 1C, you can also fill in the “DDS Movement” attribute. This will be a subaccount for the cash register account. Example document:

Sales of goods in NTT
When selling goods at a manual point of sale at the end of the shift, we do not know how many goods have been sold. But we know how much was moved from the wholesale warehouse. How to fill out a report on retail sales in 1C 8.3 (8.2) in this case?
Accordingly, 20 packages were sold.
To reflect this calculation in the program, you must use the document “Inventory of goods” (section “Warehouse”).
In the header of the document we indicate the organization and warehouse of NTT.
In the tabular part, we add items and indicate the actual balance in the warehouse. You can use the "Fill" button. Deviation from the accounting quantity will be the sale:

We post the document and click the “Create based on” button. Select “Retail Sales Report” from the drop-down list. A new document will be created reflecting the sale of goods in NTT

Reflection of revenue from retail trade in 1C
For now, we’ll just write it down, since the document won’t be processed at the moment. The point is that you also need to reflect the receipt of retail revenue in the “Bank and Cash Office” section. Here is an example document:

Now you can post the “Retail Sales Report” document.
Based on materials from: programmist1s.ru
Reflection in retail sales accounting is one of the most common transactions in trade. Retail sales in 1C 8.3 Accounting are accounted for using a special document - a retail sales report. Filling out this report can be automated, or you can generate it manually. Read this article on how to fill out a retail sales report in 1C 8.3.
When selling goods at retail, several transactions must be reflected in accounting:
- Admission Money from the buyer (cash or non-cash);
- Reflection of revenue on the credit of account 90;
- Write-off of cost of goods sold.
In 1C 8.3 Accounting there is a special document that forms these operations - a retail sales report. There are two ways to create it:
- In automated mode
- IN manual mode
If a store has equipment and software that records all product movements online, then such a retail outlet is considered automated. In this case, using special 1C software, you can automatically generate a report on retail sales in 1C 8.3.
If the store does not have equipment for detailed accounting of sales, then such a retail outlet is considered non-automated. The report on retail sales in such cases is done manually or based on inventory. As a rule, non-automated points are trays, kiosks and small shops.
In 1C 8.3 Accounting in the “Warehouse” directory, for each retail outlet you need to select one of two types of warehouses:
- Retail store;
- Manual point of sale.
For stores with automated accounting, choose the first type of warehouse. For other points of sale, select the value “Manual point of sale”.
How to make the necessary settings in 1C 8.3 Accounting in a few steps and fill out a report on retail sales, read in this article.
Quick transfer of accounting to BukhSoftStep 1. Set up 1C 8.3 Accounting for retail trade
To account for retail in 1C 8.3 Accounting, you need to make some settings. To do this, go to the “Administration” section (1) and click on the “Functionality” link (2).
In the window that opens, go to the “Trade” tab (3) and check the box next to “Retail” (4). If necessary, also check the boxes next to the words “Gift Certificates” (5) and “ Alcohol products"(6). Now the 1C 8.3 Accounting program is ready for retail accounting.

In retail, there are two ways to account for product valuation:
- By purchase price;
- At sales price, using account 42 “Trade margin”.
It is necessary to establish one of the methods in the accounting policy of the organization. To do this, go to the “Main” section (7) and click on the “Accounting Policy” link (8).

In the window that opens, indicate your organization (9) and select one of the assessment methods:
- “At acquisition cost” (10);
- “At sale price” (11).

The necessary settings have been made, and you can begin recording retail transactions.
Step 2. Create a report for a manual point of sale manually
If your store is not equipped automated system accounting for sales, then you can generate a report on retail sales in 1C 8.3 Accounting manually. To do this, go to the “Sales” section (1) and click on the “Retail Sales Reports” link (2).

In the window that opens, you see a list of previously created documents. Click the “Report” button (3) and select the “Manual point of sale” link (4). A form for creating a document will open.

In the window that opens, specify:
- Formation date (5). If the report is generated over several days, put the last date of the period;
- Your organization (6);
- Warehouse (Retail outlet) (7). A separate warehouse is created for each point. We remind you that the warehouse type in this case should be “Manual retail outlet”;
- DDS article (8). Select the value “Retail revenue” from the directory.
In the product section, fill in:
- Sold item (9);
- Its quantity (10);
- Selling price (11);
- VAT rate (12).
To conduct, click the “Post and close” button (13). The document will be posted only if cash receipt orders or payment card transactions are created during the reporting period. Moreover, the amount in the report must match the amount of payments at the cash register and card transactions. If the amount of payments for the reporting period is 140,000-00 rubles, and the amount of goods sold in the sales report is 145,000-00 rubles, then when posting the document there will be an error message: “Available retail revenue for sales: 140,000, required: 145,000. Missing the proceeds must first be capitalized using the Cash Receipt document.”

The document now appears in the general list of reports. When it is carried out in accounting 1C 8.3 Accounting, entries are generated to write off the cost of goods sold. Also, postings are created on the off-balance sheet accounts of RV “Retail Revenue” and postings for adjusting revenue in account 90 “Revenue” (postings on total amount and new ones are formed, broken down by nomenclature and quantity).
Step 3: Create an Inventory Report
A report on sales at a manual point of sale can be created from an inventory document. This document automatically calculates the accounting quantity of goods on the inventory date. It also manually indicates the actual quantity of goods identified as a result of the recalculation. The difference between the accounting and actual quantities of goods will be transferred to the retail sales report. Next, read how to create such a report in 1C 8.3 Accounting.
Create an inventory of goods in 1C 8.3
Go to the “Warehouse” section (1) and click on the “Goods Inventory” link (2). A window with previously created inventories will open.

In the window that opens, click the “Create” button (3). The inventory form will open.

In the “Product Inventory” window, specify:
- Inventory date (4);
- Your organization (5);
- Retail outlet (warehouse) (6);
- Responsible person (7).

Now in the product section in the “Accounting quantity” field (10) we see the balances according to the data accounting. In the “Actual quantity” field (11), manually enter the actual quantity of goods as of the inventory date. After this, the quantity of goods sold will be automatically calculated in the “Deviation” field (12). To carry out an inventory, click the “Record” (13) and “Conduct” (14) buttons.

Generate Retail Sales Report from Product Inventory
To create a sales report, click the “Create based on” button (15) and select the “Retail sales report” link (16). The completed sales document will open.

In the document that opens, indicate the correct date (17), check the quantity sold (18) and the selling price of the goods (19). To reflect sales in accounting, click the “Post and close” button (20). Now in accounting there are entries for writing off the cost of goods sold. Also, entries were generated on the off-balance sheet accounts of RV “Retail Revenue” and entries for adjusting revenue in account 90 “Revenue”.

Step 4: Create a retail sales report for the automated point of sale
If your store is equipped with an automated sales accounting system, then a retail sales report in 1C 8.3 Accounting is generated automatically. To see it, go to the “Sales” section (1) and click on the “Retail Sales Reports” link (2). A list of previously created documents will open.

There are two types of reports in the list:
- With the type of operation "Retail store";
- With the type of operation “Manual point of sale”.
In reports on an automated point of sale, the type of operation should be “Retail store” (3). This report, as we have already said, is automatically loaded into 1C 8.3 Accounting. The loading schedule depends on software your store. Before running the report, go into it and check all the data. To enter it, double-click on it in the general list of reports (4).

In the report that opens, check the date (5), point of sale (warehouse) (6), quantity (7) and selling price (8) of the goods sold. At the bottom of the window, check the total amount (9) with the amount of payment received for the reporting period. These two indicators should be equal. After checking, check the document. To do this, click the “Post and close” button (10). Now, accounting entries have been created for writing off the cost of goods sold and for recording revenue. Also, the report on retail sales for an automated point of sale generates transactions for receipt of cash payments. This differs from a report on a manual point of sale, where payment transactions are generated by receipts.

A report on an automated point of sale can also be created manually, similar to a report on a manual point of sale.
Attention - this is important! As we have already said, the report on retail sales at an automated point itself generates transactions for the receipt of cash payments. In order for these payments to be reflected in the cash book, it is necessary to create a cash receipt order. In order not to double the entries for the receipt of money in accounting, in the cash receipt order in the “Type of transaction” field, you must indicate “Retail revenue”. In this case, the receiver will not generate accounting entries, but will be reflected in the cash book.
This is a modern and proven system, which has many different functions that make work easier and simpler, taking into account, tax returns, reports and other important accounting documents.
To start reporting on retail sales, you should enable this function through the administration panel:
The program configuration has a standard document designed to work and fill in all the important information regarding retail sales.

The trading facility in the program can be of two types - automated (daily reports on the quantity of goods sold are submitted) or non-automated (accounting at non-automated points of sale is carried out only by retail revenue, which is calculated every evening (or at the end of the working day; there are no daily reports).

Registration of sales on ATT (automated point of sale)
In 1C: Accounting 8.3, the corresponding report is used to register sales in ATT. It is entered manually. This document will be required if you submit a report of Form No. 4.
It contains all the necessary transactions in 1C for this type of reports - accounting, tax accounting, posting money to the cash desk, etc.


If you create a document manually, then the cash register account is automatically indicated as 50.01/“Organizational cash register”. But it can be changed to “Operational cash desk” or to “Cash desk for the activities of a paying agent.”
Using the appropriate button, the product that was sold and all the data about this operation are added to the created document. If settings were previously created for this item, they are automatically transferred to the document being edited.
You can specify 2 options for non-cash payment (if the goods were paid for in this way) - by card or credit.


In the corresponding tab, you can reflect the payment that was made using a gift certificate.

If in the process of selling a product you are a sales agent, then data about this is recorded in the “Agency Services” tab.
Registration of 1C for sales accounting at a manual point of sale is carried out in the same way as described above. The main difference is the different type of warehouse, which is selected at the beginning of the document preparation. All other steps and fields to fill out are identical.
For registration retail sales via ATT in 1C 8.3 we will use the document Retail sales (checks). This document is located in the section Sales→Retail sales (checks). Each sale in 1C 8.3 is documented in a separate document:
Let's take a look at this document. In the header of the document we indicate on behalf of which organization, at which outlet the sale is being carried out. We also indicate at what type of price the product will be sold:

The table part contains four tabs:
- Goods and services;
- Agency services;
- Sale of certificates;
- Cashless payments.
When registering sales, select the required tab.
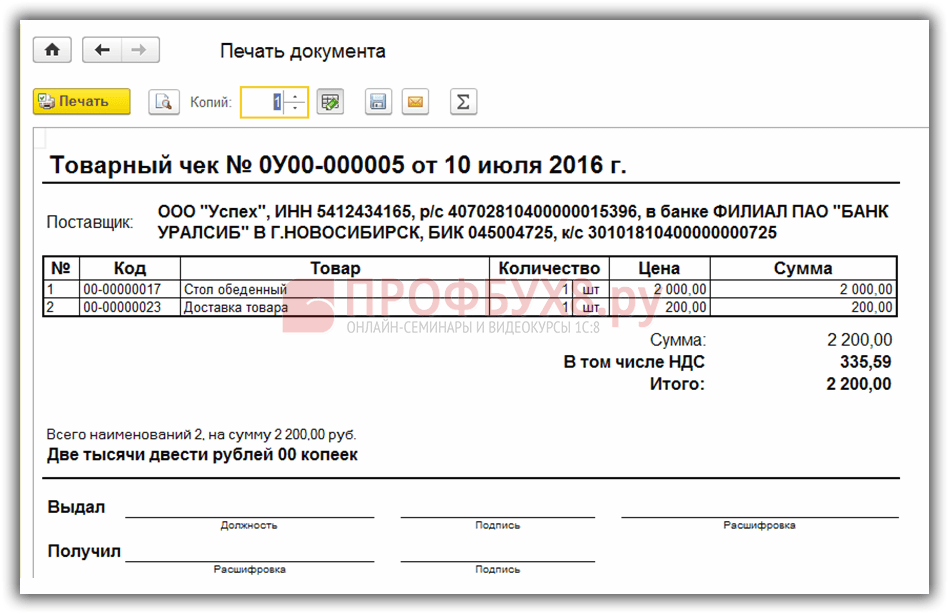
Example 1. LLC “Success” 07/10/2016 sold to a retail buyer 1 dining table. at a price of 2,000 rubles. and provided the service of delivering goods using its own transport.
Select the Products and Services tab and fill in the required items. After filling out the tabular part to record cash payment, press the button Accept payment. In the window that opens, you need to enter the field Cash indicate the amount received from the buyer:

If the amount received exceeds the payment amount, then the 1C 8.3 program calculates the change. If you need to immediately print a sales receipt, check the box Print sales receipt. And press the button Accept payment in the window Payment. That’s it, the sale to the buyer is completed, the sales receipt is printed on the printer:
If the sales receipt was not printed at the time of registration, then it can be printed later either from the document log Retail sales (checks) by button Seal, having previously selected the required document:

Or using the Sales receipt button inside the document Check:

If payment is made by bank transfer
If payment will be made by bank transfer, then select the tab Cashless payments. Select from the directory Type of payment and indicate the payment amount. If the required payment type is not in the directory, then it must be created. When creating, select a payment method from the list:

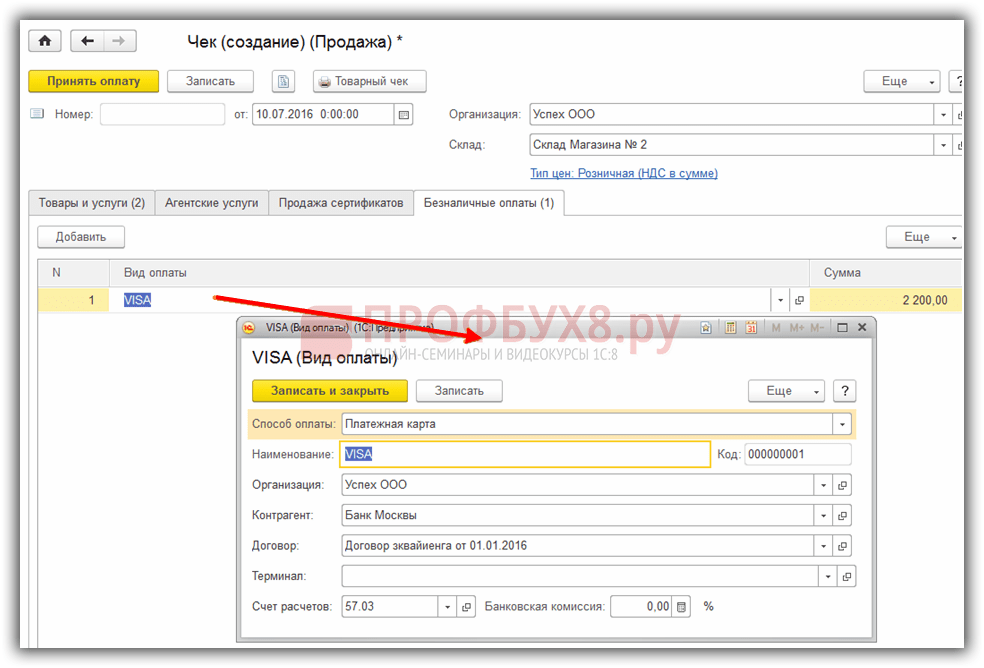
If payment is made in a combined way - cash and bank transfer
Payment can be made using one check different ways. For example, part by bank transfer, part by cash, or by certificate and by bank transfer, and so on. For a combined payment method in 1C 8.3, first indicate Non-cash payments on the corresponding tab, then click on the button Accept cash in the document Check in the window Payment select cash and indicate the total amount of the check:

With this payment method, cash will be reflected in the debit of account 50.01, and non-cash funds - in the debit of account 57.03:

To summarize retail sales for the day in 1C 8.3, a document is drawn up at the end of the day . Chapter Sales → Sales → Retail sales reports:

Gift certificates in retail
To sell gift certificates, both your own and third-party, as well as the ability to accept payment with certificates, you need to set the appropriate settings in the 1C 8.3 program. Chapter Main→ Settings→ Program functionality:

We create payment types and indicate the name of the certificate. In the counterparty field, you can specify a general buyer, for example, Retail. In the contract field you can specify Without contract:

We draw up a check in the same way as a check for the sale of goods. The same as when selling goods on a bookmark Selling certificates We indicate which certificate is being sold and how payment will be made. The sale of the certificate is completed:

Agency services for retail trade in 1C 8.3
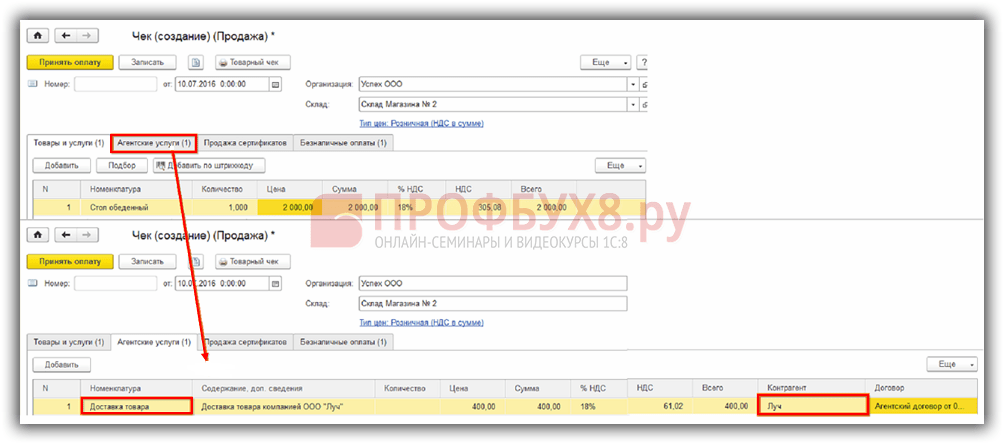
If the organization acts as an agent, then on the Agent services tab the services for which the organization acts as an agent are indicated.
Let’s take the conditions of example No. 1, but the delivery of goods will be carried out not by Success LLC, but transport company LLC "Luch" An agency agreement was concluded between the organizations, according to which LLC “Success”, on its own behalf, implements the delivery service provided by LLC “Luch”.
When issuing a sales receipt in 1C 8.3, except for the bookmark Goods and services, in this case, the bookmark is also filled in Agency services. On the tab we indicate information about the service, the cost of the service and the counterparty with whom the agency agreement was concluded. Payment information is indicated in the same way as when selling goods or certificates:
We recommend watching our seminar, which discusses how administrative and managerial expenses are reflected in 1C 8.3 trade organizations, in which account such costs should be taken into account and what settings need to be made in 1C 8.3 so that at the end of the month such costs are automatically written off to Dt account 90.
We propose to consider how the process of retail sales occurs in a manual point of sale based on the 1C 8.3 Accounting edition 3.0 program.
A manual point of sale (NTP) is a retail facility that does not have direct access to the 1C database. This could be a retail store, kiosk, market trade or outdoor trade.
Reflecting retail sales involves the creation of several related documents. This:
Receipt of goods.
Setting prices.
Moving.
Sales from a retail warehouse in NTT.
Collection or receipt of proceeds.
Retail goods are sold from a retail warehouse. Where it gets by moving from a wholesale warehouse. We will initially analyze the receipt of goods. This process is registered by the document “Receipt of goods and services”. The fields in the header are filled in:
Invoice No. - supplier document number.
Original received - check the box if the supplier has presented original documents for the supply of goods.
Number and date are generated automatically in order.
Organization - if one organization is registered in the accounting policy of the 1C program, then the field is filled in automatically or is missing. And if accounting is maintained, for example, remotely via 1C in the cloud for several organizations, then we select the required company from the directory.
Warehouse – we indicate which warehouse the consignment of goods is sent to, selected from the directory. As a rule, this is the “Main warehouse” or “Wholesale warehouse”.
The counterparty is the supplier organization. We select from the directory of counterparties or create a new one.
Agreement – is entered automatically after selecting a counterparty.
Invoice for payment – selected from the journal if it was previously issued. If you have not signed out, the field remains empty.
Settlements – this item can be configured depending on the type of settlements with the counterparty. Just click on the link and indicate the type you need.
Consignor and consignee is a link by clicking on which you can specify or change information. Used when the data differs from what is stated.
The VAT item is reflected automatically based on the entered parameters in the counterparty card and accounting policy.
The tabular part of the document can be filled out in any of the following ways:
Via the "Add" button. Each product is individually selected from the range and the quantity is manually specified.
Via the "Select" button. In this case, a product with the required quantity is selected from the product range and transferred en masse to the document.
After adding a product, if necessary, you can specify information in the columns “ Customs declaration number" and "Country of origin".
After entering all the data, we check and complete it. If the supplier has provided an invoice, you must register it by entering the number and date in the appropriate field at the bottom of the document. The goods have been received. Now you need to set the price at which it will be sold. For this purpose, there is a special document “Setting item prices”. Located on the “Warehouse” menu tab. The document is filled out manually. In the 1C program, it is possible to set prices in bulk directly from the receipt document, this is very convenient and saves time. We go to the created document “Receipt of goods and services” and press the “Create based on” button. In the drop-down list, select the item “Set item prices”. A form will open filled with basic data. All you need to do is select the price type in the appropriate field.
Based on the receipt, you can create several documents “Setting item prices” with different types of prices (if it is not possible to enter all the necessary price types).
The form contains the item “Register zero prices" If the checkbox is checked, it is better to uncheck it. Otherwise, for goods for which a new price has not been established, the price with the value “0” will be registered. It is unacceptable.
You can adjust the price value (increase or decrease by %) using the “Change” button. The cost of the goods is assigned, it can be moved to the point of sale. This could be NTT or a trading floor. The process is formalized through a special document “Movement”, the log with which is located on the “Warehouse” menu tab. This is convenient if you need to move a small number of positions. During a mass transfer, a “Movement” is usually generated from the receipt document using the “Create based on” button. All filling is carried out according to the base document; all that remains is to set the type of the receiving warehouse and manually enter the number of commodity units being moved.
Based on the receipt, you can create several “Transfer” documents to different warehouses. The quantity is edited manually. If you suddenly made a mistake and indicated more than what is in stock, the program will display an error displaying the name of the product.
Now you can sell the product. If sales are carried out from the “Trading Hall” warehouse, then at the end of the working day a “Retail Sales Report” is generated. Everything will be reflected here goods sold. The report is created for a warehouse, which you need to select yourself, reflecting revenue:
Fields to be filled in:
Warehouse – for which warehouse the report is generated.
DDS item - you must indicate “Cash receipts, retail revenue.”
Cash account is an account in which revenue is recorded.
If necessary, you can enter “Account Account” and “Income Account”, if they are not entered automatically, and subaccount.
To report retail sales at a manual point of sale, you must first take an inventory. Go to the “Warehouse” menu tab and select the “Goods Inventory” item. The header of the document indicates the warehouse and organization. Products are added in bulk using the “Fill” button. From the drop-down list, select “Fill with warehouse balances.” The tabular section will display all the items listed in the specified warehouse. After recalculating the goods, the remaining balance is entered in the “Actual quantity” column. The “Deviation” column will reflect the quantity of goods sold.
After carrying out the inventory, directly from the document, using the “Create based on” button, we generate a “Sales Report”. But the report will not be carried out until the receipt of revenue is registered in 1C. To do this, go to the “Bank and Cash Desk” menu tab and create a “Cash Receipt” document.
Fill in the fields:
Type of operation – retail revenue.
Warehouse – which warehouse the sales were made from.
Amount – the amount of revenue.
We add a line to the tabular section indicating the payment amount and the DDS item.
We carry out the document. After that, we return to the sales report and run it.


