1s 8.3 driver for commercial equipment. Data collection terminal driver for 1C:Enterprise based on Mobile SMARTS. More about features
Continuing the theme of automation retail Let's return to commercial equipment. In our previous materials, we discussed the theory: how to choose the right retail equipment and how it interacts with 1C. This article will focus on practice, namely the method of connecting retail equipment to configurations on the 1C:Enterprise platform. We strongly recommend this material for study, since in the future, when talking about the features of this or that type of retail equipment, we will not address in detail the issues of connecting it to 1C.
Currently, the 1C software range can be clearly divided into two parts: configurations based on regular and managed applications. They are easy to distinguish by appearance, the internal differences are just as significant and therefore, despite the continuity, the approaches to working with retail equipment in regular and managed applications differ and will be considered separately. Before continuing reading, we recommend brushing up on the principles of interaction between retail equipment and 1C by reading the article:.
Regular application
This type of configuration includes Trade Management 10.3 and Retail 1.0; in the future, we will use Retail as an example, although the methods for connecting equipment in any configuration of this type are the same.
First of all, connect all the necessary commercial equipment to the PC, switch it to the required mode (for example, RS-232 emulation) and install the necessary drivers for the operating system. After this, you can proceed to connecting the equipment directly to the configuration. To successfully complete this task, we will need two more things: service processing and a vending equipment driver.
As we already wrote in the previous article, service processing is an external component of the 1C:Enterprise platform, which is responsible for the interaction of the configuration with the retail equipment driver, which is a dynamic library directly responsible for interacting with the equipment and implementing specified functions.
 With drivers it’s a little more complicated; here you first need to establish who exactly is supporting the equipment: 1C or third-party manufacturers. For a regular application, 1C drivers exist only for barcode scanners and are also available on the update service. The rest will have to be found on the manufacturers' websites. Also keep in mind that many commercial equipment drivers are paid, for example, ATOL.
What if you don’t know where to get the driver? There is a little trick that we will talk about later, but for now you can skip this step and go directly to connecting the equipment. In 1C: Retail we will open Service - Trade equipment - Connecting and setting up trade equipment(in other configurations the path may be slightly different). In the window that opens, we will see all the equipment connected to the workplace, distributed into groups.
 Please note that the equipment is configured for each computer separately, binding is carried out by host name, so if you rename the computer, the equipment will have to be configured again. Information about equipment connected to different computers is stored in the Trade Equipment information register.
 There are two ways to connect the equipment: manually or through an assistant, we recommend using an assistant who will quickly guide you through all the necessary steps, while manual installation requires some experience and knowledge.
 Everything is simple here - select the desired type of equipment and click Further. On the next screen we will see all the service processing loaded for this type of equipment. If the list is empty or the required processing is missing, then it must be loaded by selecting the appropriate item.
 To download, specify the directory containing the service processing and click the button Get list, in this case all processing will be loaded, and not just for the type of equipment being installed, i.e. It is enough to perform this operation once.
 After loading, return to the previous screen and select the required processing. The choice depends on the installed drivers for commercial equipment, for example, for a barcode scanner, processing is offered for the driver from 1C and input device drivers from ATOL. Each processing has its own list of supported equipment, from which you should select the desired model. Scanners are simple, in fact they are standard equipment, so let’s take something more complex, for example a customer display Gigatek DSP-820.
First of all, let’s visit the page http://v8.1c.ru/retail/300/vs_drivers.htm and find out that this model is supported by ATOL (paid) and Scancode (free)

It is quite logical to choose a free driver. Therefore, we go to the Scancode website, download the TO driver in the support section and install it.
 Then in 1C we select Scancode service processing
 Clicking Further we will see previously created devices for our processing, since the required model is not there, then we select Add a new device.
 And in the list of supported equipment, select the desired model, here we indicate its name (substituted automatically) and the cash register on which this device will be used.

It is enough to create any device once, after which it can be used to connect similar equipment at other workplaces. The created devices are stored in the Trade Equipment directory and, as is not difficult to notice, represent lists of compliance with the device model and service processing.

If you use the same model of equipment, but in different modifications, then it makes sense to create a duplicate position, clearly reflecting this in the name. For example, Voyager 1250 Barcode Scanner (USB) and Voyager 1250 Barcode Scanner (RS-232), directly indicating the physical interface of the device, instead of an impersonal Barcode Scanner (generic). Why is this necessary, if from the point of view of 1C these are absolutely identical devices? And so that, without getting up from your workplace, just by looking at the register, you can tell exactly what equipment is installed at each workplace.
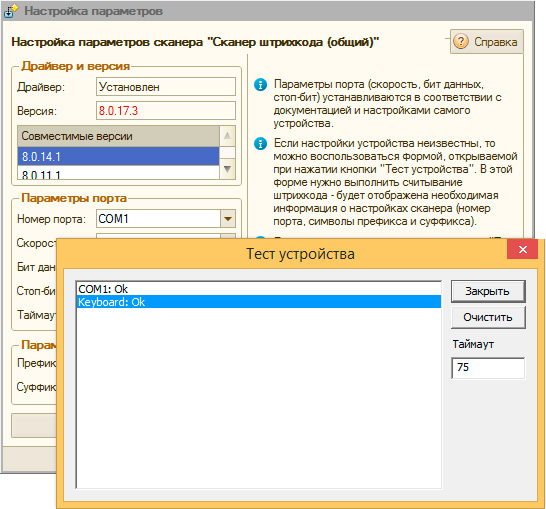
Finally, having selected or added the required device, we proceed directly to setting it up. The setup, as we have already said, is done for each computer separately. Depending on the type of equipment, the number of available options may vary. Below is a typical settings window, let's look at it in more detail.
 First of all, review the driver information and driver version. It must be installed and have a compatible version; we will touch on compatibility below, but for now we’ll just make sure that the driver is available and available for the application. If the driver is not installed, then you did something wrong, you may need to register it the required library manually, or restart the program if the driver was installed while 1C was open.
Above we talked about a little trick. At the bottom of this block there is a link to latest version drivers and if you are using the current configuration release, then the link will also be relevant. So, if you don’t know where to get the TO driver or didn’t find it on the supplier’s website, then you can continue without installing it up to this point, and then go and download it from this link.
Below are the connection parameters: port and speed. If everything is clear with the port, then in order to find out the speed, refer to the documentation for the device. In the case of this display, the default speed value is 19200 bps and if you leave the value at 9600 bps, then instead of letters the display will display " "Kryakozyabra."
Now let's talk about compatibility. IT is a rapidly changing industry, so it may happen that you have more recent versions of drivers than are listed in the processing compatibility list. What to do in this case?
In most cases, the drivers are made backwards compatible and everything should work. But the situation should not be left to chance. First, run the test built into the processing and make sure that the device at least just works.
 Then carry out a test run by performing a full cycle of operations for this device in both modes (RMK and normal). So, for example, with the driver from 1C version 8.0.17.x, the METROLOGIC MS7120 "Orbit" barcode scanner works normally, and the METROLOGIC 1250G "Voyager" calls up a selection form with each reading.
If any defects are found in the operation, then you should roll back to a compatible version of the driver, but if everything works fine, then we leave it as is. To avoid the annoying message about driver version mismatch, you can correct the service processing code. Open it with the configurator and find the section responsible for checking the driver version, then replace the version of the compatible driver with yours.

After this, update the maintenance handling in the configuration.

Managed Application
New configurations are being created based on the managed application, today these are Trade Management 11 and Retail 2.1, which have significant differences from conventional configurations, both externally and internally. But there is also a large degree of continuity. If you know how to work with commercial equipment in a regular application, then without special labor deal with the managed.
The main difference is in the unification of the approach; now, instead of separate external service processing, the Plug-in Equipment Library (BPO) technology is used, which provides a single code base and libraries for working with retail equipment at the platform level. The BPO also includes certified drivers for commercial equipment, which makes it easier to find a compatible version.
All connected equipment is divided into certified, support for all components of the bundle Equipment - TO Driver - Configuration carried out by 1C and the equipment is supported by the driver manufacturer, which works with 1C Configurations at the level TO drivers provided by its manufacturer. There is not much difference between these lists, except who you will have to contact for support if problems arise, and you should also remember that third-party TO drivers are usually paid.
Please note that in a managed application, service processing is not used, and the subsystem of the same name is used to work with connected equipment. At the same time, the scheme of interaction with the equipment has not changed radically, it’s just that the code from the 1C side was unified within the BPO and included in the configuration.
 We will not delve into internal differences; those who are interested can independently deepen their knowledge on the topic of Connected Equipment Libraries, but let’s move on to changes in the user part of the settings.
One of the important innovations is Workplaces. Workplace represents the combination of a computer and a user information base. This allows you to have different sets of connected hardware for different users on the same computer. For example, for a cashier we set up a full set of equipment, but for a merchandiser we leave only a barcode scanner and add a TSD.
 Workplaces also allow you, by checking the appropriate box, to work with the settings of equipment connected to other computers. This is convenient when you need to centrally change equipment settings at several workstations at once. For example, you changed the IP address of the scales with label printing, now you don’t have to run to all the workstations from which you work with the scales; you can change the settings for them from your computer.
 The connection and setup process itself has changed slightly and has become simpler. But there is one subtlety, since TO drivers are now included in the configuration and are installed automatically, while setting up commercial equipment the program should be run as an administrator, otherwise you may encounter a situation where the application will not be able to register the libraries and you will receive an error.

The full list of drivers available in the configuration can be found by clicking the link Hardware Drivers at the top of the form Connecting and setting up equipment.

In addition to satisfying curiosity, this list is also useful because any driver can be downloaded and then used separately, for example, for configurations based on a regular application, so as not to search for it on the Internet.
 Connecting commercial equipment has also become easier, there is no connection assistant, but there is no need for it, all you need to select is the type of equipment, driver and workplace.
 Then you should write down the changes and, by clicking on the button Tune, specify the connection parameters for this piece of equipment.
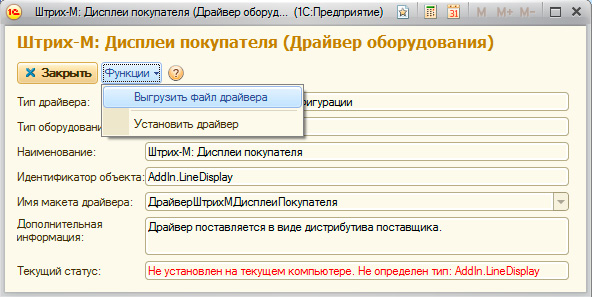
 It should be noted that error messages have become more informative; in our case, the system already had driver 8.0.15.1 for Retail 1.0 and we received a strong recommendation to update it to at least 8.0.17.1. Moreover, you can do this literally “without leaving the cash register”, select Functions - Install driver(we remind you that for this operation to be successful, 1C must be run as Administrator).

But what about equipment that is not supported in the configuration? In a normal application, it was enough to receive service processing and install the appropriate driver. Nothing has fundamentally changed in the managed application; to connect unsupported equipment, the manufacturer must provide the component with BPO technology, which must be loaded into the configuration.
For example, let's take a label printer, which is supported by Scancode. A similar component is presented on the support page for this model.
 Connecting the components should not cause any difficulties, open the list of drivers and select the option Add new driver from file, point to the downloaded archive.
 As you can see, nothing complicated. We hope that this material will help you acquire the initial skills of connecting retail equipment to 1C:Enterprise and in the future we will not focus on this issue, considering that the reader already has basic knowledge.
Tags:
There is a working 1c 8.3 x32 and all Atol 8 KKT drivers work!
PC:
Windows Server 2008 x64, RDP mode
1C:Enterprise 8.3 x32 (8.3.11.2867)
Enterprise Accounting, edition 3.0 (3.0.54.20)
KKT Atol-FPrint-22PTK
Atol driver 8.15.3.8197
We install 1C:Enterprise 8.3 x64 in the hope of using DTO 8 from Atol, and we get this “Not installed on the current computer. Type not defined: AddIn.ATOL_KKM_1C82_54FZЭ”:
And in 1C:Enterprise 8.3 x32 NOW WE GET THIS TOO.
Reinstalling 1C:Enterprise 8.3 x32 does not help.
Only DEMOLISH 1C:Enterprise 8.3 x64 and even without a reboot, everything works fine IMMEDIATELY!

Internet searches yield nothing (oddly enough, 2017)
The answer comes in a rather stupid way. Downloading new drivers ATO 10.1.1 after unpacking daddy was spotted installer, which also contains the distribution kit KKT10-10.1.1.0-windows64-setup.exe (and KKT10-10.1.1.0-windows32-setup.exe).
Let's launch KKT10-10.1.1.0-windows64-setup.exe and further, for example, in 1C:Enterprise 8.3 (8.3.11.2867) x64 The drivers install perfectly and the CCT works (the drivers are detected as 9 for some reason).

If you run 1c 8.3 x32, then the DTO 9 drivers will not work there. Why is this necessary - let’s say you also use Shtrikh-M fR (it only works under 1C 8.3 x32). We need everything to work together - then we roll back 1C to x32.
We are returning the Atol drivers for 1C x32. If you install KKT10-10.1.1.0-windows64-setup.exe in parallel KKT10-10.1.1.0-windows32-setup.exe, then in 1s 8.3 x32 DTO 9 and DTO 8 will not work as before.
Only completely cleaning the PC from Atol helped. Moreover, in the removal utility Windows programs Atol is encrypted and does not write that it is Atol - for example, the KKT 10 driver....). Be careful. For example, I had DTO6, DTO8, DTO9, and DTO10 (installed twice). Another license master.
The driver from Cleverens is a complete set of ready-made, integrated software, which allows the use of TSD with operating system Windows or Android for inventory, acceptance and shipment of barcoded goods. The delivery set includes: an installer for a special program on the TSD, integration components for 1C, a TSD program editor, as well as complete documentation and a set of additional processing for standard 1C configurations that implement additional advanced driver functionality.
The driver from Cleverens not only allows you to connect the TSD to 1C:Enterprise, it turns it into an effective business automation tool. 4 years of operation and more than 5,000 driver installations have allowed Cleverens specialists to find solutions to most of the issues and small details that arise during the implementation of barcoding. Experience of real use, collected by the work of thousands of companies, is now in your store, in your warehouse, in your production.
More about features
Collecting barcodes in a store
The simplest operation is to scan barcodes and enter quantities. The result can be loaded into any accounting system document that contains goods and quantities.
If barcodes have not yet been added to the system, then it is possible to associate barcodes with known products directly during scanning. If the product card has not yet been created, you can still scan the barcode and link it to the newly created card later.

Product information by barcode in the store
Obtaining information about the name, unit of measurement, price and availability of the product, taking into account the characteristics.
MINIMUM and BASIC licenses display the latest download data.

Printing to a mobile printer
In the standard delivery of any driver, several methods of conducting mobile revaluation are available, including printing to mobile printers. Mobile printing requires a special additional license for MS-1C-PRINT.
Revaluation using a mobile printer is very simple. We scan the product if the price is in trading floor is outdated, then we immediately print a new label using a mobile printer with Bluetooth and glue it on.


Work completely online
Support online communications with an accounting system via Wi-Fi. Allows you to receive up-to-date information about the nomenclature, current balances and prices; print documents or price tags. And even create new documents directly from the terminal.
Online work is supported only in PROF

Working with characteristics
Whenever a product is scanned, its characteristics are taken into account. It could be color, size or anything else. Working with characteristics allows you to avoid misgrading.
A product may have several characteristics. If products with different characteristics have the same barcode, then mobile device will prompt you to select the desired characteristic from the list.