How to incorporate structure into your presentations. Working in MS Power Point. creating colorful presentations. Decision Tree Diagram Template for PowerPoint
It is recommended that you start creating a presentation in Outline view. In this mode, it is convenient to develop a presentation plan, since all headings and full text are visible on the screen, as well as check the structure of the presentation and edit the text, since the work is carried out in one window. For example, to rearrange slides or bullet points, just select what you want to move and drag it with the mouse.
In structure mode, a toolbar appears on the screen to help you quickly organize the content of your presentation in the desired form; it can be placed anywhere on the screen so that it does not interfere with your work. The buttons on this panel let you change the indentation of bulleted list items, move list items or an entire slide from one level of the outline to another, show or hide formatting, and collapse or expand text on selected slides.
- * To move a slide along with its content, drag the slide icon (located to the left of the title) to the desired location in the document. The Down and Up buttons on the Structure toolbar are also used to move slides.
- * Pressing a key creates either a new paragraph or a new slide, depending on the current cursor position.
- * To create a new slide, you must first enter title text and then click the Promote button on the Outline toolbar or standard toolbar until the list marker turns into a slide icon.
- * To move a list item to another position, you must place the cursor to the left of it (the cursor will look like a cross) and drag this item to the desired location.
When working with slides in outline view, a miniature copy of the slide is visible on the screen, allowing you to accurately determine when to move to the next slide as you enter text.
If the slide thumbnail is not visible on the screen in outline mode, you should call the Thumbnail command from the View menu.
Create a new presentation in outline view
- 1 Select New from the File menu, then select the type of presentation you are creating.
- 2 Select the Structure command from the View menu.
- 3 Enter a title for the first slide and press ENTER.
- 4 On the Structuring toolbar, click the Increase Level button to move to the first labeling level.
- 5 Enter a sequence of bullet points for the slide by pressing ENTER after each bullet.
Using the buttons Lower level and Raise level, you can create different hood levels.
- 6 At the end of the last bulleted item, press CTRL+ENTER to create the next slide.
- 7 Enter titles and text for the next slide.
- 8 Once you've created all your slides, click Save to name your presentation and save it.
- 9 To view the slides in Slide View, double-click the slide icon.
Tip When using the Auto Content Wizard, as well as when selecting a presentation with suggested content, all you need to do is select what you want to replace and type your text.
Create a presentation based on structure
You can create a presentation in outline view or import it from another application such as Word. You can also insert the structure into an existing presentation.
Changing the order of paragraphs in an outline
- 1 In outline view, click inside the paragraph you are moving.
- 2 Click the Up or Down button on the Structuring toolbar.
Create a presentation by importing a structure
- 1 Select Open from the File menu.
- 2 In the Files of type list, click All Structures.
- 3 In the Name list, double-click the document you are using.
The imported outline will open in PowerPoint in outline view. Each main document title will become the title of a separate slide, and each outline item will appear as slide text.
Tip It is especially convenient to import Word document with heading styles. Open your document in Word, point the File menu to Send, then click Microsoft PowerPoint. Each paragraph formatted in the "Heading 1" style will become the title of a new slide, each paragraph formatted in the "Heading 2" style becomes first-level text, and so on.
Inserting an outline into an existing presentation
- 1 In Slide view, Outline view, or Sorter view, click the slide after which you want to insert an outline.
- 2 Select Slides from Outline from the Insert menu.
- 3 Browse to the folder containing the document you want to use as the outline.
- 4 Double-click the document you want to insert.
Splitting slide text into two slides
- 1 In outline mode, position the cursor where you want to break the text, then press ENTER.
- 2 Click the Promote button on the Outlining toolbar until a new slide icon appears with a number, then enter a title for the new slide.
Import text from other applications
You can use text entered in other applications to create a presentation, or add slides to an existing presentation. The imported text is in structure format.
When you import text into PowerPoint, you use a structure hierarchy made up of the document's styles. A paragraph with the Heading 1 style becomes the slide title, paragraphs with the Heading 2 style become first-level text, and so on. If the document does not contain styles, the structure is based on paragraph indentation. In documents with unformatted text, the structure is determined by the tabs at the beginning of paragraphs.
When importing structures from word processors PowerPoint reads .rtf documents and unformatted text. All first-level headings in the imported outline become slide titles, and the rest of the text becomes outline text with appropriate indents. The format of the title and text is determined by the slide master of the current presentation.
Note It is convenient to create a presentation from the Word structure. Open your document in Word, point the File menu to Send, then click Microsoft PowerPoint. Each paragraph formatted in the "Heading 1" style will become the title of a new slide, each paragraph formatted in the "Heading 2" style becomes first-level text, and so on.
At the bottom of the presentation window there is a row of buttons designed to change the viewing mode. Default is
1.Normal View , in which the basic steps for developing a presentation are performed. Normal mode includes three panels:
Structure (Outline/Slides) ,
Slide (Slide)
Notes (Notes) .
Panel Structure (Outline/Slides) Lets you switch between showing your presentation as an outline or slide thumbnails.
On the panel Slide The slides are presented in the form in which they will appear on the screen during the presentation.
Panel Notes is intended for entering speaker notes.
You can resize any of the panels by dragging its borders. On the right side of the PowerPoint window is a task pane that displays task-specific commands. Using the task pane, you can quickly access the commands you need without having to access menus or toolbars. PowerPoint displays one or another task area depending on the situation. For example, after starting the program, the task area appears Creating a presentation (New Presentation) , containing commands that are used when creating a presentation. When you add a new slide, a task pane will appear Layout Creating a slide (Slides Layout) , containing standard slide layouts. If the task pane you want is not on the screen, you can display it using the menu Other Task Panels . If you don't need the task area, you can remove it from the screen, thereby freeing up space for work. To do this in the menu View click on the command Task Panel . The same command is used to display the task pane if it is not on the screen.
2. In mode structures The outline panel is larger, the notes panel is positioned vertically, and the slide is displayed as a thumbnail. Outline mode makes it easy to enter and format text.
3.In mode slides each frame occupies the main part of the working window, and the presentation structure is displayed in a narrow panel on the left, where only slide symbols and their numbers are presented. In this mode it is convenient to work with objects placed on the slide, especially small ones.
4. In mode slide sorter frames are represented by sketches that occupy the entire working area, under each of which there are icons indicating the parameters for changing slides, animation, and frame exposure time.
5. When entering the mode slide show A full-screen demonstration is automatically launched with the parameters set in the slide sorter mode
Structure of PowerPoint documents.
Any PowerPoint document represents a set of slides; there can be many such slides in a presentation; each slide has its own unique number, which is assigned by default depending on its place. The sequence of slides in a document is linear. Slides contain objects of many different types. Each slide contains at least one object, called the background of the frame. Thus, we can conclude that an empty slide cannot exist, and by “empty” we mean a slide with an object of the “background” type.
Objects placed on a slide include:
Background (a required element of any slide) The background can be presented as a regular color fill or have a drawing as a basis. The source of the background image can be either internal or external.
Text. The text may have different formatting (different font design elements, color design methods, alignment, techniques for creating paragraph indents).
Headers and footers. Headers and footers can be created automatically and, like hyperlinks, refer to special formatting elements. Typically, headers and footers contain useful information, such as the name of the presentation author, company name, current date, or page number. Because PowerPoint allows you to add multiple headers and footers, you can set different headers for your slides, handouts, and speaker notes. Adding headers and footers is done using the command Header and Footer on the menu View .
Tables. Tables are specially formatted text placed in cells separated by vertical and horizontal borders. Borders can be hidden or highlighted with lines, and cells can have background colors. A table can have either an internal or external source.
Graphic images. A graphic image can be used as a background or be a separate object on a slide. To fully display graphics, you need to know the features of the graphic file formats that are supported. PowerPoint.
Inscriptions (as a special type of graphics). Button Caption (Text Box) The Formatting toolbar allows you to place additional text objects on the slide. Captions are typically used to include announcements, links, and notes in a presentation that are not related to the main text. Using the button Caption (Text Box) You can create two types of text objects: the label itself, consisting of one line, and a text field, which includes text that is automatically distributed within specified boundaries. To create an inscription, simply indicate its position on the slide by clicking in the desired place. To create a text box, drag your pointer across the slide to draw a rectangle of the desired size. The caption and text field can be converted into one another using the options provided in the dialog box Format inscriptions (Format Text Box) . You can also convert a text box to a text box by dragging the zoom handle. The width of the inscription will decrease and the text will be automatically distributed across the lines.
Diagrams (as a special type of graphics). The diagram can immediately show the relative parameters of the development of trends. Their advantage is the ability to visualize values (any numbers).
Film (video clip). A movie is a PowerPoint object containing a sequence of frames stored in a single file. The film must have an external source and is reproduced by external means.
Sound. Sound is an object external to the PowerPoint document and therefore always requires the name of the source. A small collection of sounds comes standard with Microsoft Office. Reproduction is carried out by external means.
Icon (shortcut). An icon (shortcut) is a link to both an external object and an application that can process it correctly in accordance with the file name extension of the object.
Slide color scheme (special object, color design of various objects). Color scheme – sets a specified color scheme for some objects, which can be saved and used in the future.
On both Windows and macOS, the width of the slide thumbnail area in PowerPoint is adjustable. Whether you're editing slides in the Slide Pane, working with slide thumbnails, or creating the structure of your presentation, you can easily expand your workspace. You can show or hide or enlarge or expand the area containing slide thumbnails.
In PowerPoint for the web, slide thumbnails are always available in a fixed-width area on the left side of the browser window.
Show or increase the size of the thumbnail area
If the slide thumbnails on the left side of the screen are hidden or collapsed, you can show or expand them as follows:
Hide or reduce the size of the thumbnail area
To have more space available in the editing area, you can hide or collapse the thumbnails on the left side of the screen.
Display and expand the Outline and Slides tabs
When the area containing the Outline and Slides tabs is hidden or collapsed, follow these steps to show the area or increase its width:

Hiding and collapsing the Outline and Slides tabs
To have more space available in the editing area, you can hide or reduce the area containing the Outline and Slides tabs.
If the area containing the Outline and Slides tabs takes up too much screen real estate, follow these steps to hide it or reduce its width.
Don't know what it is electronic presentation and what is it for? In this material, you will not only get answers to these questions, but also learn how to create your own presentations using the popular PowerPoint 2010 application.
Introduction
Surely many of you still know or even remember what filmstrips are. In the 70s of the last century, home cinema was considered a miracle. At that time there were no VCRs, no personal video cameras, or other means of recording and playing video available to the masses. Instead, images (slides) printed on ordinary positive photographic film were used to visually narrate or tell, for example, a story. The frames, which were shown in an enlarged size on the screen sequentially one after another, as a rule, were connected by a certain thematic line and provided with test comments.
Filmstrips were widely used for educational, entertainment, lecture and artistic purposes, successfully replacing expensive film screenings at that time. Some filmstrips were even produced with sound on vinyl records or magnetic tape to improve the viewing experience for viewers.
In the early 90s, thanks to the mass distribution of household video recorders, filmstrips were almost completely forced out of our lives, and it would seem - forever. But once again the proverb that everything new is well forgotten old worked. In our era of rapid development of computer technology, the seemingly unnecessary slide film has returned, under the fashionable name “presentation”.
Indeed, if previously the lion's share of filmstrips was aimed at children and was of an entertaining nature, then the presentation is a tool for an adult audience. Student and scientific works, announcements of new developments in production and business areas are held, new products are demonstrated or advertised. Certainly, business sphere Applications of the presentation are not limited. If desired, you can arrange a family album, photo report of a wedding or birthday in this way.
The most popular program among presentation preparation systems is definitely the PowerPoint application, which is part of the Microsoft Office suite. At the same time, PowerPoint has very few or practically no worthy analogues and competitors. With its help, you can turn graphic, text and numerical information into colorfully designed slides and diagrams, providing them, if necessary, with animation and sound.
Application structure and interface
When you start learning applications like Word or Excel, you often come across concepts that you understand intuitively. After all, even from school, everyone knows what text is and how it should be placed on a page, why a paragraph is needed or how a table is built, what rows or columns are, and so on. In PowerPoint, however, you will have to deal with new definitions, which may initially make the process of perceiving information somewhat difficult.
The basis of any presentation is a set of slides or frames, which may contain: images, graphics, texts, videos, sound and other objects. So, before creating a new presentation, it is better to prepare in advance all the materials that will be included in it (photos, videos, diagrams, etc.), structure them if possible, and put them in a special folder. This will save you a lot of time and confusion later on.
After launching PowerPoint for the first time, people who are already familiar with Word or Excel will immediately recognize the signature user interface found in the latest Microsoft Office suites. As always, the main control tool is located at the top of the window - Ribbon, with a set of thematic tabs and groups of commands. Directly above it are the quick launch bar, title area and standard window control buttons.

The work area located immediately below Ribbon and occupying almost the entire remaining space of the window, is divided into four parts: on the left there is a thumbnail area with tabs Slides And Structure, in the center is the sheet of the slide itself, and below it is a field for notes.
All tools for creating and working with presentations are located on Lente, which has several thematic tabs, such as: File, home, Insert and others. Each of these tabs contains commands and controls that are organized into groups. The buttons in each group can perform either a separate action or contain an entire menu of commands.
To increase your workspace, you can minimize the ribbon by double-clicking on the name of the active tab or on the arrow in its upper right corner. The tape unfolds in the same way.
Creating a presentation
There are three ways to create a new presentation: using a template, based on a theme, and using an existing presentation.
PowerPoint contains a considerable number of thematic presentation templates, where the slides are already designed in a certain way. All you have to do is insert your text, images, charts and tables into them without worrying about the artwork. Of course, you can later change the design of any template to your liking. But in our first presentation we will take a more thorny path and create it from scratch without software assistants.
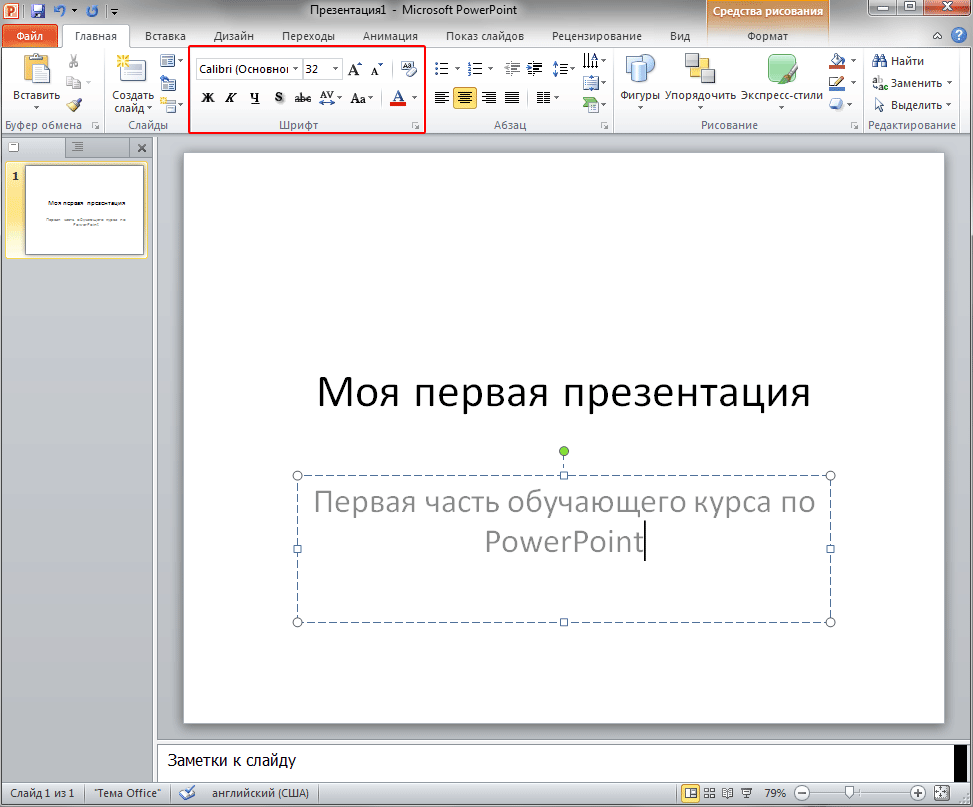
Immediately after launching the program, we see the first (initial) slide of the presentation, which is called the title slide, and is a completely white sheet with two rectangular text areas: Slide Title and Slide Subtitle.
Click on the required area and enter the desired text. At the same time, you can format the text using the commands located on Lente, on the tab home in Group Font. Here, as in the Word editor, you can set: font type, size, emphasis and color, select the text alignment direction, change the spacing between characters, etc. We will not dwell on this in more detail here, since you can learn about the text formatting functions in the Word training materials.
Notice that each text area has dotted borders around it as you edit it, indicating its current size. There are dots placed in the corners and in the middle of the sides of the area, which you can drag to change its size. The area's boundaries are used to move it, and the green dot is used to rotate it.
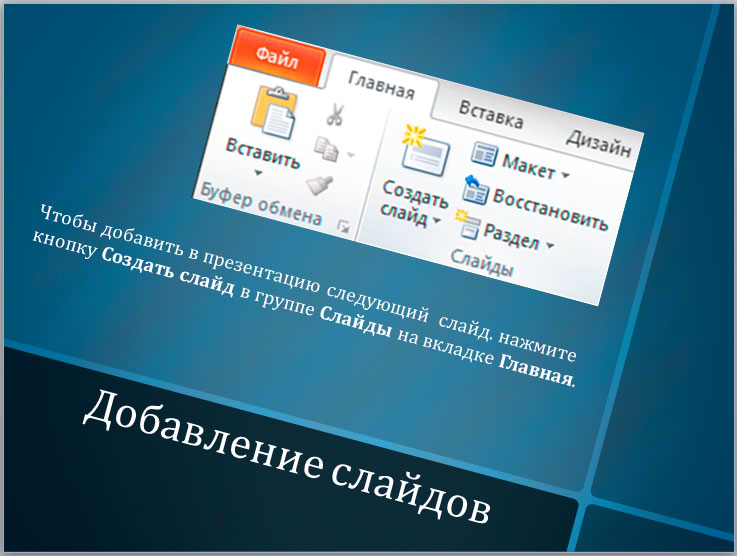
Add slides, choose a layout, apply themes
After completing the title slide, let's add the next slide to the presentation. To do this, click the button Create slide in Group Slides on the tab home.

As you can see, the placeholders (areas to fill) of the second slide are somewhat different from the title slide, since it is already intended directly for entering the content of the presentation itself. The upper area for the title here is text, but the lower, larger one, can contain not only text, but also tables, charts, images or multimedia clips. To add all this variety, there are buttons with thematic icons in the center of the document workspace.
The relative position of placeholders on a slide and the type of content they contain in PowerPoint is determined by the layout. The button is responsible for changing the layout of the selected slide. Slide layout in Group Slides, when clicked, a pop-up window appears where you can select a different standard arrangement of elements.

By default, the slide will have a Title and Object theme applied to it. If this option for arranging elements does not suit you, then at any time you can choose another theme that has a more suitable layout.

In our example, we chose the theme “Two Objects” for the second slide. On the left side, text was entered in the form of a bulleted list, and on the right, to give the table of contents a more colorful look, we inserted a picture. Inserting a picture is done by clicking on the corresponding icon and then selecting the location of the desired file.

Now let's add a third slide. Please note that each new slide is inserted after the slide that was current at the time of insertion. That is, if you had the second slide selected, then the third will be inserted immediately after it, and if the first slide was selected, then the new slide will be inserted between the first and second slide. In this case, each new slide will have the same layout as the slide after which it was inserted.
Thus, in our case, the theme “Two Objects” will be automatically applied to the third slide. However, here we will use a different arrangement of elements, so we will change the layout again to “Title and Object” and fill the fields with the necessary text.

To give your presentation a more professional look, you can apply one of the themes. A theme in PowerPoint is a set of specially selected color schemes, a set of fonts, and effects applied to certain objects.

To select a theme, open the tab on the ribbon Design. Thumbnails with topics are located almost in the center of the tab and occupy most of it. To the right of the thumbnails are arrows for scrolling and a button Extra options, by clicking on which you can open a pop-up window with all the built-in themes.
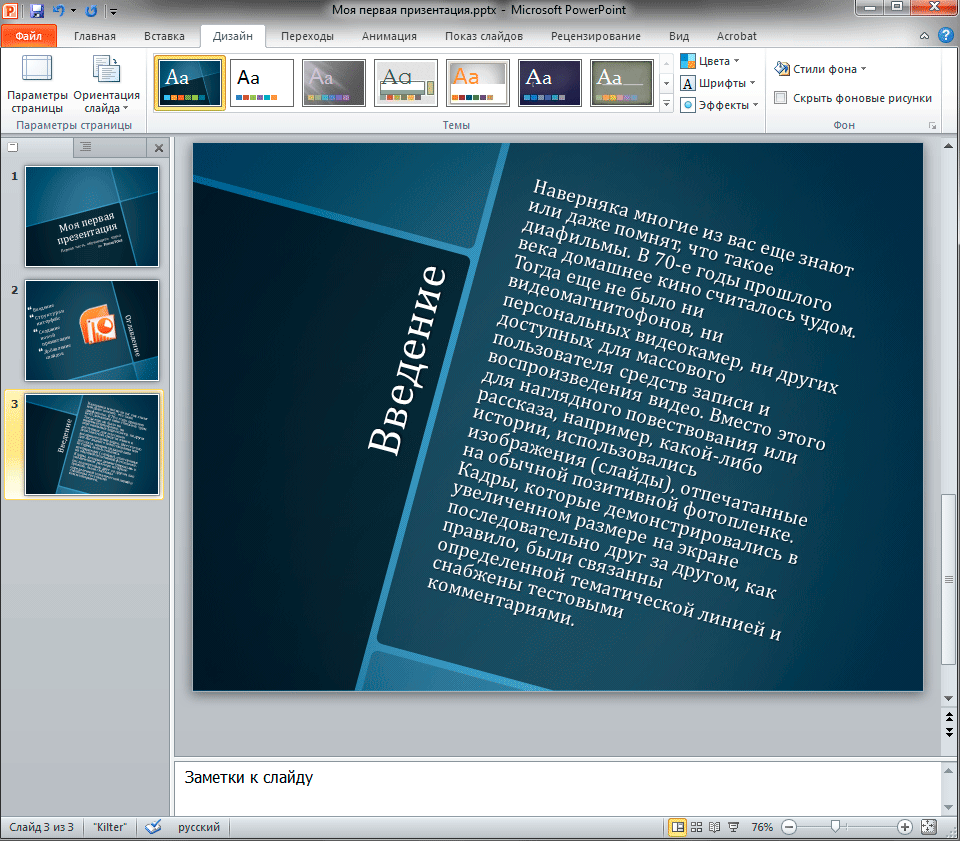
If you hover your mouse over any of the theme thumbnails, you can immediately see in real time what the slides will look like after applying it. This is very convenient and allows you to look at your presentation in different designs by simply moving the mouse cursor from one thumbnail to another.
Changing the size and location of aggregates. Inserting new objects
Placeholders on slides are designed to make it easier for users to place presentation elements. However, sometimes their location and size may not meet the desired criteria. For example, the text area may be too small or the title may be misaligned. This can be easily fixed in PowerPoint.

After clicking on any element of the presentation, a frame with markers will appear around the selected object. To change the size of the area, you need to move the mouse cursor over any white marker (the cursor will change to a double arrow), and drag it in the desired direction while holding down the left mouse button. Corner markers are used to change sizes proportionally. In the same way, you can move the selected area with all its contents, only to do this you need to hover the cursor over the frame itself (the cursor will change to a crosshair of arrows). Finally, you can rotate the selected element using the green handle (the cursor will change to a rounded arrow).
In addition to changing the relative position and size of elements on a slide, you can add new objects to it at any time. This is done using the tab Insert on the tape.
You can insert tables, charts, SmartArt and WordArt objects, all kinds of images and illustrations, text, formulas and symbols, date and time, videos and audio tracks, as well as Flash videos into slides. Thus, PowerPoint allows you to create truly professional presentations for every taste with many interactive elements.
Of course, fillers can be inserted not only into ready-made slides, but also into new ones. Let's go to the tab home and in the group Slides let’s click not on the big icon for creating a slide, as we did earlier, but on the button under it with an arrow and an inscription Create slide. What is the difference here? The fact is that this method of adding a new slide allows us to select the appropriate layout for it manually before creating it, while in previous cases the theme was set automatically.

So, after clicking on the button, a pop-up window will open in front of us, where we can select the appropriate layout for the next slide. Let in our case it be “Empty slide”.

Now, after creating the slide, you can go to the tab Insert and practice inserting any objects. As an example, we inserted a previously prepared drawing depicting a piece of tape (button Drawing in Group Images) and two text fields (button Inscription in Group Text).
The drawing was initially small, so we enlarged it to required sizes, then rotated relative to the layout lines and moved to the desired area. All this was done in the ways discussed earlier in this chapter. The text placeholders were also rotated and moved to the right places, and the required font size was set inside them.
View and save a presentation
Once you've prepared a few slides, it makes sense to see how the fruit of your labors will look in full screen mode, that is, in the mode in which your audience will view them. To do this, on the ribbon, go to the tab Slide show and in the group Start slide show click the button At first. It's even easier to start a presentation by pressing the "F5" key.

In slide show mode, the presentation will fill the entire monitor screen. You can use several methods to switch slides. The first is to simply click the left mouse button, the second is to use the navigation bar buttons that pop up when you move the cursor to the bottom edge of the screen.

By the way, there is also a button here that allows you to go to a specific slide and perform a number of other functions, for example, exit the presentation. You can also end the slide show at any time by pressing the “Esc” button.
As a rule, while working on a presentation, the created file is automatically saved many times. But in any case, you will have to make the first save yourself, indicating the name of the presentation file and its storage location on disk. You can do this while working on a document by clicking on the bookmark File on the ribbon and selecting the command Save, and before closing the file for the first time by clicking on the button Save, which will be located in the pop-up window. To create a copy of the presentation file, use the command Save as.
Conclusion
So today you met basic principles Create your own presentation using PowerPoint, which is part of the Microsoft Office suite. As you can see, the mechanism for filling slides with various content is quite simple and should not cause any particular difficulties even for novice users. Another thing is the very idea of the presentation and the development of its style. It is the quality of elaboration of these issues that will largely determine how successful the presentation of your ideas in this form will be.
Remember that presentation is all about visual presentation of material. So in general, try to use more graphics or videos while keeping text information to a minimum. At the same time, the text phrases used should be concise, like headings, and the text itself should be large and easily readable from the screen.
On the other hand, you shouldn’t get too hung up on these rules. Presentations can have different directions and therefore vary greatly in their meaning and goals, and therefore have completely different content. For example, in educational presentations the presence large quantity text in some cases may be justified. In any case, the main thing is to convey to target audience material in the simplest and most visual way without loss of information content and general essence.
To really get results quickly, you need to take advantage of the combined power of several office programs. We'll show you how this works using PowerPoint as an example.
Once you've uploaded your Word document, you'll have a nearly finished presentation that just needs a little polishing. After choosing a topic and target group we can start.
1 Preparing a rough sketch in Word
Open a new blank document and write all the headings you will need in your presentation. In order for PowerPoint to work with this later, the headings need to be formatted according to the hierarchy. From "Heading 1" PowerPoint will create a new slide.
Subordinate formats (Heading 2, Heading 3, etc.) will be assigned to the first "Heading 1" and will end up on the same slide. Texts without headings will be completely ignored. Once you've created your plan, launch PowerPoint and select File | Open". Go to the location of the document, change "All PowerPoint presentations" to "All structures" and open the file.
2 Create a structure in PowerPoint

Of course, you can do the breakdown directly in PowerPoint, but it's a little more complicated. Go to the "Outline" tab or in PowerPoint 2016 select "View | Structure mode". Click the icon to create a new slide and enter a title. Use the key to complete the creation of the slide.
To add subheadings, click on . With the + keys you will go to the nearest high level. Create required amount slides.
3 Adding breakdowns to presentations

If you need to expand an existing presentation, create new plan in Word, go to PowerPoint and on the Home tab, in the Slides category, click New Slide.
Using the Slides from Outline command, you can select your Word document and “Add” new headings.
4 Selecting a suitable design

On the "Design" tab, select one of the proposed options. As you move your mouse across the ribbon, PowerPoint displays the current slide in the appropriate design. You can use the arrow in the lower right corner to bring up additional templates.
To choose an option, click on it. If you want the theme to apply only to certain slides, right-click on it and select Apply to Selected Slides.
5 We develop individual design

If you don’t like any of the ready-made solutions, on the “Design” tab, in the “Options | "More options", click on the "Colors" option and select "Adjust colors". In the left part of the window, specify the desired color scheme, set a name and save the theme.
Now click on the “Fonts” button, select “Customize fonts”. After choosing the one that suits you, save your option. Now, in the Themes group, click on the bottom-right arrow and select “Save current theme.” You will find your own design in the “Custom” group.
6 Improving the appearance of content

Now add the actual content. You can select and format long texts via “Home | Paragraph | Convert to SmartArt Graphic." Tools in the SmartArt category will improve appearance other elements of the presentation.
Finally, on the “Transitions” tab, in the “Transition to Slide” group, select the appropriate option. Skip the optical games and tone down the effect in the Effect Options if necessary.
Thanks to the “View” button you can evaluate the work done. In the Time group, click Apply to All. Your presentation is now ready to show.
Photo: manufacturing companies