Lime marl. A group of rocks of chemical and organic origin. Class of carbonate rocks. More about marl
During construction or major renovations, gating walls for wiring is a mandatory step. The process will go faster if you know about the benefits of tools and the rationality of their use in each specific case. The effectiveness of a hammer drill or grinder is not the same when laying channels in brick and concrete walls and partitions, but if used correctly, the work does not cause difficulties. Study all the nuances to choose the right tool and avoid mistakes.
Before you begin laying the grooves, draw up a wiring plan with the location of all connection points and cable exits. Transfer the resulting drawing to the surface of the walls, marking the locations of the grooves with a marker. First, indicate where the sockets, switches and distribution boxes will be located. Connecting channels for electrical cables must meet the regulatory requirements of SNiP 3.05.06-85:
- It is forbidden to tap walls for wiring in load-bearing structures. In a panel building, all walls are load-bearing, with the exception of only small partitions.
- The channels are laid parallel to the structures: in the vertical or horizontal direction. Laying a diagonal groove is not allowed, with the exception of drilling parallel to an inclined wall (for example, in an attic).
- The maximum distance of a horizontal furrow from the ceiling is 15 cm.
- It is unacceptable to lay the groove at a distance closer than 40 cm from the gas pipe.
- The maximum possible depth of the groove is 25 mm.
Preparation of channels and nests
Make sure that there is no old cable running through the new wiring areas by using an indicator screwdriver. Before marking, remove wallpaper from the walls. To make it easier for you to find the place where the wires go, take a photo of the finished circuit. You can refer to these photographs when you need to drive a nail or dowel into the wall so as not to touch the electrical cable.
The cable can only be laid along the wall. It is strictly prohibited to ditch a ceiling made of reinforced concrete slabs, since even a small channel will mark the location of a future split, and concrete is a fragile material.
An analogy is a small scratch from a glass cutter, which then causes the glass to crack in that exact place. Make sure that your neighbor below does not drill into the ceiling, as one day you will simply fall into his apartment.

An example of a properly designed wiring
Which tool to choose for gating
When choosing how to ditch a wall for wiring with your own hands, you can consider various tools:
- chisel;
- perforator;
- grinder;
- wall chaser

Wall chaser
Wall chasers - a professional approach
A wall chaser is the most effective tool because it is designed specifically for this purpose: a modification of an angle grinder with two parallel disks. Thanks to the ability to adjust the gap between them, as well as the depth, a groove with the specified dimensions is obtained. The clamp makes the depth of the furrow uniform along the entire length, while other tools produce differences.
The disadvantage of a wall chaser is that during its operation a lot of dust arises. Moreover, almost all wall chasers are equipped with a clamp for fixing the vacuum cleaner pipe, which simplifies the removal of excess material. Laying the channel is faster, since it is cut in one pass. Otherwise, everything is the same as laying a groove using a grinder: remove excess material with a chisel or hammer drill.

Using a wall chaser when creating a cable channel
Nuances of working with other tools
Using a hammer and chisel, the furrow is left uneven. The advantage of the method is that it is cheap: you do not need to buy power tools. The groove is divided into small sections. Using a chisel, mark indentations along the edges of the channel 1-2 times the width of its tip. Then place the tool across the groove and chisel into depth. After removing the top layer, continue to deepen the channel until the required size is achieved.

Chipping using a chisel and hammer
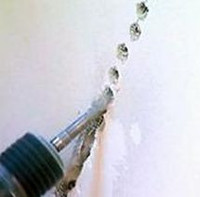
With a hammer drill you will do everything much faster, but the grooves will not be even enough. Here you will need a drill and a shovel. Along the entire length of the furrow, make holes of the required depth with a distance of 10-15 mm between them. Remove material using a spatula. Do not place it perpendicular to the channel, as it may chip the wall or plaster.

Preparing grooves with a hammer drill
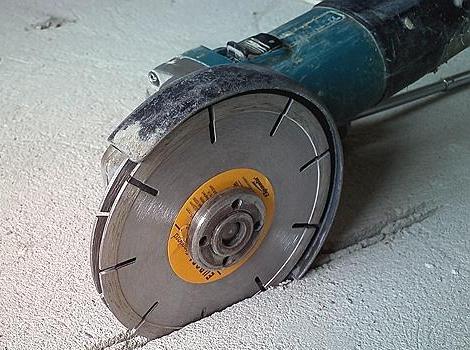
Using a grinder, the walls of the grooves are smooth, but this creates great amount dust. It is best to use a diamond disc: it is effective when processing brick and concrete. Along the edges along the canal, make two parallel cuts along the entire length of the furrow. Remove excess material between the furrows using a chisel and hammer or a hammer drill equipped with a spatula.

Working with a grinder on concrete
Features of gating walls made of various materials
In how to groove walls for wiring, the main role is played by the wall material. Depending on what the wall is made of, the work procedure has its own characteristics.
Drilling channels in a brick wall
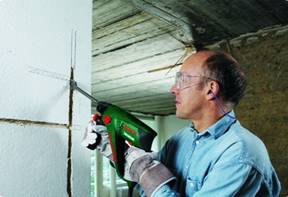
The rows of bricks are connected together with cement mortar, which is removed without special effort. The least labor-intensive way is to tap the wall along the seam using a chisel and hammer. In this case, the amount of dust generated will be minimal. When laying a vertical channel, use a hammer drill with different attachments. Make sure it meets these requirements:
- engine power from 600 Watt;
- speed controller;
- reverse rotation;
- impact drilling mode;
- self-clamping chuck;
- Supports drills with diameters from 0.5 to 12 mm.

Preparing grooves in a brick partition
Rules for chipping a brick wall:
- Before starting work, mark the locations of future holes by making indentations using a hammer and core. This will prevent the drill from moving to the side initial stage.
- Keep the tool perpendicular to the wall to prevent the drill from breaking under bending load.
- Do not put too much pressure on the tool, as it will work under increased load, which can lead to breakage.
- During the process, the drill becomes very hot and its edges quickly become dull, so cool it from time to time in a container of cold water. Be careful not to get any liquid on the motor, as this will damage it.
- Burnt brick is more difficult to process. You can recognize it by its black dust. Pass this section at low speeds with the shock mode turned on.
- If you need a hole with a diameter of 15 mm, start working with a drill with a diameter of 4 or 6 mm. Having made a hole of the required depth, replace the drill with an 8 mm one and repeat the procedure.
- Then install the final bit and drill a hole of the diameter you need.
- To remove the remaining bridges between the holes, use a chisel with the hammer set to “no drilling” mode.

Removing excess concrete with a chisel
Laying grooves in a concrete partition
To drill a concrete wall with your own hands, it is better to use a wall chaser in conjunction with a hammer drill and a chisel. At the same time, try not to damage the reinforcement running inside the slab, as this reduces the strength of the structure. When processing a wall with a wall chaser, a lot of dust is released, so be on the safe side. If you decide to use a hammer drill, operate the tool in impact mode. Otherwise, everything is similar to processing a brick wall.
If you don’t have a wall chaser, a grinder will do. It is best to use sintered diamond blades or turbo diamond blades with a diameter of 105-125 mm. The depth of the groove depends on the diameter of the cable laying, taking into account the putty layer. You should not immediately cut to the desired depth: first go 1 cm deeper and see if the grinder can cope with the load. If the disc fits well into the concrete, the final cut can be made.

Wall chaser for foam concrete
Working with wood and aerated concrete
Laying a groove in a wooden wall allows the use of all tools except a hammer drill. Instead of a chisel, use a chisel to remove excess wood between the parallel grooves made by the grinder. To cut grooves, you need not a diamond, but a circular disk for wood. The process produces little dust, but produces a lot of sawdust.
In the case of aerated concrete, a special wall chaser for foam concrete is required - a curved metal pipe with a handle at one end and a protrusion at the other. Simply grab and pull the tool along the furrow, pressing it against the surface. There is not a lot of dust generated. You can use a grinder with a circular attachment, but the process will be dustier and noisier.

Grooving a socket for a socket
How to make a socket for an outlet
These methods are not suitable for drilling sockets, switches and junction boxes. As a result of using the above tools, a socket of irregular shape with uneven edges is obtained, so special drill bits with a suitable diameter will be required.
You will have to hammer in impact mode, pressing hard on the tool. How to wire a socket or socket for a switch:
- Using a hammer drill, drill a shallow hole with a diameter of 8-10 mm in the center of the intended circle.
- Mark the outline of the future nest with a shallow cut using a crown.
- Make a hole of the required depth according to the diameter, then use a crown to remove excess material from there.
- While drilling into a concrete wall, if you come across reinforcement, do not remove it: it is better to move the switch or socket to another location.
Video: Preparing a socket for an outlet
Reducing the amount of dust during operation
How to groove walls for wiring without dust or at least reduce its formation as much as possible? No matter what tool you use, there will still be dust. To reduce the amount, your assistant can wet the area where the incision is made with water. However, you need to make sure that the liquid does not get on the electric motor of the tool.
Keep in mind that a wet surface is more difficult to process than a dry one. You can collect flying particles with a vacuum cleaner. Household appliances are not suitable for this purpose - they break down quickly, so it is better to rent a construction vacuum cleaner.

Bulgarian woman with vacuum cleaner
To prevent dust from entering other rooms, insulate the door with a damp cloth or polyethylene. The windows can be opened wide. If you are renovating a living room, wrap the furniture in polyethylene (especially carefully when it comes to soft furniture). For reliability, apply the film in several layers. It is imperative to pack all household appliances, if it is not possible to take it out of the room.
When you need to lay a small groove, you can build a paper dust collector from an A4 sheet. Fold it in half to create an open pocket envelope and secure the edges with masking tape. Glue the device on the wall as close as possible to the intended drilling location: all debris will fall there and can be removed with a vacuum cleaner. The method is time-consuming and not entirely suitable during major renovations.
Video: How to tap concrete walls without dust
How and how to seal grooves with wiring
The small area of the groove is not a reason to neglect the primer. Due to the dust that remains there, the finishing material simply will not stick and will fall off over time, which can lead to new repairs.
- Apply the solution only after the primer has completely dried and the cable has been installed.
- Before plastering, wet the wall with water to reduce shrinkage of the material.
- Use a solution with a thick consistency. Don't just pour it into the groove, but smooth it out with a spatula.
- Perform tool movements perpendicular to the groove.
- Process the vertical channel from bottom to top.
- Simply smoothing the surface will leave bumps, but excess solution can be easily removed with a smoothing iron.
- Work with the outer surface of the tool - the one where the handle is attached.
- Perform not straight, but zigzag movements, which will allow the solution to better adhere to the channel and at the same time it will not drag on the tool.
- For one area, two passes made in opposite directions are sufficient.
- When it is necessary to seal not a groove, but a hole larger than the dimensions of the trowel, an aluminum rule is suitable for removing excess mortar. Hold it at right angles to the surface and, in several passes, remove excess material in a zigzag motion, moving from the center of the dent to its edges.

Cable Termination
Finishing can begin only when the wall is completely dry.
If concrete mixture was used when sealing the grooves, wet these places with water several times a day for a week, otherwise there will be cracks. This can be avoided by using a plaster mixture - for example, Rotband. Putty is not suitable, since it is applied in a layer of no more than a few millimeters. Due to its high strength, alabaster will create difficulties during painting work.
During a major overhaul, the old wiring diagram is not always available. If you are not sure where exactly the cables are laid, turn off the power to the room in which you will be trenching the walls. If this is not possible (when the wiring is not distributed among rooms and groups of electricity consumption), turn off the electricity throughout the apartment. You can power the power tool from your neighbors using an extension cable (“carrying cable”).
When cutting horizontally laid channels under the ceiling, use some kind of stand. A stepladder is not recommended due to poor stability.
Residents apartment buildings must take into account the rights of others: power tools produce noise that may disturb them. In order not to turn into the famous “neighbor with a hammer drill”, the hero of jokes, hammer at a time convenient for those around you.
That, in fact, is all the theoretical calculations, you can get to work. But in practice, there is a high probability of encountering unforeseen difficulties, and the repair will enter the protracted stage. To be sure to get the desired result, it makes sense to call a construction team to carry out the work.
Video: Grilling for beginners
When making repairs in an apartment or house, every owner is faced with the stage when it is necessary to lay new wiring. This is done in order to install new sockets, since there is no power supply in their intended locations. It would seem: I bought a branched wire, invited a professional and that was the end of it. But the work of a master is not free, and you can tap walls for wiring yourself. It is enough to carefully study the material in the article and correctly apply it in practice.
How to properly tap a concrete wall
Before starting work, take a sheet of paper and a pencil to schematically depict the passage of the wire, the exact locations of switches and sockets. To do this, it is recommended that you familiarize yourself with the set of rules for the distribution of electrical equipment in documents 3.05 06-85 SNiP. Many people think that they know how to wire, but in fact, unfamiliarity with the basics, at best, leads the amateur electrician into a dead end. It’s better to read the main points once and do the job efficiently. Below are 6 basic requirements that must be followed:
- Do not carry out horizontal grooves further than 150 mm from the ceiling slabs.
- Beware of vertical grooves near gas pipes. The distance from them should be at least 400-450 mm. Corners and windows should be at least 150 mm apart.
- Walls can only be tapped horizontally or vertically. Ideally, there should be no unnecessary bends. The only exception may be the attic design: here the wiring is laid parallel to the wall at an angle.
- The length of one continuous furrow should not be more than 3 meters, and the depth and width should not be more than 25 mm.
- As well as tilts, there should be no turns. The transition to the switch and socket must be at the same angle (transition from horizontal to vertical), except in the case of joints that have a horizontal surface.
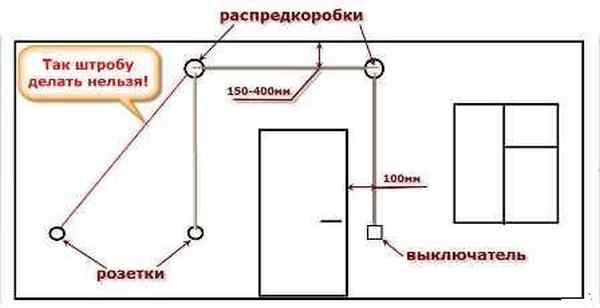
Important! Horizontal chipping of load-bearing walls is strictly prohibited. This rule applies to absolutely all buildings in any region. For panel houses, these are all walls. In this case, you need to watch a video tutorial specifically for your layout.
Having studied these rules, drawn up an action plan, determined the location of the wiring and outputs, you can begin. Don't forget about safety precautions. Any construction work requires care and precision.
Tool selection
There are a huge number of ways to groove for wiring. They are distinguished by the use of different tools: wall chaser, hammer drill, grinder, chisel and hammer, impact drill. The first method is famous for its ideal result (smooth cuts), but has a high cost. The procedure is performed with a puncher very quickly and has a relatively low price. Grinding with a grinder produces even furrows, but creates a lot of difficult-to-remove debris. The only advantage of a chisel with a hammer in this case is its cheapness. But if you want the work to be of high quality, don’t skimp on tools.
How best to make furrows, choose for yourself. The work depends not only on the tool, but also on the master, so it is better to check the correctness of the actions once again than to redo the work twice.
How to tap walls for electrical wiring with a hammer drill
Wall chipping with a hammer drill is the most popular of all existing ones. This is explained by the fact that this construction procedure does not require much time and money.
Before starting, it is necessary to carry out the classical preparation of the walls. It is no different from what is done when using other tools. All stages are extremely simple, but require a responsible approach from the master:
- Checking for old electrical wiring. Sometimes unpleasant moments happen when wires from an old electrical circuit end up in the walls. Do not risk your life and limb, check the surface carefully. There is a special device that quickly copes with this task.
- Directly marking the wall. After making sure that there are no live wires left in the wall, you can begin to schematically mark the places where the wiring is supposed to run. Draw lines from the central distribution box to the power sources (switches, sockets, lighting wires).
- Protection from dirt and dust. Don't forget to cover the windows and doors: the process is not very clean, the dust will spread throughout the room and will be difficult to remove.
Having completed your preparation, proceed to the main actions. Take a hammer drill and, along a pre-drawn line, drill small holes at a distance of about 1.5 cm from each other. Next, everything depends on your tool: either you switch it to a mode designed for punching (you need a special attachment), or insert a simple drill. Carefully connect the holes by moving the punch.
Important! If you are a beginner, do not neglect making holes, as without experience similar works It is quite difficult to achieve a perfectly straight line path.
If you still have questions, watch the video below:
Grinder when chipping
A grinder is another tool that will help you make slots for wiring. How to cut through a concrete wall with it? It is imperative to have a diamond blade, since the wall material is very durable. You can consult a professional, and he may suggest some other disk. But don’t complicate the task: diamond is easy to get, plus, the work will go much faster with it.
So, the process consists of several steps. First, we cut two strips on the marked section of the wall. The slots should be parallel to each other and have a distance of 2 cm between them. Next, you will need a hammer drill or other tool to remove unnecessary residue between the cuts. You can take a hammer drill with a so-called hammer. After this, the wiring is laid in the openings and covered with plaster.

Important! The recess for the wires should be of such a depth that it is convenient to plaster at the end of the work. When the wires are completely hidden and quite far away, there is free space left that is easy to work with, while at the end the wall looks smooth.
You can watch the supporting video:
Dust-free: is it possible?
The two previous methods have one common disadvantage - the formation of a huge amount of dust. Its layer is so large that even an industrial vacuum cleaner cannot completely clean the room. People who are interested in cleanliness in their home prefer a wall chaser for making slits. This is a tool that resembles a grinder, only it already has diamond wheels built into it. A special casing allows you to adjust the distance between the two discs and control the depth of the furrows. The advantage of a wall chaser is that it is a vacuum cleaner that does not allow dust to escape beyond the casing. The disadvantage is the price of the tool. For disposable construction work This method is clearly not suitable: you will have to buy the tool for a significant amount. But if you require absolute cleanliness, you can rent a device. Although it is not a fact that it will be inexpensive.

How much does the construction procedure cost?
The price of the process directly depends on the criteria for its implementation. It is clear that doing it yourself at home is more profitable. The cost will directly depend on the tool, plaster, and the wiring itself. Sometimes it turns out cheap, and sometimes not so much. For example, having chosen a hammer drill as a device, you only need to pay for the wires and termination materials, because, as a rule, every man has a tool. But if you give preference to a wall chaser, you are unlikely to save money.
Having decided to order the work of a master in construction company or from a private specialist, you should not expect an acceptable price. Get ready to shell out a pretty penny. This work is dangerous, so payment is requested accordingly.
Home renovation is never complete without making channels for electricity, so it is important to know the basic requirements for wall grooves, as well as follow safety rules during construction.
One of the stages of major renovation in a modern apartment or house is partial or complete replacement electrical wiring. Installing sockets and switches in places where there were none before, as well as installing additional light sources, requires laying new wires. To prevent cables from spoiling the interior and creating a fire safety hazard, it is recommended to hide them in the wall. For new branches of the home electrical main, you need to cut grooves, and if you do not want to spend money on the services of professional electricians, you will have to do this yourself. In this article we will figure out how to tap walls for wiring, highlight the nuances of this procedure, and also answer the question of what tools are best to do this.
Grilling walls for laying wires: main nuances
Before you ditch the walls of your house for wiring, you need to pick up a pencil, a sheet of paper and draw up detailed plan wiring, which will provide for the placement of all electrical elements - from lamps to switches and sockets. You also need to take into account the material from which the building is built (aerated concrete, brick, wood) and select the tool that is best suited for arranging a groove for electrical wiring.

The distribution of electrical wires in the walls of buildings is regulated by building codes and rules, which need to be studied at least familiarly, since failure to comply with them may cause a violation of electrical safety when performing work. General provisions these documents are:
- The wall for laying wires should be tapped in such a way that the groove is directed strictly vertically or horizontally.
- The vertical groove must be located at a distance of no less than 0.1 m from the wall openings.
The distance from the electrical groove to the gas main must be 0.4 m or more.
- The horizontal groove must be located at least 0.15 m from the ceilings.
- The depth and width of the groove should not be more than 0.025 m, and its maximum continuous length should not exceed 3 m.
- The wiring should not have large quantity turns on the cable path to electrical elements from distribution boxes. It is not recommended to use more than one corner transition.
- Laying horizontal grooves in load-bearing walls is prohibited.

The layout of the wiring must be drawn up, guided by the above rules - this will allow it to be carried out in accordance with current regulations and without violating safety requirements. When the electrical wiring is planned, you can move on to the next stage of work, which involves cutting the walls for wiring yourself.
Grilling walls made of aerated concrete and brick
Aerated concrete is very durable, so using a chisel and hammer to work with it can hardly be called a reasonable solution. To the question - how to groove a concrete wall - we can answer: it is best to use a wall chaser. It will allow you to cut a groove in the wall for wiring without dust, with minimal time and labor costs. But if you, like most ordinary owners, do not have such an opportunity, use a hammer drill or grinder.
Brick is the most convenient material for this work. The mixture of cement and sand, which is used to connect the elements of a brick wall, can be easily knocked out even with a chisel and a hammer, so arranging a horizontal groove does not take much time. But punching a vertical groove will be more difficult, since in this case you will have to work directly with the bricks.

Marking walls and preparing them for work
Before starting gating, it is necessary to find out whether there are hidden electrical cables along the planned route. This can be done using a special device - a locator, which will quickly determine the location of the wire. This way you can avoid the risk that the tool will fall into a live cable during operation.
After this, the wall needs to be marked along the route of laying the future groove.
The marking should begin from the distribution box, and then lead it to the places of future installation of electrical devices (sockets, lamps, switches).
Before you pierce the wall, take a damp cloth and cover the doorways with it to prevent dust from scattering throughout the room.
What is the best tool to tap walls?
You can make a groove using the following tools:
- Chisel and hammer. This is the oldest and cheapest method, but it is associated with a lot of time and effort.
- Rotary hammer, impact drill. Laying grooves with this tool in domestic conditions is most often done.

- Electric grinder. This unit allows you to make the most even groove, but its use has a significant side effect associated with heavy dust in the work area.
- Wall chaser. It is the easiest and most convenient tool to tap a wall for wiring with this tool, but people whose work does not involve frequently performing the taping procedure purchase it extremely rarely due to high price device and narrow scope of use.

The procedure for performing this operation is the same, regardless of which tool you choose for the job.
Shredding walls with a hammer and chisel
As mentioned above, you should not try to cut a groove for electrical wiring in a concrete wall with these tools - such work will be very long and tedious. But dealing with a brick wall with them is quite possible. This procedure is carried out in the following order:
- Use a chisel to deepen the upper and lower edges of the marking.
- By placing a chisel across the future groove and hitting it with a hammer, knock out the top layer of the groove core.
- Removing the layers one by one, deepen the furrow by 2-2.5 cm, using a chisel and hammer along its entire length.
When the groove is ready, dust must be removed from it and treated with a primer. When it dries, lay the cable inside, then fill the groove (you can also seal it with plaster or plaster).

How to make a groove using a hammer drill?
With a hammer drill you can either punch a concrete wall or make an electrical groove in a brick wall. There are special attachments designed for this job, one of which is called a wide auger, and the other is called a spatula. The procedure for this procedure is as follows:
- Using a hammer drill with a wide drill, drill holes 2-2.5 cm deep along the markings made. The distance between adjacent holes should be 1-1.5 cm.
- Change the attachment on the hammer drill by installing a spatula instead of a drill.
- Make a furrow through all the recesses. The wire will be laid in it.
More details about punching with a hammer drill in the video:
The advantage of this method is the speed of operation. The disadvantage is that the hammer drill does not allow you to make an even groove, and the groove made will have torn edges.
Grilling a wall with a grinder
Using this tool, you can easily make an electrical groove in any wall - concrete, brick, covered with plaster. For these works, a diamond-coated disc is put on the grinder. The cutting is done in the following order:
- Using a grinder, make two parallel cuts in the wall along the entire length of the applied markings. The depth of the cut lines and the distance between them should be approximately the same - 2-2.5 cm.
- Use a punch to remove the central part from the resulting groove. If you don't have a hammer drill, you can use a hammer and chisel.
The advantage of this method is that the resulting groove has almost perfectly smooth edges. The disadvantage is the huge amount of dust generated during operation.
To prevent it from covering the entire room, it is advisable to use the help of another person who will hold the suction hose of a working vacuum cleaner near the cut while the grinder is working.
The video shows an example of gating with watering:
Cutting an electrical groove with a wall chaser
This tool is like an improved grinder. It is equipped with two diamond discs that can be fixed at the desired distance from each other. They are covered with a casing that prevents dust from flying around the room and prevents the wall chaser from hitting the wall.
Adjusting the position of the disks, which is provided for by the design of the device, allows you to change the width and depth of the groove being made. In addition, the tool casing is equipped with an outlet to which a vacuum cleaner is connected during operation. Thus, dust generated during work will directly enter the garbage collection bag, which will keep the room clean.
The wall chaser allows you to as soon as possible, and in addition, cut a groove in the wall without dust, after which all that remains is to remove the core from it. As in the case of an angle grinder, this can be done with a drill with a chipper, or a hammer and chisel.
About working with a wall chaser in the video:
Conclusion
In this material, we figured out how to properly tap a wall in a room for electrical wiring. By choosing a tool taking into account the material from which the walls are made, you can quickly cope with this work without dusting the room. As you can see, having a modern tool and following the recommendations given, you can carry out electrical wiring in your home yourself, without resorting to the services of electricians.
Before starting to prepare the walls for gating, a project for the electrical supply of the apartment must be completed, namely a wiring plan with installation locations for switches and sockets.
Chasing walls for wiring is a rather labor-intensive process. Most often, the need to create new cavities for electrical wiring arises when installing switches and sockets in a new location, as well as new lighting devices when remodeling an apartment.
During the gating process, a lot of dust is released, therefore, in order to prevent the spread of dust to other rooms, it is recommended to cover the entrance with a damp cloth, such as a sheet.
Tools you will need:
- - level (can be laser), tape measure and pencil;
- - chisel and hammer;
- - a hammer drill with two bits 80 and 65 mm (for distribution boxes and socket boxes);
- - an angle grinder with a diamond blade or a wall chaser.
Before starting grooves, you should check whether old cables are passing along the path of future grooves. And if there are any, is there voltage on them?
To check the walls in this case, a special device is used - an indicator. In addition, we must not forget about safety precautions when working with power tools.
Choosing tools
Very often, many people associate the process of slicing, first of all, with a hammer drill, because almost everyone has such a tool. But there is another, special technique designed to carry out just such work.
#1. Thus, an angle grinder with a diamond blade has greater productivity; the edges of the recesses are smooth and quite easily brought to an aesthetic appearance. The disadvantage of such a tool is the very large emission of dust - as soon as you start work, the entire room will be shrouded in a dense curtain of corrosive construction dust.
In this case, a respirator and glasses, open windows and complete removal of furniture from the room are not very helpful - brick dust can penetrate even through doorways sealed with film.
#2. Using a chisel and a hammer, it is quite easy to make a groove in plaster of great depth (1.5-2 cm), but making a groove in brick, and especially in concrete, with a chisel is almost impossible.
#3. As a more acceptable tool, you can use a “perforator-chisel” combination - essentially this is a mechanized hammer. The main disadvantages of this tool are a lot of noise and vibration - all neighbors will immediately know about the work being carried out in your apartment.
As a result of impacts, the new plaster will become covered with unnecessary cracks, and the old one may bounce off in whole layers. The result is a rough and sloppy groove, as if carved out by the claws of an unprecedented animal.
#4. The optimal tool for wall gating is a wall chaser. It is a modified grinder, equipped with two disks and a platform for moving along the wall. A construction vacuum cleaner can be connected to the tool casing.
The wall chaser is specially designed for such work; with its help, you can make high-quality and neat gates in a matter of minutes. Two discs produce twice as much dust as one, so when working with a wall chaser you cannot do without a construction vacuum cleaner, which is connected to the tool casing.
Dust harms not only humans, but also the instrument itself. To perform one-time work, purchasing a wall chaser with a construction vacuum cleaner is not profitable, since these are quite expensive tools. If possible, it is better to rent these tools.
Work order
Often performed using a hammer drill. First you need to prepare the wall surface - mark with a pencil the wiring routes and the installation locations of switches and sockets.
When planning wiring, it should be taken into account that wire crossings are not allowed, and the cable length should be as short as possible.

To make holes for switches, sockets, and boxes, crown-type hammer drill attachments are used. When working with a hammer drill, you should use by individual means protection - glasses, a mask to protect the eyes and face.
For execution grooves for wiring along the marked line at the minimum possible distance from each other, holes of the required depth are drilled with a hammer drill. To remove the bridges between the holes, place a flat chisel on the hammer drill and turn on the no-drilling mode.
After this, the wires are laid in the groove, socket boxes and distribution boxes are installed in the corresponding holes. Then all wiring elements are fixed with alabaster.
Chipping a brick wall
To work on a hard brick wall, a chisel and a hammer are not enough - you will need a more powerful tool - an angle grinder with a diamond blade or a hammer drill, and with the help of a hammer and chisel you can finish only some details.
If the brick wall is not yet covered with plaster, then the task can be much simplified. All wiring is marked along the brick wall; holes for dowels are drilled along the lines every 25-40 cm.
In these places, using self-tapping screws and special fasteners, the wiring is attached to the wall. You can use pieces of the same wire as fasteners. To install socket boxes and distribution boxes, it is necessary to drill the corresponding holes.
The wiring installed in this way protrudes above the surface by 4-5 mm and is easily sealed with a fairly thin layer of plaster.
Before starting work, you should remove from the walls the remains of old wallpaper and other elements that may interfere with the movement of the wall chaser. Pieces of wallpaper can clog the tool casing, blocking the exit of dust, which can result in an emergency.
If repairs are necessary in the future, with the help of these photographs you can easily find the wiring locations. You can also refer to these photographs when you need to drive a nail or dowel into the wall so as not to accidentally hit the wire.
It is best to make holes for boxes or socket boxes as follows:
- 1. - drill a small hole (8 mm) in the center;
- 2. - use a crown to make a small cut to indicate the contours of the future hole;
- 3. - drill 8-10 thin holes along the contour;
- 4. - use a bit to drill the hole to the end.
When making holes for boxes or socket boxes, you can stumble upon fittings. It is strictly forbidden to damage fittings in panel houses. This will lead to a violation of the strength of the walls and structures of the house as a whole, which can subsequently lead to cracks in the walls and their complete destruction.
If the sockets are installed at a small height from the floor, then wall gating work can be significantly reduced by laying the wiring in the floor.


