Patterns for dot painting with contours. Stencils for dot painting for beginners bottles and boxes. Materials for dot painting
Many people have asked me to tell me how I make dot patterns. Apparently the time has come for my first MK in point-to-point technique(point to point). Of course, I can’t compare with the eminent masters of the Internet, and I’m not exactly a good photographer, but I think some things will become clearer for those who are just starting to do dot painting.
Master class... see below
I... have selected stencils - templates for YOU... and some information and photos...
Black and white templates - some use them as coloring books for children, others as material for handicrafts... But in fact, they are used in scrapbooking and are called DIGISTAMPS. What it is? These are images that could be stamps, but not everyone has the opportunity to have such stamps (specific or large assortment), so they are simply printed out and used. This way, you have opportunities to decorate your card or other work.
Perhaps for YOU it’s just a dotted set... for me it’s many of many things... including Romanian and Dec... and art... it all depends on imagination and knowledge...
★☆★☆★
←Ƹ̴Ӂ̴Ʒ →★☆★☆★
★☆★☆★←Ƹ̴Ӂ̴Ʒ →★☆★☆★ 
★☆★☆★←Ƹ̴Ӂ̴Ʒ →★☆★☆★ 
★☆★☆★←Ƹ̴Ӂ̴Ʒ →★☆★☆★
★☆★☆★←Ƹ̴Ӂ̴Ʒ →★☆★☆★
Dear needlewomen, masters of dot painting, if the area of small objects - bottles, boxes, notebooks - has become cramped for you, I suggest you try to apply your skills on large surfaces: decorative panels using technology Point-to-Point They will be able to raise the cost of your home :-)


 .
.


★☆★☆★←Ƹ̴Ӂ̴Ʒ →★☆★☆★
Master classes
These contours have thin noses and this is very important. There are 6 colors in the set.
But the set does not include Copper. I buy it separately.
Other paints in the set are usually sold separately as well.
And also, in some works, I use Gamma paints - Copper with sparkles and Gold with sparkles. The noses there are quite thick, but they are suitable for these colors.
I know that there are contours for glass and ceramics from PEBEO and IDEA, but they are not found in our area and I can’t say anything about them...
The first thing to do is to prepare the surface to be painted - wash with dishwashing detergent, dry and degrease with alcohol or vodka. Don’t put the vodka far away in the future - creative person It’s impossible without vodka!))) - during the work, hand marks will remain on the glass and we will remove them with a swab soaked in vodka. If you degrease the glass poorly, the paint may not adhere well.
You can practice on a regular glass, which you don’t mind))
We learn to place dots by lightly pressing on the tube. We try to ensure that not only the points are the same size, but also the distance between them
It turns out? Now we try to put small points
Now we are trying to draw a curved line.
That, in general, is all the wisdom! All that remains is to fill your hand. Drawing stripes is boring, so I suggest drawing a floral pattern
Please note that you need to alternate dots of different sizes - then the drawing will not look monotonous. And we continue
And I do some work on primed glass. Serves as soil stained glass paint. And then the finished work might look like this
.............
I would like to primarily address this master class to beginners in the point-to-point technique, and to everyone interested in this technique.
I took as a basis a generalized oriental motif, in which there is a figure of a heart as a symbol of life, a traditional hexagonal star and droplets - a symbol of purity. I never learned to draw, so I took the base for the plate from the Internet (unfortunately, I don’t know the author of this ornament) Here’s the base

The main thing is to always remember that we don’t just want to copy some drawing, but we need a foundation that we will fill with colors and soul.
Prepare a plate for work. First, degrease it well and dry it.
In order to transfer the design to the plate, I used my favorite carbon copy method. I secured the carbon paper with the drawing using stationery clips and began to trace the outline of the drawing. I do this with a pen so that I can definitely see what has already been circled and what has not.

After removing the carbon paper, we get faint black lines on the plate. The main thing is to be vigilant - the carbon mark is not durable, so you don’t need to rub it vigorously with your hands, otherwise it will erase very well. The downside of this mark is that there is dirt on your hand, so you can put a napkin under your hand when working

When drawing using the point-to-point technique, the most important thing in my opinion is steadiness of the hands. Because I am right-handed, then in my case the position of my hands looks like this. Both elbows are on the table. The left hand is located under the bottom of the plate, which allows you to scroll it when applying a design, without touching the design itself. The right hand holds the outline at approximately a 45-degree angle to the surface of the plate, plus resting the edge of the palm on the very edge of the plate for additional stability.

Before making a dot outline, I advise you to take a napkin and try to make a dot on it. This way you can understand the thickness of the contour, whether the spout is clogged, and at the same time, if you accidentally pressed hard on the contour and got a fat point, save the plate. If everything is satisfactory, we begin to apply the drawing from the center. Everything is simple here; it is more difficult to smear the pattern in the center with your hand than if it is on the edges.
Spot painting is gaining more and more fans. It attracts into its ranks those who draw professionally and those who complain about the lack of this skill. This hobby does not require any special skill, and you can decorate anything with such unusual painting, including household items, textiles, and boxes. Sometimes each painting item requires its own paint, but more often than not, you can find it in a tube with a spout, which is what we will need. Brushes are not necessary here.
Dot painting is perfect for decorating a wide variety of objects - you can use this technique to decorate a phone case, a T-shirt, a thin sweater or a turtleneck; you can also use it to decorate dishes or cans for bulk materials. New Year's painting also looks great - using dots you can create frosty lace and animal silhouettes on glass or a mirror, or decorate a bottle of champagne. Pictures from the gallery can serve as a source of inspiration; round stencils for painting plates can be downloaded on the Internet, and in our article we have instructions and instructions, and of course, a useful video at the end.
Since ancient times, dot painting was called drip painting, because it was painted with drops blown from an ordinary straw. Now, with the advent of paints in convenient containers, the process has become noticeably easier.
Drawing technique dots were invented by Australian aborigines, and a little later it could be found among artists from India, Thailand, Africa and Persia.
It was from drip painting that another type of equally popular art “Mehendi” arose - body painting with henna. Now, henna designs have changed a lot, and in addition to dots, you can also find plant elements in it. However, dot painting has also undergone changes; mosaics are made from it and entire landscapes are painted, not limited to simple ornaments.
Dot painting patterns look very simple and stylish. If you try to mindlessly engage in this hobby, then you can easily turn it into a relaxation session. The easiest way to do this is to use contours; they are suitable for beginners, professionals love to use them, and applying patterns with such convenient paint is a pleasure.
Usually, The subjects of painting are:
You can put drawings on anything. It is important to remember that each type of material has its own paints. Those that promise to last a long time on glass will not last even a day on fabric.
Gallery: dot painting with contours (25 photos)


How to start?
 Some special skills and talents are not needed for this skill, but you can practice in advance on a piece of paper, placing dots side by side, trying to maintain the same distance between them. Too much a big difference will be noticeable in the finished drawing, and if the dots are placed very close, there is a high probability that they will merge, turning into one large dot. Masters of dot painting They simply draw at incredible speed, but many of them use auxiliary materials for application. After all, it’s very easy to make a mistake with color or location. Therefore, even they do not neglect the schemes.
Paints should be selected based on the subject of painting. If you choose the right paint for the material to be painted, follow all the rules of application and the necessary procedures, then, in the end, you can get long wear resistance. Acrylic paints are most often suitable for many objects, but contour paints, which exist specifically for dishes, fabric and wood, are considered the most convenient. Acrylics are also suitable for most materials, but their problem is inconvenient packaging. Having chosen the necessary decoration item and type of paint for yourself, you can start looking for a stencil for beginners.
Contour paints exist and those that remain convex even after drying, and look like rhinestones. Such a drawing will especially attract attention with its volume.
You can make a stencil yourself using any design, your own or found on the Internet. It is best to use an unnecessary folder and a sharp blade for such purposes. Ordinary paper can also serve as stencils for dot painting, but it will not last long, although it is ideal for decorating glasses and bottles because of its flexibility. Dense materials will cost more flat surfaces, textile.
Sometimes, templates serve as auxiliary material with patterns applied to them for dot painting, glued on top of the material. Most often, they use some specific elements simply to maintain dimensions.
Patterns with contours
 It’s easier to come to some more complex outline drawings by trying out stencils in dot painting, so your hand will become “filled.” By copying them, in the future you can easily create your own, unique patterns, hone your own style, and find the best color combinations.
Templates for dot painting can never be neglected. They are helping see the drawing, which should be obtained subsequently, do not deviate from the dimensions, and avoid distortion of the ornament and study the basic ornaments for painting.
Schemes for dot painting can be used by those who have well trained their hand on dot patterns. You can print it out or redraw it, placing it under a plate or in a glass, for further dot painting with diagrams.
It should be remembered that many surfaces should be degreased before applying paint, especially glass. . This way the contour will lie more firmly, and will last longer.
Decorating plates
Having chosen a plate for painting, you should also choose a function for it: if it remains for food purposes, you need to carefully read on the paints whether it can continue to be used for these purposes. If the plate will serve a decorative role, then the choice of colors expands to any that is suitable for this type of art.
Nowadays, making decorative interior elements with your own hands has become very popular. Picturesque plates are especially common. They can decorate the interior of the living room, kitchen, hallway. Will bring special comfort to country house. Painting can be used to decorate dishes, mirrors, various accessories, and to give a unique ornament to a teapot. This is also a good gift for your family and friends.
There are several types of painting on dishes:
- Tiffany - a similar technique allows you to get the effect of a three-dimensional pattern.
- Khokhloma is a very popular painting, done in black, red and gold colors.
- Zhostovo - the main motifs are flower bouquets.
- Dotted - a drawing is created using dots.
- Gzhel - simple drops, meshes, flowers, lines. Made in blue tones on a white background.
- Mezenskaya - rhombuses, crosses, discs are made in black and red colors.
- Inscriptions - simple words, phrases, lines and so on.
- Geometric patterns are a design consisting of many shapes and lines.
- The whole composition is landscapes and still lifes.
The Russian folk style includes Gzhel, Khokhloma, Zhostovo and Mezen paintings. Wood products are painted in the Khokhloma style.
Petrikov painting is popular in Ukraine. Floral patterns occupy a special place in the technique: roses, cornflowers, dahlias, asters and other flowers. In this style, Ukrainians painted the walls of houses, stoves, dishes, and clothes. Each nation has its own national painting, which is unlike others.
Origin of the painting
 Let's take a closer look at dot painting. It appeared in ancient times. Initially, the dot was used in coinage as a means and basis for the design. This technique was used by residents of Persia and India, Thailand and Africa. The Australian Aborigines also used a similar technique to transmit messages from generation to generation. In such messages they conveyed history, their way of life, victories and defeats.
And nowadays, body painting with henna is popular in many countries, such as Africa and India. The formed dot painting has survived to this day, which allows you to create light, elegant and beautiful designs. Using the dot painting technique, you can decorate dishes, clothes, shoes, and interior items. Plates, glasses, bottles decorated in a similar way look beautiful. Creating decorative elements decorated with patterns of dots is a fun activity that does not require special knowledge. To create a masterpiece you need to follow the recommendations. Let's look at dot painting for beginners.
The rule for drawing the contours of an ornament lies in the very name of the technique: the pattern is made up of a set of points located next to each other. An individual dot can have different sizes and colors. To obtain a clear pattern, use a pre-drawn sketch, or you can download ready-made stencils for dot painting with contours from the Internet . It's better to start drawing on simple things that you are not afraid to spoil.
Necessary materials
When choosing paints for creativity, decide on what surface they will be applied. Otherwise, the pattern will not last long, and all your work will be lost. The following paints should be used for painting:

Also, paints are water-based, which can be easily washed off with water, and indelible, organic-based - they can be removed from the surface only with solvents such as white spirit.
There are also two types of paints:
- Overglaze - a mixture of pigments with fusible glass. They are applied to glazed dishes.
- Underglaze - a mixture of pigments with glaze. They are used to decorate unglazed surfaces.
 Depending on the result you want to get, choose glossy or matte, translucent or opaque paints. To obtain convex dots and “pearls” it is convenient to use 3D gels.
To degrease the surface, you will need alcohol or nail polish remover.
You will also need acrylic primer or any paint to create a background: acrylic, stained glass, automotive or gouache.
You will also need acrylic varnish to cover the product after applying paints.
Drawing process
The outline should be placed vertically, held in your hands like a pen.
We bring a tube of paint to the desired place on the product and lightly press it with your fingers. A droplet will appear on the spout, connecting to the surface of the object.
The spout does not touch the surface to be decorated. This allows you to put the same points.
Once the point has been reached the right size, stop putting pressure on the tube. And we tear off the contour from the product in a vertical position.
In a similar way, we work out the entire sketch with contours by forming chains of dots.
 Dot painting looks good on plates and bottles. Let's take a step-by-step look at making a painted plate.
Before work, you should carefully work out the sketch, which can be transferred with a pencil to a previously degreased product. If you cannot draw yourself, then use diagrams and templates from the Internet. Round ornaments, mandalas for coloring, and so on are well suited for plates. Choose the pattern you like and print it out. Next, determine your color palette. Required for operation a small number of colors, do not overdo it in the selection, it is enough to choose 1-4 shades. Their choice depends on your imagination and the chosen pattern.
For the first works, it is better to use a transparent glass plate as a base. Before decorating, thoroughly degrease the surface. We place the sketch under the plate and secure it with tape. Before you start painting the product, practice creating contours on paper, decide on the pressure on the tube so that the dots are neat. And only after that start decorating the plate.
We start working from the center of the drawing, gradually working out the outline. If you are working with several contours, then you need to first work on everything with one color, let it dry, and only then start working with a different color. First we draw large elements, then move on to small details. Gradually, dot to dot, you get a picture. When creating lines, maintain a minimum gap between the points so that they are readable, but do not turn into one continuous line.
After painting Allow the paints time to dry, then cover with a layer of varnish to secure the design.
 Since we had a transparent plate, it was time to choose a background. We take paper of different colors and put it under the plate, decide on the background. When the background paint is prepared, treat the back of the plate with alcohol. Apply paint along the glass from the edges to the center until the surface becomes smooth. Leave to dry and then varnish.
If you are painting an opaque plate, then first apply the background to a previously degreased surface. Then you mark the future drawing and only after that apply the dots.
Glass painting
Dot painting can decorate glasses, bottles, vases, creating unique and inimitable interior items. To decorate them, airy, light ornaments in the form of curls are used.
The technique of applying dots when painting glasses is the same as for plates. Draw a sketch on a piece of paper, or if you wish, you can cut out any design you like. Attach with tape to the inside of the glass. We select colors. We degrease the surface of the glass and begin to apply dots along the contour of the design. After applying the outline, let the paint dry. Then we gradually fill the drawing with another color. After the glass has dried, apply colorless acrylic varnish over the design. The unique glass is ready. A similar technique can be used to make wedding glasses. In this case, an entertaining hobby can be a way additional income. Products self made are expensive.
To paint on a bottle, you need to get rid of the labels. It is convenient to use flat-shaped bottles. Thoroughly degrease the surface and, if you are not satisfied with the color of the bottle, apply background paint or primer. Then they draw the drawing in pencil and begin painting with paints.
When working with contour paints, do not forget to clean the elongated plastic spout from dried paint; this can be done conveniently with a sewing needle. If you open a new tube of contour, test it on a small piece of glass. And see how the drop behaves. Sometimes it is necessary to put a fresh circuit in the refrigerator for a couple of hours before working. It will become thicker and will not spread.
Oriental patterns
 Oriental patterns look expressive on ceramic and glass surfaces. The tradition of decorating dishes first appeared in the East in Persia. At that time, the ornament was applied not only as decoration, but also as a talisman. And all the elements made on the products had a certain meaning.
The traditions of painting have been preserved to this day, and colorful patterns on multi-colored dishes can always tell something. For example, a beautiful flower in the center represents the sun; circles - the cycle in nature; triangles are a talisman against the evil eye. Items decorated with patterns will create a special oriental atmosphere and will be a good addition to any interior. They fit perfectly into any stylistic decisions. Oriental patterns have some features:
- Rhythm.
- Repeatability of elements.
- Abstract forms and stylized objects act as individual elements.
- The most used elements: rosettes, cones, birds, Turkish cucumber.
- The main feature of oriental patterns is the carpet filling of the surface. There are no free spaces on the surface of products painted in this way.
If you're having trouble coming up with a pattern, then the following can be used as patterns for painting:
- Interesting patterns on fabrics, made in different styles.
- Patterns for cross stitch and mosaic weaving with beads.
- Crocheted openwork napkins and knitting patterns.
- Ethnic patterns and ornaments. You can find them in books and print the pattern yourself.
- Cards and napkins for decoupage.
 Even a child can do this type of painting. He will be able to make simple patterns on his own, and more complex patterns - under the supervision of adults. This activity is good for developing fine motor skills child, perseverance, attentiveness. It also brings together adults and children, which is very important nowadays. The child can be trusted to cut out the sketch.
Everything described above will allow you to create real works of art in a single copy.
Good afternoon dear readers of the blog site. Today I will tell you and show you the progress of my work using the technique of dot painting with outline outlines. The stencils that I used will help you draw lace with symmetrical accuracy and will make it easier to do the painting itself. I gave it the same name as the name of the decoupage card itself, Dreams of Paris.
This technique of imitation lace will help you apply the acquired skills when decorating any item.
Well, friends, let's get started?
Materials and tools
For this work we will need:
- Round plywood base with a diameter of 30 cm
- Water stain
- Decoupage card A3 format Dreams of paris
- Acrylic paints
- Glue for decoupage
- Acrylic lacquer.
- Contour acrylic paints
Preparing the watch base
We take our workpiece, sand the surface and cover it with stain in several layers until we obtain the desired shade and uniform color; in this work I used chestnut-colored stain.
You can also experiment and get the color you like. Just keep in mind that you need to dilute as much paint as necessary to cover the entire workpiece, because it is very difficult to repeatedly obtain the desired shade when mixing different paints.


Decoupage
For this work we used a decoupage card.
We cut out the fragment that we liked in the shape of a circle, having previously marked the center of our picture. Soak our picture in water at room temperature for a couple of minutes. Next, we paste our picture using glue using the file method, strictly in the center of our workpiece. When centering, we focus on our marks where we marked the center.


Please note that in this work we are not thinning our decoupage card, but gluing it onto a dark background. When the picture dries, it will be as bright as it was originally.
We cover acrylic varnish apply our work in 3 layers and go over it with sandpaper No. 800

Finishing the picture acrylic paints. Whitewash, burnt sienna, blue, green, a little yellow - by mixing these colors and achieving the required color, we draw the picture. To prevent the underdrawing from extending beyond the edges of the picture, you can use a homemade paper “stencil” or use masking tape for this purpose. After completing the painting, we fix our picture with 2 layers of varnish.


painting
Let's start our dot painting. We hold the tube as it is comfortable for our hand, experiment and find your comfortable position. It’s convenient for me to hold the tube, slightly tilted like a handle. Also, the hand should lie completely on the table (support), including the elbow, so it will not shake. Using a white outline, we go along the edges of the picture, point by point. We try to ensure that our points are the same size. Before applying, experiment on a draft. We try to place them as much as possible closer friend to a friend.

Let's move on to our lace. Using a ruler and a watercolor pencil, you can draw on barely noticeable dots at equal distances. We will focus on them. This scheme will help to draw a more symmetrical picture.
Using a ruler and a contour, at an equal distance from each other, mark the larger points and connect them as in the photo below.


We draw the second row identically.


And may the hours you created bring you even more minutes of happiness and joy. Thank you for stopping by, see you again! Bye bye.
Recently, such an activity as dot painting has gained popularity among housewives and needlewomen. Even a beginner can cope with the task of painting with contours, since there is nothing complicated about it. All you need to practice dot painting is patience, accuracy, a template and the appropriate tools.
In contact with
Classmates
- materials needed for spot painting;
- where to get samples for painting;
- what materials can be used;
- stencils for painting.
Materials for dot painting
To paint window glass, instead of paints, you can take nail polishes. But unlike acrylic paints, nail polish is the least durable. But this method can be used for one or two seasons. And recently, craftsmen have been using special markers that dry quickly. This option is suitable for those who can draw well. For a more voluminous drawing, you can try using 3D gels, which are otherwise called pearl paints. Don't worry if some element turns out uneven. In this case, you can use clear nail polish and carefully touch up the result. By the way, it is necessary to degrease the prepared surface with the same transparent varnish before starting the creation.
What materials can be used for spot painting?
Spot painting doesn’t always happen on glass objects, so don’t get hung up on just one ready-made templates. Real craftsmen in this business know how to show class and use other materials, the options of which we will also share:
- you can choose patterns for beading or embroidery, since the ornaments in both these cases and ours differ only in technique;
- various patterns on white or colored fabrics will be interestingly presented as a gift to loved ones, especially if the patterns are aimed at an ethnic style;
- You can also use patterns that are used in knitting or on openwork napkins;
- patterns on paper made in ethnic style (you can print a suitable image from books that describe traditions);
- paper napkins, and you can also use decoupage cards.
Where can I get samples for painting?
 Most often, masters who have been doing dot painting professionally for a long time, come up with patterns themselves. Some do things differently. First, the craftsmen put points, after which they draw lines from each point to another and at the end they complete the details that were initially missing. This method is quite mysterious and interesting if you observe the whole process. But both methods are used by far from beginners, so a little advice for beginners - first you need to use standard methods, and then move on to more complex ones.
Beginners can use stencils or samples, which can be found on the Internet or in specialized stores. The easiest option for beginners is to trace the drawing. That is, let’s take, for example, a transparent plate and place a pre-printed drawing with patterns under it. Next, we outline the image and the painting is ready.
 Many people use dot painting of plates as a gift to your loved ones, because a homemade gift is the best. To make such a gift, you need to find a stencil with images or patterns that match the shape of the plate. Most often, the drawing starts from the middle, which is marked with a dot, and extends to the edges. When dot painting plates, it is important to apply the patterns very carefully and uniformly, since one mistake can ruin the entire appearance of the gift. To understand how this happens, it is best to watch a video with a master class before starting work.
For dot painting of bottles You will need elongated thin patterns, long ornaments or images with wide ribbons. By the way, it is for glass transparent bottles of different shapes that you can use the decoupage method. And you can also depict animals on bottles, for example, Leopold the cat.
Ideas for dot painting on glasses plenty too. Mostly beginners use regular confetti images. The scheme of such a drawing is simple, because what could be easier than drawing circles? If the glass is without a stem, then you need to put the circles at the very bottom without spaces. The higher you draw the confetti, the less often the circles should diverge. To make it more clear, circles need to be drawn in the form of bubbles. This is where quick-drying markers in silver and gold colors come in handy.
For more complex images, you will need a picture, especially if you want to depict dot painting on stemmed glasses. In this case, you will need a little more accuracy, but the result will be more satisfying. You can draw branchy trees on the sides with legs. Whether they will be without foliage, or, conversely, with a thick “hairstyle,” is up to you to choose. Before you start this kind of work, you should definitely watch the master class.
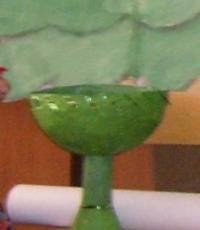
 The simplest idea for this option would be a drawing in the form of some kind of flower, where the stem is the stem, and the container is the petals and core of the flower. Let's take, for example, a sunflower and paint its stem very carefully with green acrylic paints. Don't forget that the outlines should be brighter than the rest of the elements. Sunflower leaves should be drawn on the glass stand in the form of several pieces.
Next, let's move on to the core and at this stage, the main thing is not to overdo it. The seeds can be depicted as black dots at the very bottom of the glass. And the last stage of painting on a glass is the petals. You can draw no more than six of them, because sunflowers have quite wide petals.
And also, other designs can be depicted on glasses, for example, birds with long legs. In this case, templates in the form of a stork, a heron, a pink flamingo, and so on are just right. Their delicate and fragile paws will look great on the stems of glasses. But such drawings are much more difficult to apply and it is better to entrust this task to masters or artists who will definitely show their class.
It is much easier to work with glassware, since you can trace the pattern along the contour and see if all the patterns turn out as even as in the picture. As for other materials, then this will require a more trained hand. In any case, you can watch a few master class lessons and learn how to do dot painting yourself.