725 pale print. Printing consumables at wholesale prices. Main problems and ways to solve them
Over time, any owner of a printer or multifunctional printer has to solve various kinds of problems associated with both the hardware and software parts of the device. One of the fairly common problems is the following: why does the printer print faintly when the cartridge is full? This problem is perhaps one of the most pressing among all models of laser printing devices. If your printer begins to print faintly, then do not rush to the nearest service center, because you can solve this issue absolutely independently. The main thing is to treat it with all seriousness and responsibility, because... The sources of such a problem can be very different.
In general, a light image is a consequence of insufficient optical density of the laser device. This parameter depends on the charging voltage of the photo roller, the power of the laser beam, the “blackness” of the toner, its amount transferred to the drum and the amount transferred directly to the surface of the paper. Of all the listed quantities, the amount of ink transferred to the photo roll is of particular importance - the optical density of the print largely depends on this parameter.
Main problems and ways to solve them
If you notice that your laser printer prints dimly, then first of all pay attention to the settings of this device. In this case, we are talking about a setting known as “Economy Printing”. The fact is that such a function helps to extend the service life of the device’s cartridge, however, this is of little use, because this may negatively affect print quality. This function helps the device correctly distribute the supply of dye. But when there is less than half of the toner in the cartridge hopper, then this setting begins to save it, as a result of which the device produces poor quality prints. In this case, printed documents may appear faded. Therefore, any owner of a laser printer can be recommended to disable this function in advance, especially since with its help you can save at most 40-70 additional pages.

But if for some reason you are unable to simultaneously replace the elements described above, for example, for financial reasons, then you can resort to some other methods. It should be noted that the surface roughness of an element such as a magnetic shaft may decrease for reasons that include wear of the part and filling of the “pores” on its surface with a coloring agent. What to do in the first case? It is impossible to cope with shaft wear, because... this process is irreversible. But the problem associated with its pollution can be solved, and independently. To eliminate the filling of “pores” with toner, it is necessary to clean the roller using a strong solvent. After this, the printing printer should produce a fairly clear image. 
To clean the “pores” of the magnetic shaft, purchase an affordable product such as acetone. But remember that you cannot use excessive force, because... This way you can damage the shaft coating and reduce its roughness. Also, do not forget that acetone is a toxic substance and when using it, you must take all precautions, including ventilating the room. After cleaning all the “pores” clogged with toner, you need to print a test document. If you are completely satisfied with its quality, then the problem is solved, otherwise you will have to contact the service center.
As practice shows, in order to solve the problem of pale printing after refilling the laser printer cartridge, it is advisable to also clean the dosing blade. The fact is that when a printing device is used, a strip consisting of pressed toner is formed on the edge of this part over time. This strip, as it were, moves the dosing blade away from the shaft, which negatively affects the friction force, which gradually decreases. That is why, in order to restore normal printing, you need to clean this part. To do this, you should use dry, lint-free wipes, which, if necessary, can be slightly moistened with distilled water if dry cleaning does not remove the build-up of the dye. Even if wet wipe If you couldn’t remove them, it’s better to change the blade, or use acetone.
As you can see, the problem with a fading laser cartridge can be solved quite simply. But if even after these manipulations the device prints palely, then perhaps the reason is in the device itself, perhaps it is a disease of your printer. Then we recommend that you familiarize yourself with the materials on a specific model by selecting it in the right drop-down menu.
A laser printer is a very convenient device. Especially if it performs several functions at once (MFP). Its presence makes it possible to print documents and photographs without leaving home. However, sometimes the process is fraught with difficulties. One of them is a blurry image. It may appear even after the printer has been refilled and the cartridge is full. Why does the printer print pale? What to do in this case?
What will we talk about:
Checking settings
The first reason why a laser printer prints palely is its settings. Many models, such as HP or Canon, have an option called "Economy Printing". It helps extend the life of the cartridge:
- First, it distributes the ink so that there is enough for more printed pages.
- As soon as about half of the paint remains, the device enters economy mode. As a result, the printer prints too faintly.
Disabling this setting will help correct the situation. Thanks to it, you can print several pages or more photos. However, the image quality will suffer.

Lack of dye
Another reason why a Canon printer prints pale (this also applies to other models, for example, HP) is an insufficient amount of dye. If the image turns out unclear, you do not need to immediately run for a new cartridge or carry out the procedure for refilling it.
You should proceed something like this:
- get the cartridge,
- shake well
- put it back.
Thanks to these steps, you will be able to print dozens more pages of printed text. Moreover, this applies to devices from almost all brands and models, be it HP, Canon or others.
What to do if the situation has not changed? Either refill the cartridge or replace it.
Possible breakdowns
The laser printer prints faintly after refilling and due to cartridge failures. This element is not durable, so it often fails. Any malfunction of any complexity reduces print brightness, even if the cartridge is full.
The main parts of the cartridge are the magnetic shaft and squeegee.
- The roller allows the ink to stick to the drum. The paint receives a negative charge from the roller. The drum is positively charged. The potential difference promotes adhesion. The larger this value, the more ink will fall on the drum and the clearer the image on the paper will be.
- A squeegee is a device that dispenses paint and distributes it evenly along a magnetic shaft.
In normal condition, these parts should not have any nicks. However, during the printing process, their edges become distorted, causing white streaks to appear on images. But most often the printer prints pale.

It is worth noting that cartridges work the same on almost all models of such devices. But the process of their production is different:
- Metal is used to make HP and Canon magnetic rollers. Their top layer is rubberized. The squeegees from these companies are polyurethane.
- Samsung shafts are made entirely of rubber. Squeegees are in most cases metal.
An effective way to solve the problems described above is to replace the failed parts. The print quality will improve immediately and the image will become brighter.
Sometimes it happens that the shaft and squeegee are not worn out at all, the cartridge is full, but the HP printer prints palely. In such cases, it is necessary to clean them of excess paint.
How and what is the best way to do this?
- The magnetic shaft can be cleaned with acetone. It is not recommended to use isopropyl alcohol - it does not completely dissolve the paint.
- For squeegees, it is better to use special lint-free wipes. If necessary, they can be soaked in distilled water.
All movements must be light, without pressure, otherwise the coating will be damaged.
How to refill a cartridge correctly
In order for a laser printer to print high-quality images, the cartridges must be refilled correctly.

Both HP, and Canon, and other models are refueled approximately the same:
- Cover the work surface with paper.
- Remove the cartridge.
- Using pliers, remove the bushings that secure the photoconductor. Then take out the drum itself. Wrap it in a clean soft cloth and place it in a dark place.
- Divide the cartridge into two halves. They are usually secured with pins. They need to be taken out or, conversely, driven in (removed after opening the part).
- Carefully, without touching the rollers with your fingers, remove the rubber element located under the drum. Remove the mounting screws and squeegee.
- Shake out the trash.
- Put all the parts back together.
- Unscrew the cap of the part of the cartridge that contains the paint container. Pull out the plug.
- Add toner. It is important that the container is not filled completely. This may damage the device. The ideal option is standard dye packaging.
- Replace the plug.
- Assemble the cartridge.
It is worth remembering that in laser printers the cartridge can withstand up to 15 refills. Refilling along with replacing some elements (shaft and squeegee) is a restoration. The feasibility of this depends on the capacity of the cartridge. If it is increased, restoration should be carried out with each refueling. If the cartridge is standard, this procedure is performed much less frequently.

So, we figured out why the printer prints palely after refilling. There can be many reasons - incorrect device settings, insufficient toner, or cartridge malfunctions. You can solve problems at home. It is enough to replace failed parts, add dye or reconfigure the printer.
A series of cartridges for HP P1005 printers and their various analogues (HP CE278A, CE285A, CB435A, Canon 725, 728, 712, etc.) are distinguished not only by their fastidiousness to the quality and type of toner, but also by a number of features characteristic only of them . One such feature is reduced toner transfer density on the right side of the print. Sometimes, the operation of such a cartridge is accompanied by extraneous noise and crackling. This malfunction occurs quite regularly, usually after several cartridge refill cycles.
Figure 1. Printing defect. The right side gradually fades away. The outer frame is not printed, the barcode is not readable by the scanner (thin lines are not printed). On the left side the print is normal.
As we managed to find out, the reason is the weak mutual pressure of the two parts of the cartridge, and therefore the magnetic shaft and photo cylinder located on them.
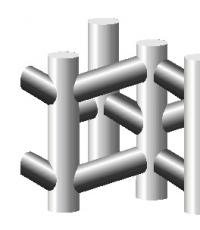
 Figure 2. Two halves of the cartridge. When assembled, uniform mutual pressure of the two shafts must be ensured.
 Two springs located on both sides of the cartridge are responsible for tight and uniform pressure. During operation, their pressing force weakens, as a result of which the toner from the magnetic roller is poorly transferred to the photo cylinder, therefore, on the printout we will have a lower image density. Due to the design features of the cartridge, problems begin with the spring on the right side of the cartridge (the one located on the gear side), and generally end there. Also, due to poor clamping, poor engagement of the gears of the magnetic shaft and photocylinder occurs, and then their slipping, which leads to the clicks mentioned above and further deterioration of the print (horizontal stripes appear).
 Figure 3. The culprit is the spring on the gear side.
 The solution to this problem appeared on the surface. It is necessary to somehow change, increase the stiffness or increase the number of coils of the spring. We experimented with different springs and were able to eliminate the defect. But we realized that there are no such springs with the characteristics we need required quantity It will be difficult to find, so we decided to conduct a series of experiments. We tried to stretch the original spring - this also gave a positive result, but, unfortunately, after some time the spring sagged again and the defect returned, although not so clearly. The idea came to me logical - to put something under this spring, thereby compressing it more strongly. Again, due to lack of space and design features, standard washers were not suitable, something else was needed. An ordinary nylon screed came to the rescue, which was ideal in terms of size, ease of installation and accessibility. And if it is still black, then the modification is not noticeable at all.
 Figure 4. Tie installed under the spring.
  Figure 5. Spring on assembled cartridge. The next time you disassemble the cartridge, you need to be careful - it quickly pops out.
 After a series of tests this decision was adopted by our service center.
 Figure 5. Fingerprint of the modified cartridge.
 It is worth noting that this defect was not observed on compatible cartridges, at least those manufactured by Patron and ColorWay. This is most likely due to the modified design of the halves fastening.
HP 36a, 35a, 78a, 85a and Canon 712, 713, 725, 728 cartridges print faintly.
A problem that many laser printer users often encounter– printer after . This often happens with cartridges HP 36a, 35a, 78a, 85a And Canon 712, 713, 725, 728. The problem could be either the printer or the cartridge. Let's consider a common case - the printer is new, purchased recently and is working. The cartridge has just been refilled with fresh, high-quality toner, and he prints palely. Most likely the problem is in the cartridge.
A common cause of faded print from HP and Canon printers is the condition of the magnetic roller or dispensing blade of the cartridge.
The main purpose of the magnetic shaft surface is to transfer from the bunker to the developing area. The purpose of the dispensing blade is to create a layer of toner on the surface of the magnetic roller. An additional function of both is the electrification of the toner as it passes through the point of contact between the surface and the blade. In order to improve performance, the surface of the magnetic shaft is made rough, and the dosing blade is made of a suitable shape, rigidity and composition.
During operation of the cartridge, the edge of the dosing blade grinds off, and the magnetic shaft loses its roughness. The toner is not charged enough, resulting in faint printing.
The best solution to the problem is to replace the magnetic shaft and dosing blade. You can try to reanimate the cartridge without replacing parts. What is needed for this?
1. Disassemble the cartridge and carefully inspect it.
2. Clean the surface of the magnetic roller from toner. This can be done using a strong solvent such as acetone.
3. Inspect the surface of the dosing blade - it should be clean. If there is toner on the surface of the blade, carefully clean it with a cotton swab and solvent.
4. Completely remove the old one toner.
When cleaning, you must act carefully, without exerting much force, so as not to damage the surface.
It may be that the magnetic roller or dispensing blade is not only dirty with toner, but also very worn. Unfortunately, physical wear and tear on the magnetic shaft and blade is irreversible. In this case, there is no alternative to replacing the shaft and blade.
Every specialist involved in refilling and remanufacturing cartridges is faced with a situation in their work where cartridges of the same model, refilled with the same toner, installed in the same printer, produce different optical print densities. Some cartridges print normally, while others produce too faded images. As you can see, in such a situation, the classic excuse like “bad toner” no longer works, and you have to look for reasons in a completely different place...
As is known, Canon printing devices and Hewlett Packard printers produced on their basis use a single-component magnetic development system. The principle of its operation is as follows:
1) The image created on the photodrum is developed using a developing magnetic roller. This shaft consists of two main elements:
Bar multipole permanent magnet;
Non-magnetic outer shell.
The bar magnet is located inside and must be oriented in a very specific way relative to the photodrum and the toner hopper. This orientation is ensured by a special shaped retainer and a corresponding bevel on the magnetic rod itself. The magnetic field formed by the poles of the bar magnet is oriented in such a way that its lines of force are most directed inside the toner hopper. This is done to ensure that the toner is picked up from the hopper. In addition, the power lines also create a magnetic brush, which ensures contact of the toner with the surface of the photodrum.
2) Developing the image, i.e. “sticking” of the toner to the photodrum is carried out electrostatically, i.e. The toner is attracted to the photoreceptor by electrical forces. The potential difference between the photodrum and the toner itself helps to attract the toner to the areas illuminated by the laser. Thus, it turns out that the toner must carry an electrostatic charge.
3) The toner in laser printers is triboelectric, i.e. it is charged by friction. In Canon/HP printers, the toner is charged by its friction against the surface of the magnetic developing roller. To create this friction, the cartridge contains a dosing squeegee (Doctor Blade), and the surface of the magnetic shaft itself has a special coating (note that the magnetic shaft is very dark, almost black, although its edges are a well-polished shiny metal).
Thus, the amount of electrical charge accumulated on the surface of the toner particles is determined not only by the characteristics of the toner itself, but also largely depends on the friction force. And it, in turn, is determined by the quality and current condition of the surface of the magnetic shaft and the dosing squeegee.
The amount of toner that is transferred from the hopper to the surface of the drum during image development is proportional to the potential difference between the toner particles on the surface of the magnetic roller and the latent image area on the surface of the drum (the area illuminated by the laser). The greater the potential difference, the more toner will be transferred to the image area, the greater the print density will be. In turn, the greater the potential difference, the lower the potential of the illuminated areas of the photodrum and the greater the potential of the toner particles.
Now let's return to the problem at hand. So, when refilling cartridges, you very often have to deal with the problem of a faded image. A faded image is actually a low optical density of the print.
In general, the optical density of printing depends on the following parameters:
1)
The magnitude of the charging voltage of the photodrum. The lower this voltage, the higher the print density, and, conversely, low density may indicate an overestimated voltage on the charge corotron;
2)
Laser light output power. Reducing the laser power leads to less discharge of the photodrum surface, i.e. to an increase in the potential of the exposed area, and, as a result, to a decrease in print density;
3) The optical density ("blackness") of the toner itself, which is ensured by the absorption of light by the dye pigment used in the production of the toner. For the vast majority of modern original and compatible toners, the differences in this parameter are negligible;
4)
The amount of toner transferred to the drum during the development stage. The more toner is transferred, the naturally thicker its layer will be and the higher the print density will be;
5) The amount of toner transferred to the paper. This parameter is determined by many quantities, for example, the voltage on the transfer coronator, paper quality, conditions environment and so on.
Of all the quantities that affect print density, we highlight the fourth point (the amount of toner transferred to the photodrum). It is this parameter that can vary greatly in different cartridges, and primarily depending on their physical wear.
The remaining parameters are not relevant to the topic of the current discussion. And therefore, if the printer is working properly, is in good technical condition, operates under normal conditions (at the appropriate temperature and humidity), and when printing paper of the appropriate quality is used, then only the amount of toner transferred remains a significant factor. Therefore, let's try to figure out what elements of the cartridge can affect this parameter.
Based on their structure, photoreceptors can be divided into two types:
- single-layer photoreceptors;
- multilayer photoreceptors.
So-called "single-layer" organic photoconductors (in which the functions of generation and transport of charge carriers are combined in a single layer) are relatively rare and are mainly manufactured by Mita. The question of the advantages and disadvantages of such photoreceptors is quite complex and requires special discussion. But it is believed that a feature of single-layer photoreceptors is their high photosensitivity.
Multilayer photoreceptors separate the generation and transport functions into different layers, giving manufacturers significantly more freedom to improve each layer. This allows you to set the necessary properties of each layer, thereby “programming” the characteristics and parameters of the photoreceptor, making it, for example, more sensitive to light, or more wear-resistant, less sensitive to temperature changes, etc. It is multilayer photoreceptors that currently find the greatest application, so it is advisable to discuss only them further.
The number of layers in a multilayer photoreceptor can be different - everything is determined by what characteristics they want to endow the photoreceptor with. But the classic version, characteristic of the vast majority of modern photoreceptors of all brands, is
a four-layer photoreceptor applied to an aluminum base made in the form of a drum (photodrum).
So, in this case, the photoreceptor consists of the following layers:
1) PL (Protective Layer)- a protective layer, 0.5 - 5 microns thick, serves to protect the surface of the photoreceptor from mechanical wear and action harmful factors atmosphere, corona discharge, etc. Currently rarely used in modern photoconductors.
2) CTL (Charge Transport Layer)- charge transport layer (charge transport layer), 25 - 35 μm thick, serves to transfer charge carriers to the surface of the photoreceptor and locally reduce the surface potential.
3) CGL (Charge Generate Layer)- charge generation layer (charge generation layer), 0.2 -1.0 microns thick, serves to absorb exposure radiation and form an electron-hole pair.
4) G.L.- a primer layer, 10 - 20 microns thick, serves to level the surface of the aluminum substrate, and also serves to prevent dark charge injection from the substrate into the CGL layer, etc.
5. Substrate or UL- aluminum substrate (aluminum cylinder) with polishing up to class 14. It is the basis of the photodrum.
Also, photoreceptors are usually divided into so-called “cold” and “hot” photoreceptors. Cold"photoreceptors have a relatively low sensitivity to laser radiation. Therefore, when the surface of the photoreceptor is illuminated by a laser beam, only those charge carriers that are directly in the exposure zone are activated in the CGL layer. This leads to the fact that a small amount of charges additionally “flows off” from the CTL surface, immediately surrounding the laser beam. As a result, the size of the point (i.e. the size of the illuminated area) practically corresponds to the cross-sectional area of the laser beam. In other words, the illuminated point has minimum dimensions. "Hot“Photoreceptors, on the contrary, are very sensitive to external radiation. Therefore, during their exposure, not only the carriers located in the illumination zone are activated, but also all nearby charge carriers. As a result, the charge flows off the surface, significantly exceeding the cross-sectional area of the laser beam. i.e. That is, the illuminated point turns out to be quite large. The image formed on “hot” photoreceptors looks more saturated, i.e. small details become larger (lines turn out “bold”, dots are black, etc.). But, of course, clarity the transmission of small details on "hot" photoreceptors leaves much to be desired. Therefore, it is preferable to use "hot" photoreceptors in cases where mostly text is printed. But for graphics, drawings, photographs, etc., it is better to use "cold" photoreceptors, although text it doesn’t look so rich and clear on them
In addition, the use of “hot” photoreceptors leads to greater toner consumption
Charge shaft
The potential of the illuminated areas on the surface of the drum at the same intensity of the laser beam is practically independent of the initial potential of the charged surface of the drum, i.e. the influence of the charge roller and the reduction in charge sensitivity from wear of the outer layer of the drum (charge transport layer - CTL) is minimal. This means that the faded print problem cannot be corrected by replacing the charge roller.
Image drum
Based on the previous paragraph, one could conclude that a faded image cannot be corrected by replacing the drum, but this theoretical conclusion, unfortunately, is hampered by practice, which shows that in some cases replacing a worn drum with a new one can increase print density. This is facilitated by two factors:
1)
The new drum, according to its characteristics, may be “hotter” than the one that was installed before, i.e. The charge generation layer (CGL) of this drum generates more charges and, accordingly, the latent image potential for this drum becomes lower. In addition, a larger number of generated charges leads to the fact that the point illuminated by the laser has a geometrically larger size. The generating properties of CGL weakly depend on the physical wear of the drum, so the “hotness/coldness” of the drum in most cases can be considered “innate” during production and unchangeable during operation;
2) Reduced optical transparency of the photodrum (optical decay). The charge transport layer (CTL), which should be transparent to laser light, becomes dull from wear, and because of this, less light passes to the charge generation layer (CGL). This, of course, is typical for significantly worn drums, the degree of wear of which is close to critical.
Thus, it turns out that replacing the drum to solve the problem of faded printing can only give results in two cases:
If the new drum, according to its characteristics laid down during its production, is capable of attracting more toner than the one that was installed previously. Replacing a used drum with a new drum of the same type (manufacturer) will not significantly increase print density;
If the worn drum has a “matte” surface that strongly scatters the laser light.
Magnetic shaft and dosing blade
The potential of the toner particles on the surface of the magnetic roller consists of two components: the bias voltage, which is applied to the magnetic roller, and the charge received by the toner particles from triboelectrification, i.e. from their friction against each other, against the dosing squeegee and against the shell of the magnetic shaft.
The bias voltage set by the printer can be considered a constant value, and the only thing that needs to be done in the cartridge to ensure that this voltage does not decrease is to ensure stable contact. To do this, it is useful to clean the sliding contact pair of the magnetic shaft from contaminated conductive lubricant and apply a thin layer of fresh lubricant to it. Otherwise, the influence of this potential can be excluded.
The triboelectric charge of toner particles in reality is highly dependent on several factors. If we exclude from this list the triboelectric properties of the toner itself and environmental conditions, then there will only be two of them left:
Condition of the dosing squeegee;
Condition of the magnetic shaft shell.
One of the functions of the magnetic roller shell is to transport toner from the hopper to the development area. One of the functions of the dispensing squeegee is to form a layer of toner on the surface of the magnetic roller. But both of these components together have another important function - charging the toner by friction as it passes through the contact point between the squeegee and the shell. To improve this process, the surface of the magnetic shaft is roughened, which increases the friction force, and the material of the metering blade has a certain rigidity and corresponding chemical composition.
During long-term operation of the cartridge, the edge of the dosing squeegee wears out, and the surface roughness of the magnetic shaft shell decreases. This leads to a decrease in friction force, i.e. leads to insufficient toner charge and, as a result, faded printing. Unfortunately, we have to state the fact that in modern HP/Canon monochrome cartridges this decrease in charging properties appears already during the first cycle of the cartridge, and after several refilling cycles it becomes very noticeable.
Solution
The problem of faded printing can be radically solved very simply - replace the dosing squeegee and the magnetic shaft shell (or the entire magnetic shaft). It is better to replace them at the same time in order to extend their service life and immediately improve the print density by a clearly noticeable amount.
However, if this option is not possible for some reason (lack of necessary spare parts or for financial reasons), then you can try to solve the problem of faded printing and “little loss”, i.e. without replacing the named components.
A decrease in the surface roughness of the magnetic shaft occurs for two reasons:
Physical wear of the magnetic shaft;
Filling the “pores” on the surface of the magnetic roller with toner.
If it is pointless to fight physical wear and tear, because... Since it is irreversible, the problem of contamination of the magnetic shaft can still be overcome. Toner filling the "pores" of the magnetic roller can be eliminated by cleaning the roller with a strong solvent. Such solvents, available to anyone, include acetone. Cleaning the magnetic roller with acetone can temporarily solve the problem of faint printing.
However, when carrying out the cleaning procedure, several basic rules must be observed:
Do not apply excessive force, as this may damage the coating of the magnetic shaft, i.e. worsen its roughness;
It is necessary to remember about the toxicity of acetone, and therefore you should follow the rules for working with it (well ventilate the room in which work is carried out, and it is also advisable to use protective gloves when working).
Isopropyl alcohol is also known as a toner solvent, but it is not very suitable for cleaning the magnetic roller. The fact is that isopropyl alcohol is not a very strong solvent, and therefore, instead of cleaning, it can, on the contrary, clog the “pores” of the magnetic roller with dissolved toner.
Practice shows that along with the magnetic shaft, it is also advisable to clean the dosing squeegee. During operation, a strip of pressed toner usually forms on the edge of the dispensing squeegee. This strip “moves” the squeegee away from the magnetic shaft, which leads to a decrease in the friction force. Therefore, to restore normal printing, it is necessary to clean the squeegee. It is believed that the use of any solvents (acetone in the first place) can disrupt the chemical composition of the squeegee and lead to a deterioration in its elastic properties. Therefore, it is most often recommended to use dry, lint-free wipes to clean the squeegee. If dry cleaning does not work and toner build-up remains, you can moisten a cloth with distilled water and repeat the procedure. If this does not help, then you will either have to leave the squeegee without further cleaning and put up with possible defects, or change the squeegee to a new one.
However, our work experience says that, despite all the prohibitions, using acetone to clean squeegees gives a very good effect. Especially if you need to choose between installing a new squeegee and cleaning the old one.
In principle, there is another “folk” method of restoring the roughness of a magnetic shaft, which is used by individual specialists with varying degrees of success. We're talking about sandblasting or treating the surface of the magnetic shaft with fine sandpaper. But the result obtained in this way is extremely unstable and requires certain practical skills, which can be developed, as a rule, by “killing” several magnetic shafts. That's why this method We would not recommend it for practical use.
Source World of peripheral devices PC-6"09