How to make a small chicken coop in the country. Making your own chicken coop at your summer cottage. Video: chicken coop for laying hens
Friends, in this photo collection I would like to show projects of the simplest homemade chicken coops in the country, which you can make with your own hands. Often, summer residents who live on their summer cottage all year round, or from spring to autumn, get chickens.
Most people focus on 10 pieces plus a rooster - this is a kind of minimum that will allow you to have both eggs and meat. Chickens not only lay eggs, but also leave valuable fertilizer - chicken droppings, so the benefit from them is double.
The simplest chicken coop with a walking area under the net

Or maybe even triple, if you consider that surplus eggs can always be sold on the market, which means you can recoup at least part of the costs. I offer you 10 projects for building a chicken house that I found and which seemed worthy of attention.
The simplest winter chicken coop is easy to maintain

Here with this project home chicken coop everything should be clear from the drawing. Select sizes to suit your needs. The idea seemed very practical to me.

Beautiful winter version of the poultry house
I liked this beautiful and functional mini chicken coop for 5 chickens. The video shows the entire structure with behind-the-scenes comments from the author. Take a look and get inspired to build.
The idea of a good-quality chicken coop with a poultry walking area

If your herd is larger, you can increase the size. This, in my opinion, is the best video, I can watch it all the time, everything is done so intelligently!
This video gives practical advice on construction. I recommend watching it!
Wooden frame chicken coop


The simplest chicken coop drawing
If you are just starting to delve into the issue of building a chicken coop yourself, then this article is for you! Carefully read the practical part of construction, there in clear language describes how to build a frame house for chickens, covered with planks on both sides, how to insulate it, how to make a floor and windows.

Video by Sergei Lisitsky - an excellent chicken coop for 15 chickens (Hisex and Loman Brown breeds)
Be sure to watch this video! I think that Sergei has the ideal and correct chicken coop and the optimal breeds of laying hens. 13-15 eggs per day from 15 chickens is, in my opinion, an excellent indicator! After reading the video material, it will not be difficult for you to make a similar chicken coop for yourself.
Chicken coop project with walking area

You can see in detail in excellent magnified photos the design of a chicken coop with a walking area. The light summer house is connected to a walk fenced with a chain-link fence. Very useful article!
In it, the authors also touch on the rules for keeping chickens, because the structure of the chicken coop directly depends on these rules. The photo projections show the dimensions of the house and its necessary elements: feeding troughs, perches, openings for access to walking.
Chicken coop with a timber frame covered with plywood

The construction of a wonderful chicken coop for 20 chickens is described on the website
The structure was built from timber covered with OSB board. With a gable roof and windows covered with thick metal mesh. The article contains a list of materials required for construction. In principle, this chicken coop can be built with a metal frame - it’s up to the owner.
However, to use this chicken coop in winter, additional insulation is needed. The project involves the construction of a run around the chicken coop. We hope that this material will be useful to you!

You will see the construction of a “five-star” chicken coop on the “Do It Yourself” website
On step by step photos The construction and decoration of a warm winter house for chickens is captured in detail. The size of the chicken coop is 4x5 m, it consists of two rooms. This chicken coop even has a heated floor!
Everything has been thought out: a perch with removable trays, a ventilation system, doors at the bottom of the wall for chickens to escape into the next room. If you decide to build a winter chicken coop, then this information is for you!
Backfill winter poultry house option
Small chicken coop with walking area

The author of the article offers readers an interesting project for a small chicken coop
Its overall size is 2x3 m. The base of this chicken coop is made of 100x100 mm timber, and the frame of the house is made of 50x50 mm timber. The house itself is small - only 2x1.2 m, lined with OSB boards and finished with a slab coated with Maxima paint (mahogany). Looks pretty good! The chickens don’t care, but people enjoy watching! Consider this successful project.
Chicken coop option for 50 chickens

The article talks about the construction of a chicken coop (poultry house). For construction, you can use the drawing of a chicken coop for 50 chickens. For clarity, the authors of the site have placed a video at the end of the article about the features of caring for this type of bird. This is related to the peculiarities of arranging the necessary premises for them. Interesting video. Quite clear, concise and useful information!
Lighting issues
Also, after building the room, you need to resolve issues with lighting. This video provides useful tips.
Fleas in the chicken coop
Separately, I would like to say about fleas, or more precisely about prevention methods to prevent their appearance in the chicken coop. The main condition is the presence of a container with ash so that the chickens can take ash baths.
By the way, contrary to the belief of some, lice do not touch chickens, and there is no way they can breed on them. Therefore, there cannot be any lice on chickens, only fleas.
Photos of chicken coop ideas - what they are like
An example of a good-quality wooden chicken coop, with a walking area for chickens, protected by a net from predators. Please note that the design allows you to move it from place to place, thereby providing the bird with access to fresh greens.

We all have our own idea of what the ideal chicken coop should be. For example, this one is more of an option for city dwellers who want to play with chickens for the summer.

This is a simple, good-quality chicken coop with a walking area covered with mesh. In general, nets are absolutely necessary, since ferrets can chew the bird. These animals can destroy all the chickens in one night, so pay attention to protecting the birds from these predators.
But if a rat gets through, it will spoil the eggs; it will not dare to attack the birds. Only in extreme cases, when one is completely hungry, have large rats attacked chickens. A control option, as in the case of ferrets, is to upholster the inside of the room with mesh.
Well, if a fox snuck into your chicken coop, then all you have to do is sympathize. It will suppress everyone, and if you follow the safety rules, no one will get in your way. Therefore, address all questions to yourself...

Another example of decorative execution. Children will be happy to watch the life of chickens.

I am a woman, which means I am primarily looking for beautiful ideas. Functional designs are written above, but here - joy!

Another simple chicken coop is a square for 5 hens and a rooster. This is an all-season option and is heated inside.

If you are concerned about your garden, but still want your chickens to be able to eat insects and fresh herbs, then pay attention to the idea of a tunnel with a metal mesh.
Such a structure can be regularly moved around the site so that birds do not trample down the same place. Also, a metal mesh will protect your chickens from predatory animals and hawks.
The mesh can simply be folded into an arc, and the bottom edges can be fastened with either wire or fishing line so that the arc does not unfold. Individual fragments of the structure can be fastened together with plastic clamps, or with the same wire or fishing line.

A strict chicken coop that resembles a closet. It is imperative to consider lighting inside the room so that the chickens can fully use the space. The fact is that chickens almost cannot see at dusk; remember the expression “night blindness”. Therefore, always light the chicken coop.

simplest summer chicken coop hut for five chickens. Suitable for those summer residents who are interested in the process of interaction with the bird rather than receiving large quantity eggs
![]()
A transparent chicken coop is a nest, but even it has perches. In general, a perch is an essential element of any chicken coop, even the smallest one. Chickens, like any birds, love to sit on sticks; this is inherent in them by nature.
Just always make these sticks in one row, otherwise the stratification of society will flourish among the chickens and weak individuals will be herded to the lower levels.

Would you like to have such a cute chicken coop in your country house? Original, beautiful and practical!

Beautiful chicken coop with walking area

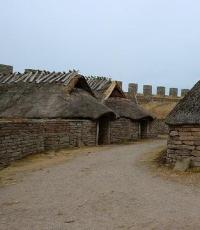
An interesting example of a good quality chicken coop. The author did not make the structure from waste material, but approached it with understanding and purchased new wood for the chickens.

Of course, this is an option for the dacha, for the summer, for your own consumption. But first of all, we need an egg for ourselves.

Exit for chickens to the walking area.

External feeder and drinker.

Perch and internal feeder.

Masonry nests.
More ideas


Well, two more beautiful chicken coop to complete the selection.

I hope that this material will be enough for you to make the right decision about your chicken coop project. Build with pleasure, eat homemade eggs from your chickens, sell any surplus if you have any. Good luck!
Bonus video - budget chicken coop for 200 rubles
If you need a chicken coop, but have very little money to purchase building materials, then by watching this video you will learn how you can make it for practically nothing from recycled materials.
In fact, in Europe there is a very widespread passion for buildings made of waste materials. There are even entire communities in which authors share their buildings, and sometimes they look more beautiful than those in which a lot of money was invested.
If you dream of raising chickens in your country house, but the lack of a specialized room is stopping you, don’t despair; building a comfortable and functional chicken coop with your own hands is not at all difficult.
First of all, you need to decide on the number of chickens that will live in the future building.

Taking this information into account, you can plan the size of the chicken coop and allocate space for the building.

You can make a simple chicken coop from any available materials, naturally, having at least the most minimal construction skills.

Requirements for the building
Any specialized structure must meet the requirements for its functionality. Even at the design stage, some points should be taken into account:
- Ensuring the safety of the structure from predators. Otherwise, you may miss the number of birds or the number of eggs.
- Provide for the possibility of ventilation or constant ventilation of the poultry house.
- The absence of drafts is an important requirement that will prevent all kinds of bird diseases and help maintain a comfortable temperature.
- Thermal insulation is also necessary, especially if you plan to keep chickens all year round.
- For good egg production of chickens, the room needs lighting, which must be turned on at some time of the day.
Chicken coop project
Choose a place for the chicken coop on a hill; in the lowlands, the poultry house will be constantly wet, not having time to dry out from the morning fogs and precipitation.

When calculating the area of the building, do not forget about poultry walking; the more the hens walk, the better they lay. When accurately calculating the area of the chicken coop, take into account the fact that for the comfortable existence of five chickens, 4 sq.m. is enough, and about 7 sq.m. of space for walking.

The clearing for walking chickens would be correctly located to the south. Fence it with a chain-link mesh and be sure to make a roof. It will protect not only from rain, but also from the sun.

If your site is flat, then before construction, make an artificial elevation of sand and crushed stone. To protect the coop from small rodents, mix clay and broken glass and place on top of the mound.

Natural lighting in the poultry house can be provided by making a door with glass. To provide space, the ceiling is raised to 2 m. If bird nests are placed outside the house, you will not have to go inside to pick up the eggs. You can see a drawing of this version of the chicken coop in the photo.

Foundation
If you are building a summer frame chicken coop, you do not need a concrete foundation for it, just a slight elevation is enough.
When building a permanent brick structure, a foundation is required. A monolithic or strip base is suitable here. It is ideal to place a winter chicken coop in such a room.

Poultry house floor
Earthen and clay floors can be made with a low strip foundation. If desired, the floors can be assembled from boards or concreted.

When using the room in winter, the floor must be insulated with mineral wool, which is laid between the joists and then covered with plywood. Such floors are covered with sheets of roofing felt to provide reliable coverage and protect the floor from bird waste products.


Sand is also good for sprinkling the floor.

Note!

Construction of walls
Most often, the walls of a chicken coop are built of wood; as a rule, it is a frame building covered with clapboard. They are insulated with mineral wool or polystyrene foam, and the outside of the building is covered with a vapor barrier material before cladding.
A brick building requires good heating in winter period, which will lead to costs, and the construction of such a chicken coop will be more complex and expensive.

Walls made of any materials must be disinfected before use; this can be done with ordinary lime.

Chicken coop roof
When building a chicken coop for chickens in the country, it is better to make a gable roof. This technique will help allocate space for roof insulation.

If the chicken coop is of modest size, you can do without an attic and lay the insulation directly under the roofing material. Chicken coops are covered with slate, metal tiles, and professional flooring.
Room ventilation
Good ventilation is important for bird health, especially in summer time. The ventilation system in the chicken coop can consist of several holes on opposite walls with valves.

Note!

The valves will help control and regulate the flow of cold air, which is especially important in winter.

Chicken coop interior
The most important and basic element of the interior of the chicken coop is the perches; they are wooden rounded poles, the length from wall to wall of the chicken coop. It is on roosts that chickens spend most of their lives.

They need to be fixed at a distance of 50 cm from the floor and 25 cm from the wall and 35 cm between each other. Each resident of the poultry house is provided with 25 cm of poles. So we are counting on 10 chickens in the chicken coop, we will have to place perches at 2.5 m.

If laying hens live in the chicken coop, then the second important piece of furniture will be nests. You need to build at the rate of 5 laying hens per nest. Having built a chicken coop for 20 chickens, you will have to place about 4 nests.

It is best to place them in the dark corners of the chicken coop, having previously been well insulated with sawdust.

The dimensions of the layer box are 30cm x 30cm wide and 40cm high. The nest is raised 50 cm from the floor.
Note!


Lighting
An important condition for the normal functioning of a chicken is lighting. In dark rooms, the bird becomes inactive and its egg production decreases.

The chicken coop must have an opening window, which will provide not only sunlight, but also additional ventilation.

Laying hens must be provided with light up to 18 hours a day. In winter, you cannot do without artificial lighting.

Heating the chicken coop
In winter, the chicken coop must be heated to a temperature of at least 10 degrees during the day and 15 at night. It is important to control the level of humidity in winter; increased humidity will lead to illness and further death of birds.


In our selection of photos of chicken coops, you can choose the best option for yourself.

DIY chicken coop photo


Today, building a chicken coop on a country plot is quite simple.
To do this, you will need the necessary building materials, as well as a drawing of the planned structure.
Chicken coop equipment goals
The arrangement of the chicken coop is carried out, focusing on such important points as:
- the number, as well as the age category of birds for which the dwelling is being built;
- seasonality during which the housing is planned to be used;
- the need for constant cleaning and disinfection of the house.

To maintain the functional, hygienic condition of the chicken coop, it is important to take care of it:
- high quality ventilation system;
- insulation, heating;
- excellent lighting;
- competent selection of affordable, easy-to-care materials.

In the process of building a bird house, it is important to take care of equipping it with perches, drinkers, and feeders - this is the best microclimate that is suitable for birds.
Arrangement of a good microclimate
The well-being and productivity of livestock directly depends on lighting, humidity levels, and temperature conditions in the chicken coop.

Even during the warm season, it is important that the house is reliably protected from drafts and humidity. It is for this reason that after constructing the frame, it is necessary to insulate the roof, wall and ceiling surfaces.

Taking advantage necessary materials, with minimal skill you can arrange a house for poultry inexpensive. You will need easy-to-install polystyrene foam, mineral wool and other building materials:

If you intend to keep livestock exclusively during the warm season, then this type of design will prevent overheating of the bird, as well as drafts.

When equipping a house for wintering birds, it is important to think about the heating system.
Today, to heat poultry houses, poultry farmers use infrared lamps, which are easy to install, economical and most effective in operation, while heating the area located precisely under the radiation source, and not the surrounding air space.

But when installing such a device, do not forget that the distance from it to the bird should not be less than 50 centimeters, and it is important to cover the flask with special protective grilles.

Lighting and ventilation system
If you plan to use lamps as heating and at the same time for good lighting, then at night the lights must be turned off completely to provide the birds with proper rest.

When arranging a birdhouse inside, you cannot do without a good ventilation system, thanks to which you can eliminate specific odors and normalize temperature regime, humidity level.

Perches and nests
Perches with nests are an important part of a well-equipped chicken coop. You can create them using plywood, plastic containers, buckets, baskets. Litter is arranged at the bottom of the nest.

When creating a chicken coop yourself, it is important to install perches. For this you can use perches with a diameter of 40 mm.

If the poles have a rectangular or square cross-section, then the corners should be rounded as much as possible, and the surface should be carefully processed using sandpaper.


One of the first perches is formed at a height of approximately 50 centimeters, the rest - approximately at a distance of 35 centimeters from the next one. Chickens should not sit as close as possible in a row so that the birds on top do not pollute the birds below.

how to make a bird house arrangement
Poultry farmers with many years of experience certainly have their own secrets for arranging chicken coops:

- It is imperative to monitor the length of daylight hours in the house. When there is excessive lighting, birds become nervous, trample eggs and peck at their relatives.
- You should not build nests directly on the floor, otherwise the chickens will certainly use them for sleeping.

- To increase egg production, you need to install nests in corners where there is no light.
- It is preferable to install feeders closer to the wall surface between perches and nests, so that all residents of the house can view them.

DIY chicken coop photo


A dacha is a great place to relax, but it is also an excellent opportunity to change activities. It’s not for nothing that arranging a summer house and growing ornamental and garden plants are becoming a popular activity for city residents. However, today those who are planning to build a chicken coop in their dacha with their own hands do not surprise anyone. Moreover, thrifty owners choose solid buildings. If you build a poultry house slightly larger than a dog house, the birds will get sick or eat the food to no avail. Then you shouldn’t expect such desirable environmentally friendly eggs from them. Let's find out the secrets of good construction.
Finding out how to make a cost-effective chicken coop starts with allocating space for construction. Its design can largely depend on the location of the poultry house. There are basic principles that should be followed when making a choice:
- Location. The poultry house must be placed on a hill, because in the lowlands it will be more difficult for birds to walk: it is in such places that the moisture does not dry out longer, and the melting of the snow occurs with a delay.
- Building orientation. The chicken coop must be correctly oriented to the cardinal points. The rectangular building is located along its length from east to west. The ideal placement of the poultry house would be when its windows face south and the door faces east. Windows should let in as much light as possible during the day. The length of daylight hours significantly affects the egg production of chickens. However, in hot weather the windows should be shaded.
- Temperature. Both too high and too low temperatures are negative for chickens. Already at +25 C°, poultry productivity will drop by half, and if the temperature rises another 5 degrees, the chickens will stop laying eggs altogether. In case of heat, the windows of the chicken coop must be equipped with plywood shutters. In winter, the optimal temperature is +12 C°.
- Peace. Chickens should feel calm, so for the chicken coop you need to choose a place away from active recreation areas. Protecting your chicken coop with a hedge is a good idea.
- Square. The location should be selected taking into account the dimensions of the future building. There should be no more than two chickens per 1 m2 of chicken coop room. If chickens will live in the chicken coop during the winter, it is necessary to provide a vestibule as an element of insulation of the chicken coop so that cold air does not directly penetrate to the birds. For the vestibule, you also need to allocate space in the construction plan.
Experts recommend choosing a place with a reserve of space in case success in raising chickens prompts the owners to create, for example, a quail farm. After all, such a farm is an excellent source of not even additional income, but full-fledged income.

A chicken coop is often called a ramshackle barn, but if you take a businesslike look at this building, it can be made much more attractive, and then it will be easier to find a place for it

To be healthy, chickens must have room to roam, which is why this chicken coop with a vestibule is a well-deserved success.
What does it cost us to build a house for chickens?
Let's agree in advance that we choose four-edged timber 100x150 mm as the material for the construction of our chicken coop. This is a low-budget option and construction from such material does not require professional skills.
Stage #1 – selection and construction of the foundation
We choose the dimensions of the upcoming building. It is better to draw up the project so that you can accurately determine the need for materials. We will proceed from the approximate weight of the chicken coop when deciding on the foundation.

A chicken coop on a columnar foundation looks very secure, neat and compact, despite the fact that everything you need is provided in it
The best option for a relatively light chicken coop can be considered a columnar foundation. Why?
- Economic benefit. Cabinets made from old brick will be very cheap, and, if desired, you can even get by with ordinary stone. Cement, sand, gravel and a trowel are the main costs for such a foundation.
- Protection. It will be difficult for rats and ferrets to enter the room, and ventilation under the floor surface can prevent rotting of the wood.
We will mark the foundation using thin but strong rope and metal rods. In full accordance with the project, we hammer rods around the perimeter of the building. We tie them with a rope, placing it near the surface of the earth. We check the accuracy of the markings made by measuring the distance diagonally with a regular tape measure.
We carefully remove the fertile layer of soil 15-20 cm inside the marking: it will be useful in the garden. Now we will make pedestals at the corners of the building and along its perimeter. The distance between them should be 0.8-1 m. We dig holes 60-70 cm deep and 50 cm wide (two bricks). Using a hydraulic level and ropes, we mark 20-25 cm above the ground - a guideline for erecting the pedestals.

A columnar foundation is most appropriate when building a chicken coop, since it is economically beneficial and the building on it will be protected from rotting and from predators
At the bottom of the pit, pour layers of sand and medium-grained gravel 10 cm thick. Place the first two bricks at the bottom of the pit, and put cement mortar on them, mixed at a ratio of 1:3. We place the next two bricks across the previous ones. So the cabinet should be laid out to the level marked with ropes. Cement mortar will help to level the cabinet exactly to the level.
In construction, there is a technological break of 5-7 days so that the solution has a chance to set. After this, the finished columns must be treated with a special protective mastic or simple bitumen. Coarse gravel should be poured between the bollards and the ground. They also cover the surface inside the perimeter of the building.
Stage #2 - erection of the walls of the building
For the process of laying timber, a standard technology has long been developed, which must be adhered to. A double layer of roofing material can be used as an insulator for the first crown from the foundation. The ends of the timber should be connected into half a tree. As floor joists we use 100x150mm timber, laid on edge. The optimal distance between the logs is 50 cm. We close the gaps with scraps of timber.

The walls of the building are erected by sequentially placing timber and connecting it at the corners of the building into a tongue-and-groove joint.
The second, third and subsequent crowns at the corners are connected using a tongue-and-groove system. Flax-jute fiber can be used as a sealant in locking joints and between crowns. If the timber from which the chicken coop is built has natural moisture, it is better to use wooden dowels to securely plant the crowns.
Their presence will protect the frame from distortion after shrinkage. You need to make holes for the dowels in the corners of the building and around the perimeter every meter or one and a half. They are made 2.5 beams deep and in a checkerboard pattern. The dowels should be driven into the wood “sunk” by about 7 cm. The minimum height of the walls being erected should be 1.8 m. Next, the ceiling beams must be strengthened, rafters installed and the roof laid.
Stage #3 – ceiling and roof of the chicken coop
You can make the roof of the chicken coop single-slope, but a gable design is the choice of far-sighted people. Feed and equipment need to be stored somewhere. Why not use a comfortable and dry attic space for this purpose?

Of course, it is better to make the roof of the building gable, then the food, equipment, and even the rowan fruits dried for the chickens for the winter will be safe
We strengthen the ceiling beams, lay the ceiling with any boards and insulate it. Expensive roll insulation can be replaced with expanded clay or coal slag. Before insulation, you need to take care of the ventilation of the room. To do this, you should knock together two wooden ventilation ducts. We fix them at opposite ends of the building. One end of the ventilation channel is located flush with the ceiling, and the second is approximately 40 cm below it. Tin dampers on ventilation pipes will help regulate the temperature in the room.
Stage #4 – laying and insulating the floor
Freezing and blowing of floors should be avoided. That's why the best option can be considered double floors. In this case, we will use a board 25 mm thick. The subfloor should be made of dry unedged boards. A layer of vapor barrier is laid on the boards, followed by 100x100mm bars. We fill the gaps between the bars with insulation, after which we lay the finished floor from edged boards.

If you can use any boards for the ceiling, then for the floor savings are only appropriate when laying the subfloor: the finishing floor should be made from a tongue-and-groove board
We equip the poultry house from the inside
Well, we figured out how to build a reliable and warm chicken coop, now we need to properly organize the room inside. If we talk about the necessary elements of the internal structure of a chicken coop, then the perch is just one of them.
When calculating perch requirements, you need to know that each bird will need at least 30 cm of perch. Knowing the number of feathered inhabitants of the chicken coop, we calculate the quantitative need for perches. It is better to make them from rectangular timber 40x60 mm. The perches need to be rounded, otherwise they will injure the birds. Perches should be placed at a distance of 50 cm from each other at a height of 60-80 cm from the floor, but not above each other. Trays placed under the roost will make cleaning the coop easier.

Properly organizing a chicken coop from the inside is no less important than ensuring its proper construction: chickens need perches, drinking bowls, feeders, and places for laying hens

Laying areas should be located in a part of the coop where the chickens can feel safe and secure.
Don’t forget that we built a chicken coop for laying hens, which means that we need to provide them with all the conditions for them to lay eggs. To do this, you can equip them with boxes with sawdust in a place where the chickens will feel peace and security.
Feeders and drinking bowls should be filled, clean and located on a hill. Cleanliness and order in the chicken coop can be ensured more easily if the floor is covered with sawdust or straw. The sloping floor will also make cleaning easier. For the winter, the chicken coop can be additionally insulated with mineral wool and polystyrene foam.
To learn how to build a chicken coop with your own hands using other methods, we suggest watching the following videos.
Poultry breeding is a troublesome business and requires constant care for the bird population. In a suburban or dacha area, such conditions, as a rule, do not exist, so the vast majority build a chicken coop at the dacha with their own hands for a small number of birds, a maximum of five to seven chickens. As an option, you can order a simple wooden poultry house from a carpenter or buy any of the ready-made chicken coops for the country, sold at exhibitions and specialized stores. Most often, this is a small chicken coop with a walk, designed for the summer version of keeping poultry in the country, from March to November.
Which poultry housing option do you prefer?
Old and experienced poultry farmers say: “build it as if it were for yourself.” For chickens, even the simplest chicken coop is their home. If, after completion of construction, you can sit inside the built barn for chickens for a couple of hours without much discomfort, then the birds living in the country will also be happy.
There are quite a lot of ways and options to build a chicken coop at the dacha with your own hands, ranging from brick premises to carved huts made of timber and tongue-and-groove boards. The most popular for a summer residence is considered a simple chicken coop, which is easy to assemble yourself from OSB boards, plywood or unedged boards on a frame made of wooden beam as in the video:
The use of wood as a building material allows us to obtain a number of additional benefits plank and timber house for a summer residence in comparison with sandwiches or brick premises:
- The wooden structure of the chicken room is light and at the same time durable, which does not require a capital foundation;
- Using timber and boards allows you to do 99% of all work in a chicken coop at your dacha with your own hands, even if you do not have the professional skills of a joiner or carpenter;
- The wooden structure of the chicken coop can be easily supplemented and changed without radically rearranging the premises.
Attention! Even if, for objective reasons, you suddenly have to abandon the idea of making a chicken coop, the materials purchased for construction - timber, boards, plywood will not remain as dead weight at the dacha and will easily find use.

Unlike most modern building materials, wood does not frighten chickens; the wooden walls of the room have sufficient sound insulation so as not to hear rain or wind, and at the same time convey well the sounds and footsteps of night visitors. The disadvantages of a wooden chicken coop include poor protection from rats and mice, which can enter poultry houses for grain and steal eggs.
How to choose a place to build a chicken coop at your dacha
When choosing a place in the country for placing a residence for chickens, they are guided by the same principles as when installing any other wooden building. The morning sun should illuminate the windows and the entrance to the chicken coop to the maximum, warming up the cooled room and ridding it of excess moisture. In the midday heat, the chicken coop must be protected from direct sunlight, so if possible, the room is located under the crown of the tallest tree in the country house or covered with a fabric awning.
It is best to place the chicken coop away from the cottage building and garden beds, which will attract chickens to themselves like a magnet. There should be no cesspools or compost pits, sewers or other sources of infection near the walking area.

An excellent solution is to build a chicken coop as an extension to the cottage building. This makes it easier to heat the room and control the condition of the chickens. Often a chicken coop is attached to a summer kitchen in a country house, but if it is not heated in winter, there is little point in such a decision.
We build a chicken coop out of wood at the dacha
Before building a chicken coop, you will need to make a simple sketch, or better yet, a drawing with a layout of the location and internal structure of the chicken coop in the country. The average area norm is calculated - two chickens per square of usable area. Thus, for 5 chickens you will need 2.5 m2, and another 30% needs to be added for three nests. As a result, the theoretically calculated area of a five-person house will be 3.2 m2, but in practice, a small chicken coop, less than or about 2.8 m2, with a ceiling height of 1.8 m, is suitable for living five chickens in the country, photo.
We will build a room for chickens at the dacha taking into account the following features:
- As a foundation, a typical cast columnar foundation for a dacha is best suited;
- The body of the chicken room is made on the basis of a frame made of 100x50 timber;
- The floor, ceiling and side walls are sheathed with tongue and groove boards;
- The roof is assembled according to a simple single-pitch scheme with the high side of the slope extending 50-60 cm.
Attention! Insulation of floors, walls and ceilings is best done using sheet EPS or foam plastic sheets 20 mm thick.
Construction of the foundation and frame of the chicken coop
After choosing a place in the country for the construction of a chicken coop, it is necessary to make a preliminary marking of the soil and water level. If the soil at the dacha in the spring, after the snow and flood waters have melted, remains damp for a long time, most likely the water level is quite high, so you will need to make a full drainage and connect the pipe to the general drainage system of the dacha.

After marking the outline of the future chicken coop, we dig five holes 50 cm deep for casting or laying out the foundation pillars. At any dacha there will be old wire that can be used as reinforcement, and cutting boards for making formwork. The dimensions of the supports are 15x15cm, with a height above the ground of at least 30 cm. After the concrete has set, we clean the upper end of the pillars and level them to the general horizon.
From the timber we assemble the frame for the basement of the future chicken coop and lay the logs. To protect chickens from rats and mice, which hunt in abundance around the dacha, we stretch a fine-mesh metal mesh onto the timber, with a margin of at least 50 cm on the sides. After assembling the chicken coop frame, the edges of the mesh will be placed on the inner lining of the walls and nailed down.

At the next stage, you will need to install the corner posts of the frame, align them vertically and knock them down with temporary jumpers from the slab. After installing the upper belt of the frame made of timber and ceiling beams, the walls, floor and ceiling of the room are sewn up with tongue-and-groove and unedged boards, which can be found at the dacha.

To arrange the roof of the chicken coop, you can use roofing materials left over from the roof of the dacha, for example, old slate or metal. The best option counts bitumen shingles or ondulin, but for dachas experts recommend slate as durable, non-flammable and resistant to the teeth of predators.
Finishing and arrangement of the chicken coop
The entrance to the chicken coop and the run must be positioned so that it is easily visible from the garden beds or porch of the dacha. In summer, chickens like to roost at sunset, and the closing time of the door to the chicken house must be constantly monitored. To be able to see how and when the chickens entered the chicken coop, from any point in the dacha, you can install a lamp above the entrance to the room or vestibule.
In addition to the main door, they often hang a second one, like a mosquito flap for a summer house, only instead of a polymer mesh, they use a steel mesh with a fine mesh. A window is arranged in a similar way.
The floor in the chicken room can also be insulated with materials left over from the renovation of the cottage. Do not use basalt or mineral wool for insulation, even if the roof or floor was insulated at the dacha with this material. Chickens hear odors very well and react poorly to vapors of phenol and phenol-based resins, and a relatively thin floor does not guarantee reliable protection. The easiest way is to lay a double layer of sheet foam and a film to protect against condensation, and be sure to install a vent under the subfloor to remove moisture.

Proper ventilation plays a special role in the life of chickens. The simplest is forced ventilation in the form of a small window in the back wall. An exhaust hole measuring 15x10 cm is cut out in the ceiling area, and the air flow is designed in the form of an air valve on the front door.
The walls of the chicken coop are insulated in the same way as the dacha. In the simplest case, the boards for internal wall cladding are covered on the outside with EPS sheets, covered with film and covered with wooden clapboard.
Chicken coop layout
Usually inner space The chicken coop is divided into two halves by a central passage, photo. Most of the chicken coop is allocated for arranging a roost; nests and feeders for chickens are installed in the smaller half of the room.

The floor in the chicken coop is covered with a layer of sand and sawdust, which protects the wood well from bird droppings and at the same time protects it from condensation.
During periods of severe frost, chickens may leave the roost and huddle together. In this case, you can lay a layer of straw, or use rags available at the dacha to close the cracks and the ventilation inlet valve to prevent the lower tiers of the chicken coop from freezing.
Conclusion
A wooden chicken coop is always light and warm. But in cold weather, when it is impossible to do without heating, wood becomes a source of increased risk from a fire safety point of view. Therefore, the wooden walls of the building for chickens have to be regularly treated with fire retardants, and the places where the heater is installed must be sheathed with metal sheets. In this case, the chicken room at the dacha will last quite a long time.